
為 Spring Boot 專案新增資料庫支援
在本部分教學中,你將使用 Java Database Connectivity (JDBC) 為專案新增並配置資料庫。 在 JVM 應用程式中,你會使用 JDBC 與資料庫進行互動。 為了方便起見,Spring Framework 提供了 JdbcTemplate 類別,可簡化 JDBC 的使用並協助避免常見錯誤。
新增資料庫支援
在基於 Spring Framework 的應用程式中,常見的做法是在所謂的 服務 (service) 層中實作資料庫存取邏輯 —— 這是商業邏輯所在之處。 在 Spring 中,你應該使用 @Service 註解標記類別,以表示該類別屬於應用程式的服務層。 在此應用程式中,你將為此目的建立 MessageService 類別。
在同一個套件中,建立 MessageService.kt 檔案與 MessageService 類別,內容如下:
// MessageService.kt
package com.example.demo

import org.springframework.stereotype.Service
import org.springframework.jdbc.core.JdbcTemplate

@Service
class MessageService(private val db: JdbcTemplate) {
    fun findMessages(): List<Message> = db.query("select * from messages") { response, _ ->
        Message(response.getString("id"), response.getString("text"))
    }

    fun save(message: Message): Message {
        db.update(
            "insert into messages values ( ?, ? )",
            message.id, message.text
        )
        return message
    }
}
建構函式引數與相依注入 – (private val db: JdbcTemplate)
Kotlin 中的類別具有一個主建構函數。它也可以有一個或多個 次要建構函數。 主建構函數 是類別標頭的一部分,位於類別名稱和選用的型別參數之後。在我們的案例中,建構函式為 (val db: JdbcTemplate)。
val db: JdbcTemplate 是建構函式的引數:
@Service
class MessageService(private val db: JdbcTemplate)
尾隨 Lambda 與 SAM 轉換
findMessages() 函式呼叫了 JdbcTemplate 類別的 query() 函式。query() 函式接受兩個引數:作為 String 執行個體的 SQL 查詢,以及一個將每一列映射到一個物件的回呼 (callback):
db.query("...", RowMapper { ... } )RowMapper 介面僅宣告了一個方法,因此可以透過省略介面名稱的 Lambda 運算式來實作它。Kotlin 編譯器知道 Lambda 運算式需要轉換成的介面,因為你將其用作函式呼叫的參數。這被稱為 Kotlin 中的 SAM 轉換:
db.query("...", { ... } )在 SAM 轉換之後,查詢函式最終會有兩個引數:第一個位置的 String,以及最後一個位置的 Lambda 運算式。根據 Kotlin 慣例,如果函式的最後一個參數是函式,那麼作為對應引數傳遞的 Lambda 運算式可以放置在括號之外。這種語法也被稱為 尾隨 Lambda:
db.query("...") { ... }用於未使用的 Lambda 引數的底線
對於具有多個參數的 Lambda,你可以使用底線 _ 字元來替換你未使用的參數名稱。
因此,查詢函式呼叫的最終語法如下所示:
db.query("select * from messages") { response, _ ->
    Message(response.getString("id"), response.getString("text"))
}
更新 MessageController 類別
更新 MessageController.kt 以使用新的 MessageService 類別:
// MessageController.kt
package com.example.demo

import org.springframework.http.ResponseEntity
import org.springframework.web.bind.annotation.GetMapping
import org.springframework.web.bind.annotation.PostMapping
import org.springframework.web.bind.annotation.RequestBody
import org.springframework.web.bind.annotation.RequestMapping
import org.springframework.web.bind.annotation.RestController
import java.net.URI

@RestController
@RequestMapping("/")
class MessageController(private val service: MessageService) {
    @GetMapping
    fun listMessages() = service.findMessages()

    @PostMapping
    fun post(@RequestBody message: Message): ResponseEntity<Message> {
        val savedMessage = service.save(message)
        return ResponseEntity.created(URI("/${savedMessage.id}")).body(savedMessage)
    }
}
@PostMapping 註解
負責處理 HTTP POST 請求的方法需要加上 @PostMapping 註解。為了能夠將作為 HTTP Body 內容傳送的 JSON 轉換為物件,你需要為方法引數使用 @RequestBody 註解。由於應用程式的 classpath 中包含 Jackson 程式庫,轉換會自動進行。
ResponseEntity
ResponseEntity 代表整個 HTTP 回應:狀態碼、標頭和主體。
使用 created() 方法,你可以配置回應狀態碼 (201) 並設定位置標頭,指出所建立資源的 context 路徑。
更新 MessageService 類別
Message 類別的 id 被宣告為可 null 的 String:
data class Message(val id: String?, val text: String)然而,將 null 作為 id 值儲存在資料庫中是不正確的:你需要優雅地處理這種情況。
更新 MessageService.kt 檔案的程式碼,以便在將訊息儲存到資料庫時,如果 id 為 null,則產生一個新值:
// MessageService.kt
package com.example.demo

import org.springframework.stereotype.Service
import org.springframework.jdbc.core.JdbcTemplate
import java.util.UUID

@Service
class MessageService(private val db: JdbcTemplate) {
    fun findMessages(): List<Message> = db.query("select * from messages") { response, _ ->
        Message(response.getString("id"), response.getString("text"))
    }

    fun save(message: Message): Message {
        val id = message.id ?: UUID.randomUUID().toString() // 如果 id 為 null,則產生新的 id
        db.update(
            "insert into messages values ( ?, ? )",
            id, message.text
        )
        return message.copy(id = id) // 傳回包含新 id 的訊息副本
    }
}
Elvis 運算子 – ?:
程式碼 message.id ?: UUID.randomUUID().toString() 使用了 Elvis 運算子 (if-not-null-else 簡寫) ?:。如果 ?: 左側的運算式不為 null,Elvis 運算子會傳回它;否則,它會傳回右側的運算式。請注意,只有在左側為 null 時,才會計算右側的運算式。
應用程式程式碼已準備好與資料庫配合使用。現在需要配置資料來源。
配置資料庫
在應用程式中配置資料庫:
在
src/main/resources目錄中建立schema.sql檔案。它將儲存資料庫物件定義: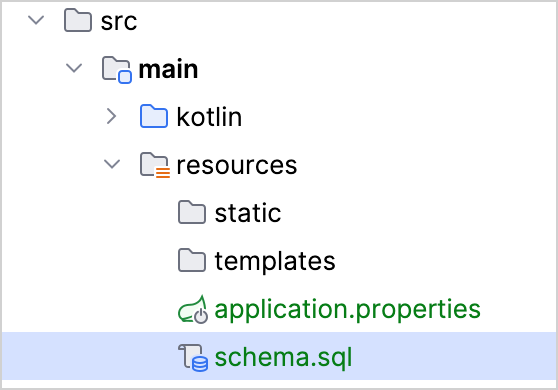
使用以下程式碼更新
src/main/resources/schema.sql檔案:sql-- schema.sql CREATE TABLE IF NOT EXISTS messages ( id VARCHAR(60) PRIMARY KEY, text VARCHAR NOT NULL );這會建立具有兩欄的
messages表格:id和text。表格結構與Message類別的結構相符。開啟位於
src/main/resources資料夾中的application.properties檔案,並新增以下應用程式屬性:nonespring.application.name=demo spring.datasource.driver-class-name=org.h2.Driver spring.datasource.url=jdbc:h2:file:./data/testdb spring.datasource.username=name spring.datasource.password=password spring.sql.init.schema-locations=classpath:schema.sql spring.sql.init.mode=always這些設定為 Spring Boot 應用程式啟用了資料庫。 請參閱 Spring 文件 以取得常用應用程式屬性的完整清單。
透過 HTTP 請求將訊息新增至資料庫
你應該使用 HTTP 用戶端來操作先前建立的端點。在 IntelliJ IDEA 中,使用內建的 HTTP 用戶端:
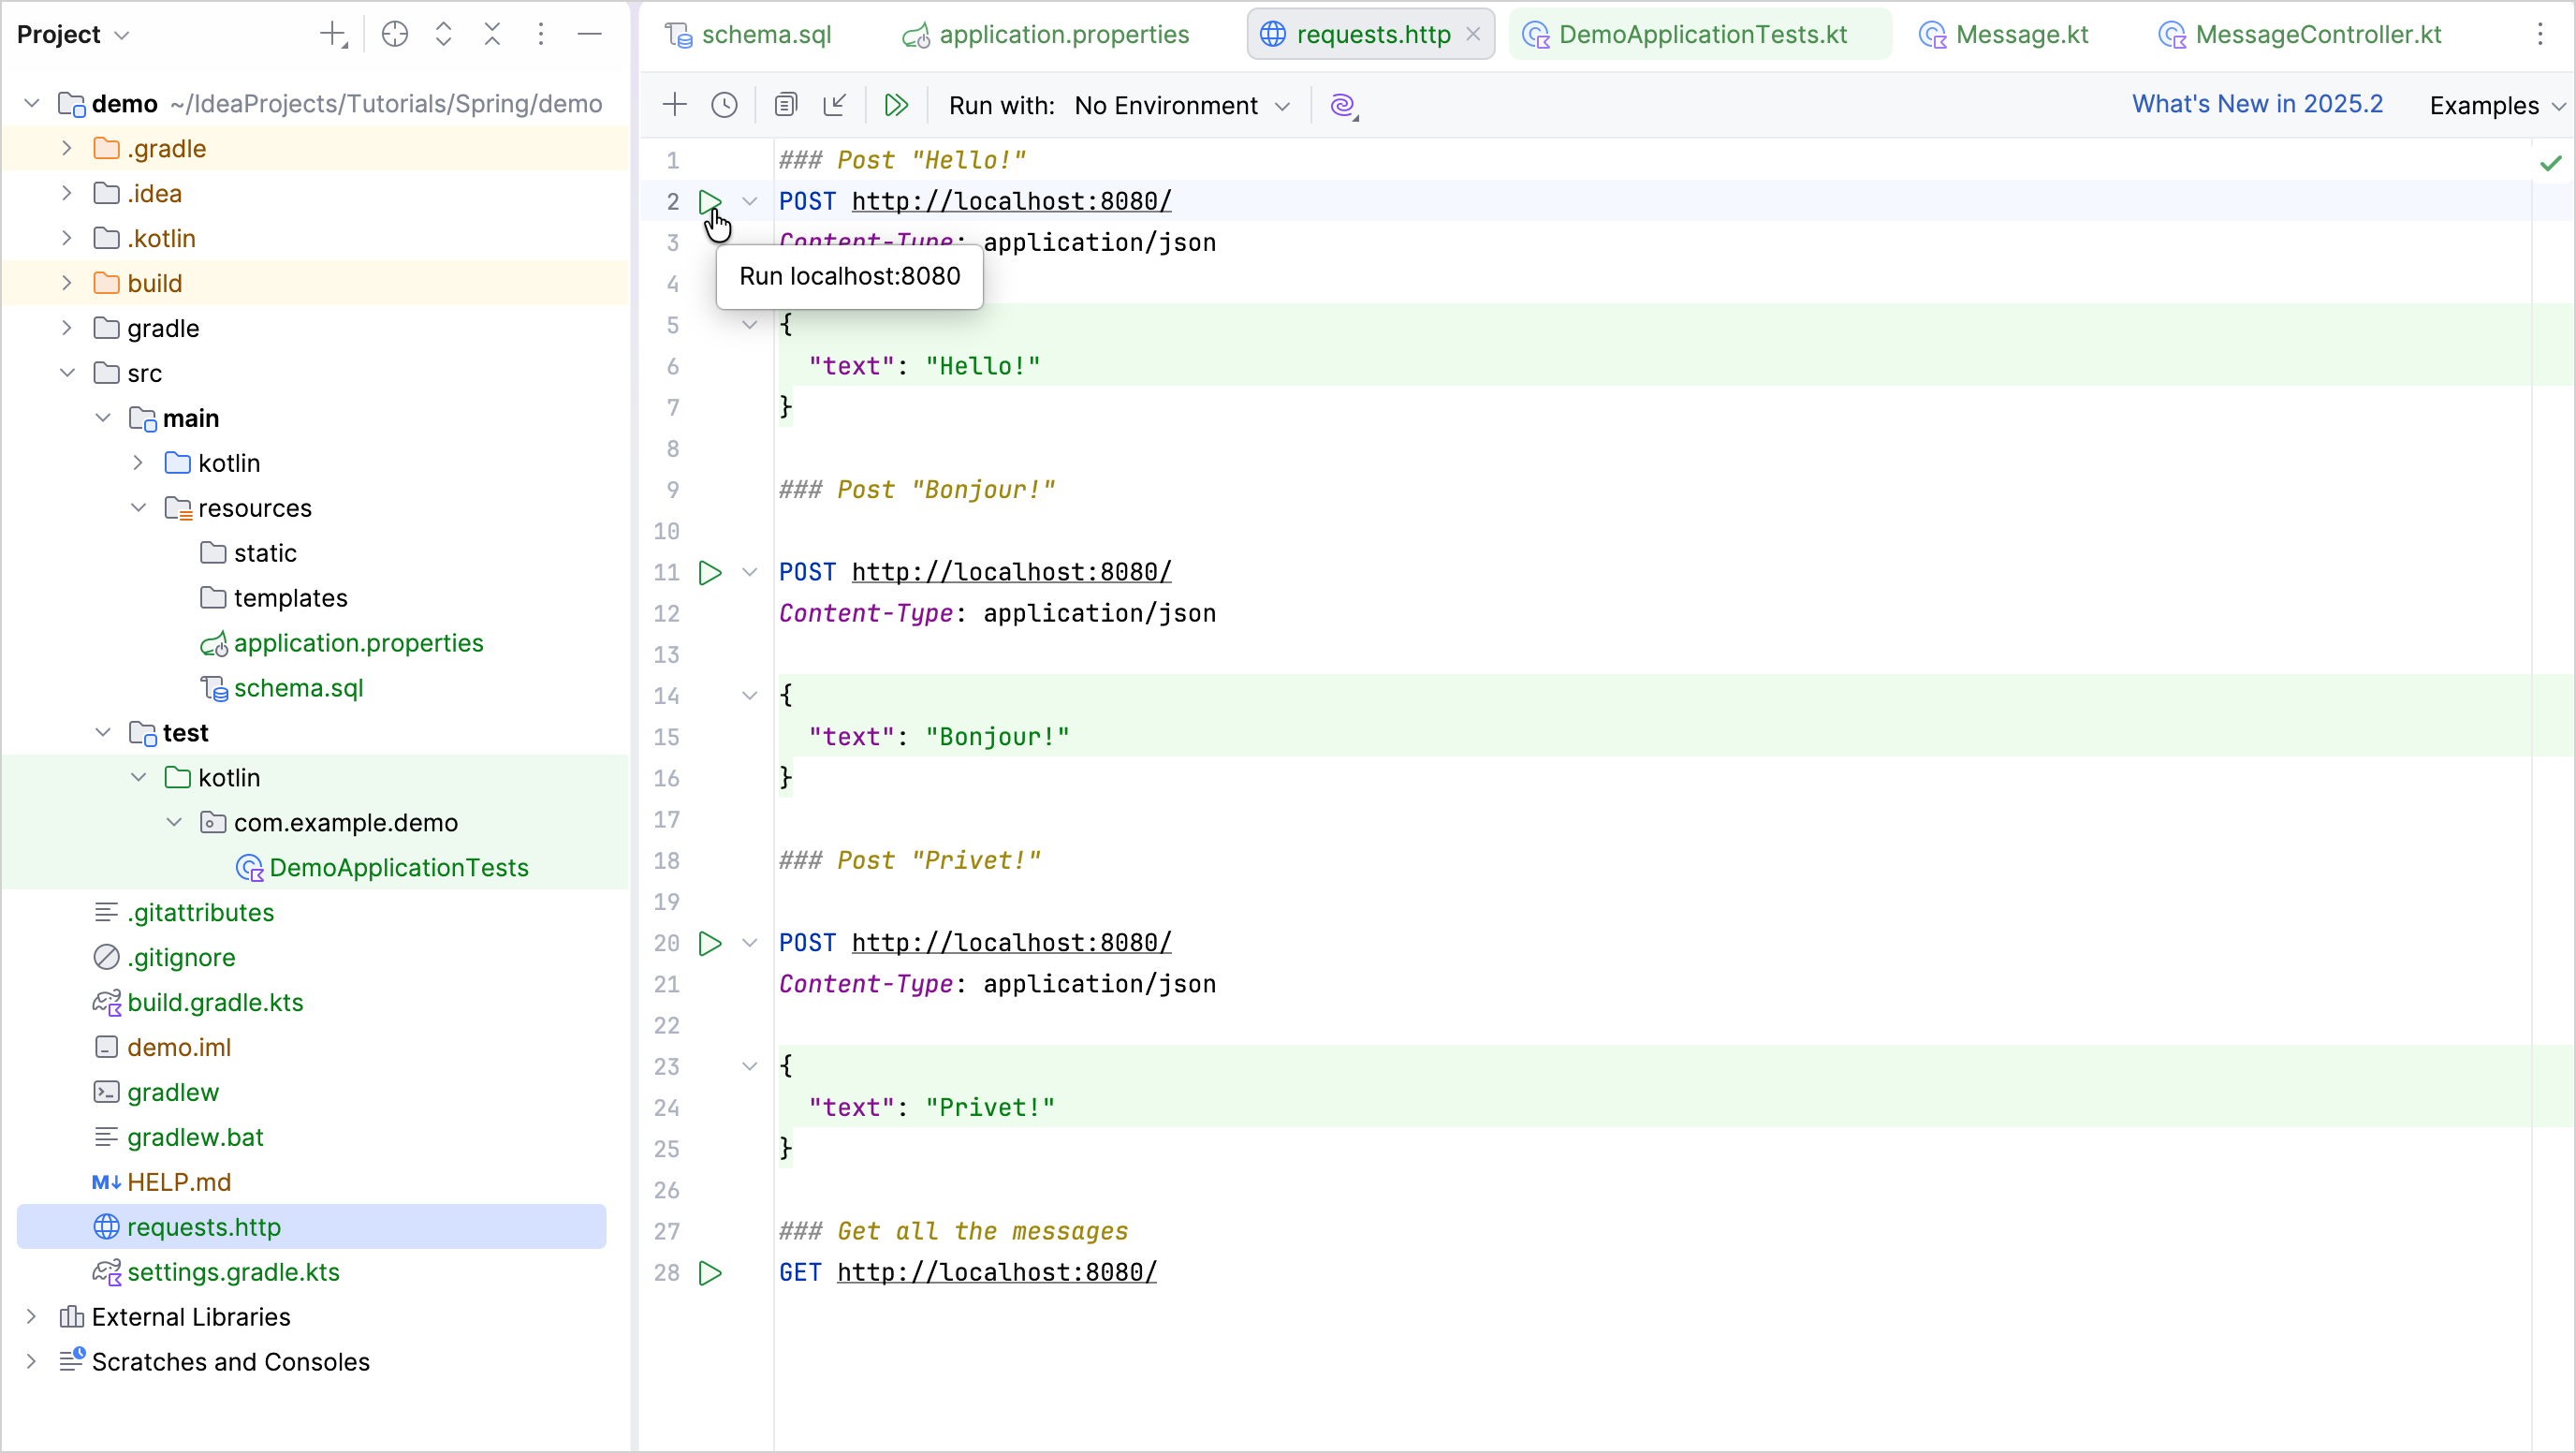
執行應用程式。應用程式啟動並執行後,你可以執行 POST 請求將訊息儲存在資料庫中。
在專案根資料夾中建立
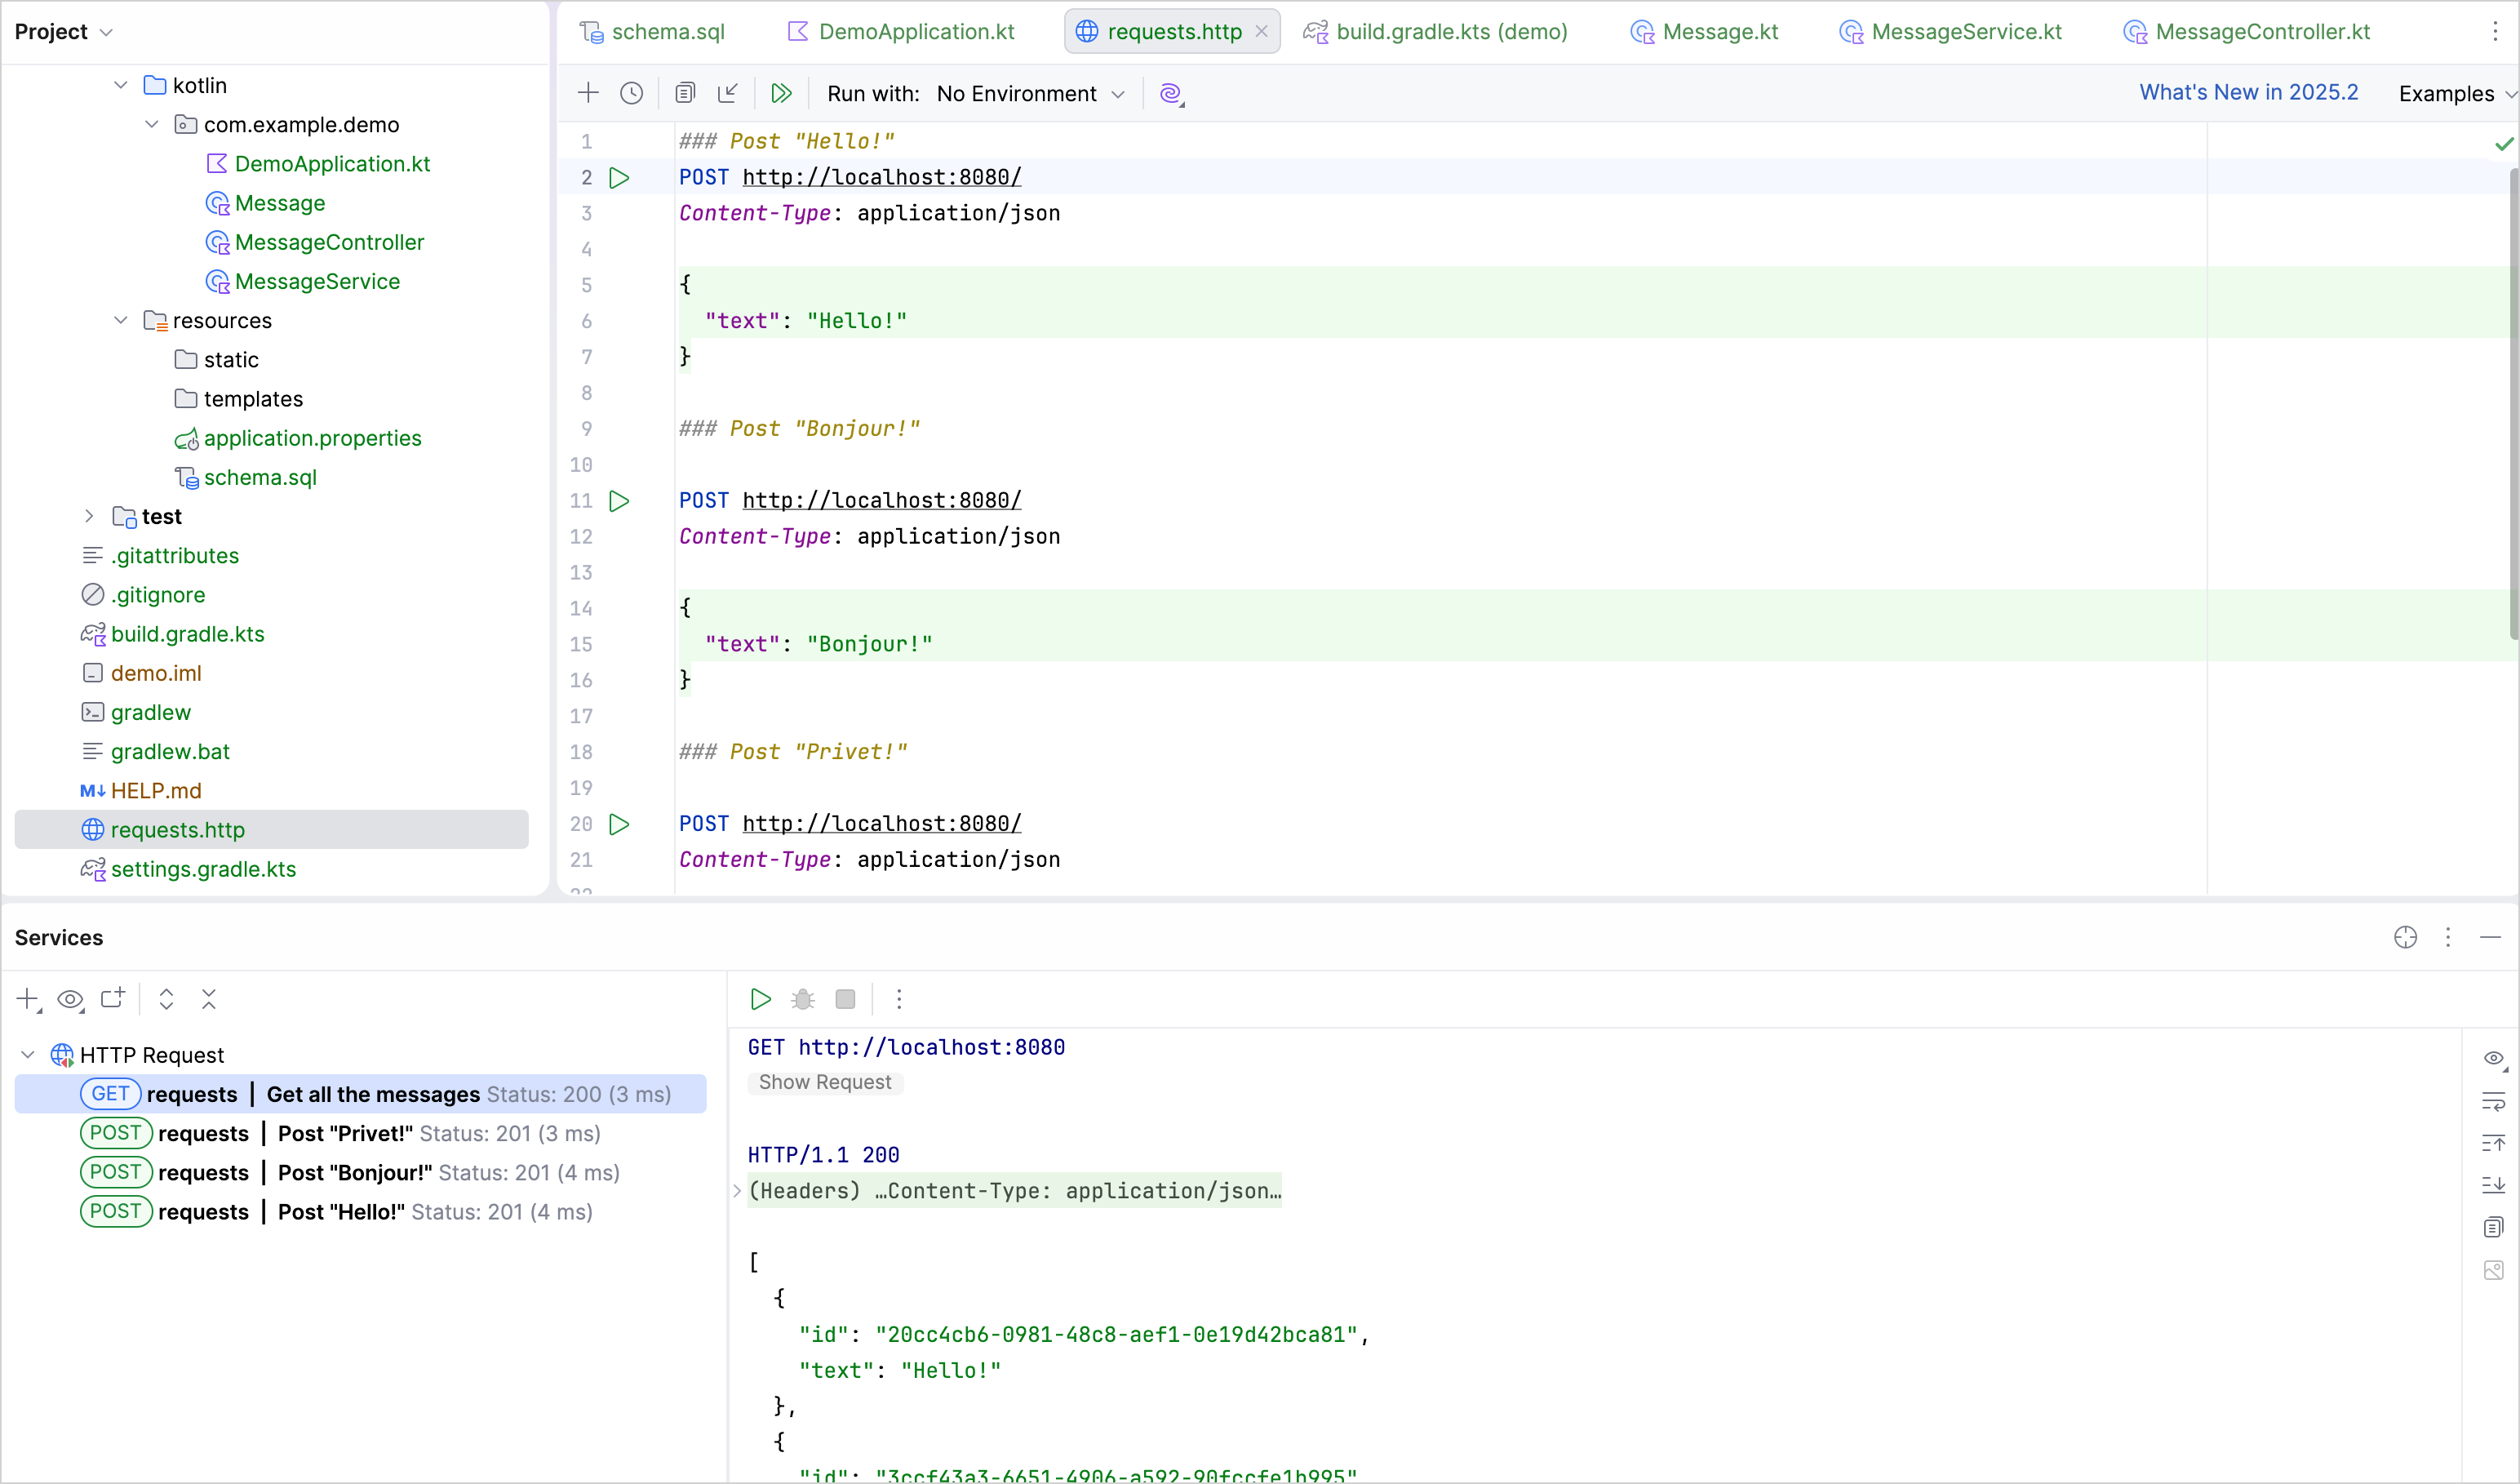
requests.http檔案,並新增以下 HTTP 請求:http### Post "Hello!" POST http://localhost:8080/ Content-Type: application/json { "text": "Hello!" } ### Post "Bonjour!" POST http://localhost:8080/ Content-Type: application/json { "text": "Bonjour!" } ### Post "Privet!" POST http://localhost:8080/ Content-Type: application/json { "text": "Privet!" } ### Get all the messages GET http://localhost:8080/執行所有 POST 請求。使用請求宣告旁裝訂邊上的綠色 執行 圖示。 這些請求會將文字訊息寫入資料庫:
執行 GET 請求並在 執行 工具視窗中查看結果:
執行請求的替代方式
你也可以使用任何其他 HTTP 用戶端或 cURL 命令列工具。例如,在終端中執行以下指令以獲得相同的結果:
curl -X POST --location "http://localhost:8080" -H "Content-Type: application/json" -d "{ \"text\": \"Hello!\" }"

curl -X POST --location "http://localhost:8080" -H "Content-Type: application/json" -d "{ \"text\": \"Bonjour!\" }"

curl -X POST --location "http://localhost:8080" -H "Content-Type: application/json" -d "{ \"text\": \"Privet!\" }"

curl -X GET --location "http://localhost:8080"
依識別碼檢索訊息
擴充應用程式的功能,以便依 id 檢索個別訊息。
在
MessageService類別中,新增函式findMessageById(id: String)以依 id 檢索個別訊息:kotlin// MessageService.kt package com.example.demo import org.springframework.stereotype.Service import org.springframework.jdbc.core.JdbcTemplate import org.springframework.jdbc.core.query import java.util.* @Service class MessageService(private val db: JdbcTemplate) { fun findMessages(): List<Message> = db.query("select * from messages") { response, _ -> Message(response.getString("id"), response.getString("text")) } fun findMessageById(id: String): Message? = db.query("select * from messages where id = ?", id) { response, _ -> Message(response.getString("id"), response.getString("text")) }.singleOrNull() fun save(message: Message): Message { val id = message.id ?: UUID.randomUUID().toString() // 如果 id 為 null,則產生新的 id db.update( "insert into messages values ( ?, ? )", id, message.text ) return message.copy(id = id) // 傳回包含新 id 的訊息副本 } }參數清單中的 vararg 引數位置
query()函式接受三個引數:- 執行時需要參數的 SQL 查詢字串
id,這是一個 String 型別的參數RowMapper執行個體,由 Lambda 運算式實作
query()函式的第二個參數被宣告為可變參數 (vararg)。在 Kotlin 中,可變參數不一定要放在參數清單的最後一個位置。singleOrNull() 函式
《
singleOrNull()函式會傳回單一元素,如果陣列為空或具有多個相同值的元素,則傳回null。用於依 id 獲取訊息的
.query()函式是由 Spring Framework 提供的 Kotlin 擴充函式。如上面的程式碼所示,它需要額外的匯入import org.springframework.jdbc.core.query。在
MessageController類別中新增帶有id參數的新index(...)函式:kotlin// MessageController.kt package com.example.demo import org.springframework.http.ResponseEntity import org.springframework.web.bind.annotation.GetMapping import org.springframework.web.bind.annotation.PathVariable import org.springframework.web.bind.annotation.PostMapping import org.springframework.web.bind.annotation.RequestBody import org.springframework.web.bind.annotation.RequestMapping import org.springframework.web.bind.annotation.RestController import java.net.URI @RestController @RequestMapping("/") class MessageController(private val service: MessageService) { @GetMapping fun listMessages() = ResponseEntity.ok(service.findMessages()) @PostMapping fun post(@RequestBody message: Message): ResponseEntity<Message> { val savedMessage = service.save(message) return ResponseEntity.created(URI("/${savedMessage.id}")).body(savedMessage) } @GetMapping("/{id}") fun getMessage(@PathVariable id: String): ResponseEntity<Message> = service.findMessageById(id).toResponseEntity() private fun Message?.toResponseEntity(): ResponseEntity<Message> = // 如果訊息為 null(未找到),將回應代碼設定為 404 this?.let { ResponseEntity.ok(it) } ?: ResponseEntity.notFound().build() }從 context 路徑檢索值
當你為新函式加上
@GetMapping("/{id}")註解時,Spring Framework 會從 context 路徑中檢索訊息id。透過為函式引數加上@PathVariable註解,你告訴框架將檢索到的值用作函式引數。新函式會呼叫MessageService以依 id 檢索個別訊息。具有可 null 接收者的擴充函式
擴充功能可以定義為可 null 的接收者型別。如果接收者為
null,那麼this也會是null。因此,在定義具有可 null 接收者型別的擴充功能時,建議在函式體內進行this == null檢查。你也可以像上面的
toResponseEntity()函式那樣,使用虛無安全調用運算子 (?.) 來執行 null 檢查:kotlinthis?.let { ResponseEntity.ok(it) }ResponseEntity
ResponseEntity代表 HTTP 回應,包括狀態碼、標頭和主體。它是一個泛型包裝器,可讓你更精確地控制內容,並將自訂的 HTTP 回應傳回給用戶端。
以下是應用程式的完整程式碼:
// DemoApplication.kt {...}
// DemoApplication.kt
package com.example.demo

import org.springframework.boot.autoconfigure.SpringBootApplication
import org.springframework.boot.runApplication

@SpringBootApplication
class DemoApplication

fun main(args: Array<String>) {
    runApplication<DemoApplication>(*args)
}
// Message.kt {...}
// Message.kt
package com.example.demo

data class Message(val id: String?, val text: String)
// MessageService.kt {...}
// MessageService.kt
package com.example.demo

import org.springframework.stereotype.Service
import org.springframework.jdbc.core.JdbcTemplate
import org.springframework.jdbc.core.query
import java.util.*

@Service
class MessageService(private val db: JdbcTemplate) {
    fun findMessages(): List<Message> = db.query("select * from messages") { response, _ ->
        Message(response.getString("id"), response.getString("text"))
    }

    fun findMessageById(id: String): Message? = db.query("select * from messages where id = ?", id) { response, _ ->
        Message(response.getString("id"), response.getString("text"))
    }.singleOrNull()

    fun save(message: Message): Message {
        val id = message.id ?: UUID.randomUUID().toString()
        db.update(
            "insert into messages values ( ?, ? )",
            id, message.text
        )
        return message.copy(id = id)
    }
}
// MessageController.kt {...}
// MessageController.kt
package com.example.demo

import org.springframework.http.ResponseEntity
import org.springframework.web.bind.annotation.GetMapping
import org.springframework.web.bind.annotation.PathVariable
import org.springframework.web.bind.annotation.PostMapping
import org.springframework.web.bind.annotation.RequestBody
import org.springframework.web.bind.annotation.RequestMapping
import org.springframework.web.bind.annotation.RestController
import java.net.URI

@RestController
@RequestMapping("/")
class MessageController(private val service: MessageService) {
    @GetMapping
    fun listMessages() = ResponseEntity.ok(service.findMessages())

    @PostMapping
    fun post(@RequestBody message: Message): ResponseEntity<Message> {
        val savedMessage = service.save(message)
        return ResponseEntity.created(URI("/${savedMessage.id}")).body(savedMessage)
    }

    @GetMapping("/{id}")
    fun getMessage(@PathVariable id: String): ResponseEntity<Message> =
        service.findMessageById(id).toResponseEntity()

    private fun Message?.toResponseEntity(): ResponseEntity<Message> =
        this?.let { ResponseEntity.ok(it) } ?: ResponseEntity.notFound().build()
}
執行應用程式
Spring 應用程式已準備好執行:
再次執行應用程式。
開啟
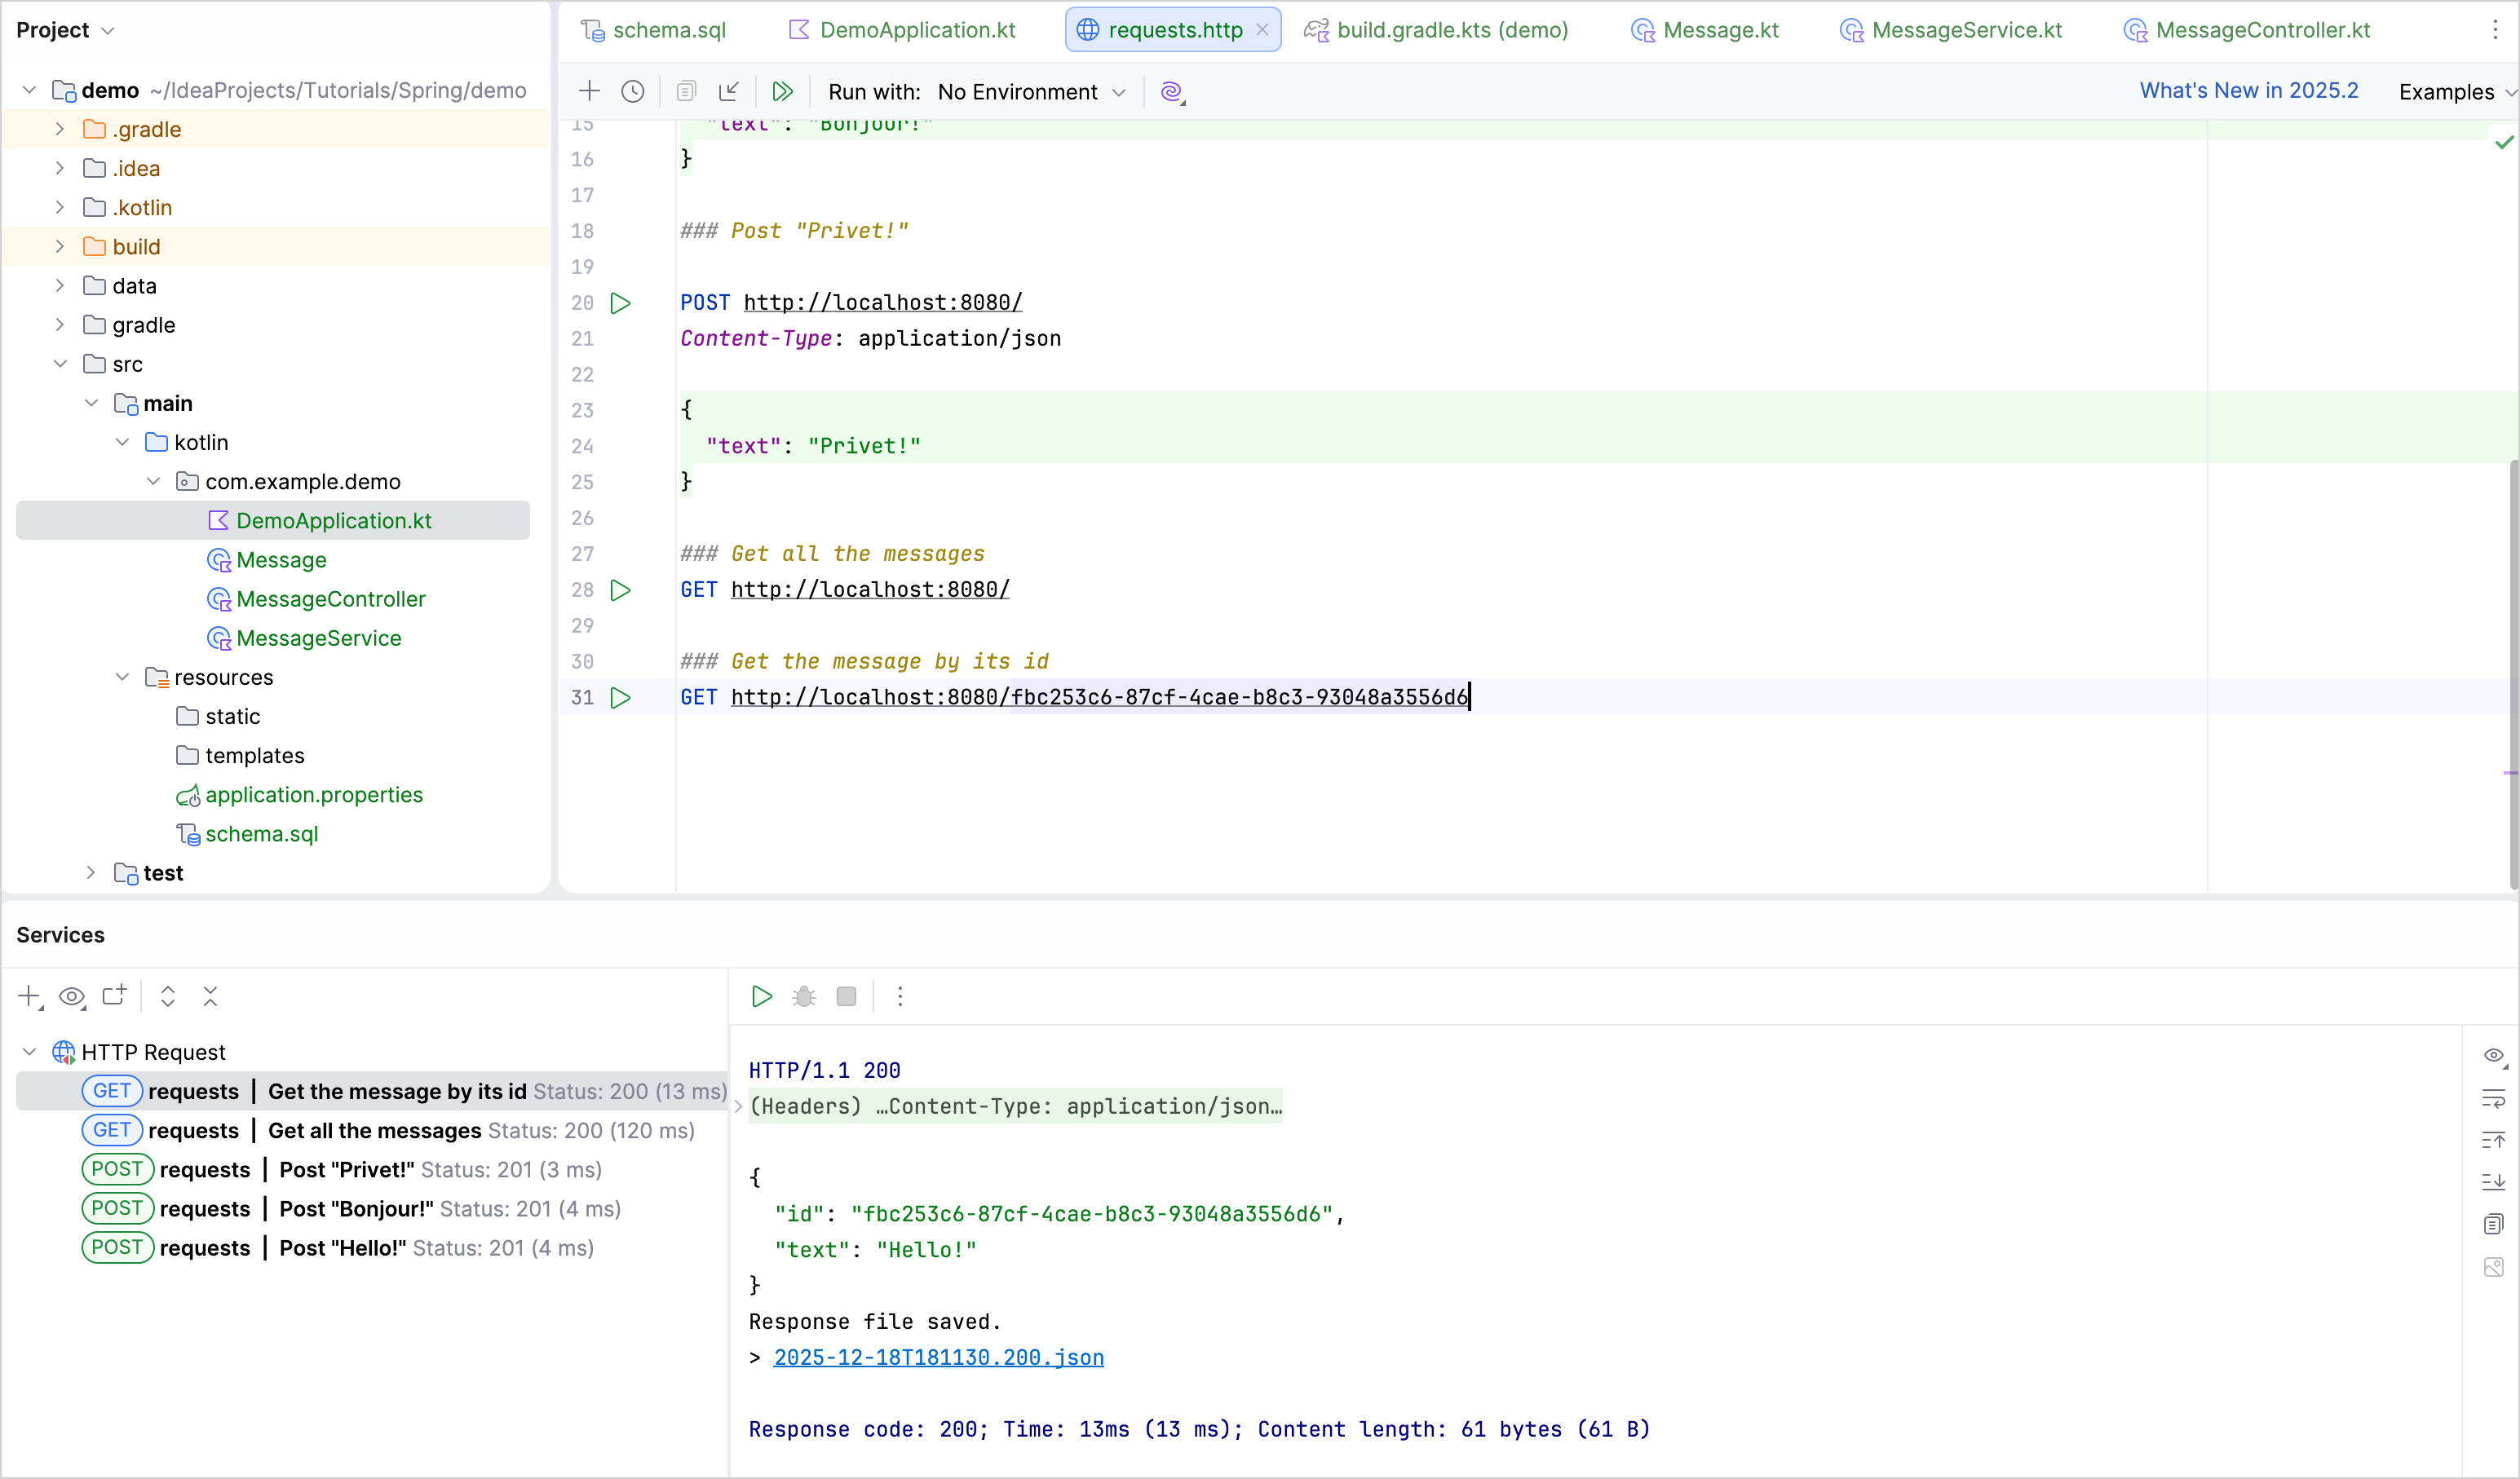
requests.http檔案並新增新的 GET 請求:http### Get the message by its id GET http://localhost:8080/id執行 GET 請求以從資料庫中檢索所有訊息。
在 執行 工具視窗中,複製其中一個 id 並將其新增到請求中,如下所示:
http### Get the message by its id GET http://localhost:8080/f910aa7e-11ee-4215-93ed-1aeeac822707請使用你自己的訊息 id 替換上述 id。
執行 GET 請求並在 執行 工具視窗中查看結果:
下一步
最後一個步驟將向你展示如何使用 Spring Data 與資料庫進行更常見的連線。