
Spring Bootプロジェクトにデータベース・サポートを追加する
チュートリアルのこのパートでは、Java Database Connectivity (JDBC) を使用して、プロジェクトにデータベースを追加および構成します。 JVMアプリケーションでは、JDBCを使用してデータベースとやり取りします。 便宜上、Spring FrameworkはJDBCの使用を簡素化し、一般的なエラーの回避に役立つ JdbcTemplate クラスを提供しています。
データベース・サポートの追加
Spring Frameworkベースのアプリケーションにおける一般的な慣行は、いわゆる サービス (service) レイヤー内にデータベース・アクセス・ロジックを実装することです。ここはビジネス・ロジックが存在する場所です。 Springでは、クラスがアプリケーションのサービス・レイヤーに属することを示すために、クラスに @Service アノテーションを付加する必要があります。 このアプリケーションでは、この目的のために MessageService クラスを作成します。
同じパッケージ内に、MessageService.kt ファイルと MessageService クラスを次のように作成します:
// MessageService.kt
package com.example.demo

import org.springframework.stereotype.Service
import org.springframework.jdbc.core.JdbcTemplate

@Service
class MessageService(private val db: JdbcTemplate) {
    fun findMessages(): List<Message> = db.query("select * from messages") { response, _ ->
        Message(response.getString("id"), response.getString("text"))
    }

    fun save(message: Message): Message {
        db.update(
            "insert into messages values ( ?, ? )",
            message.id, message.text
        )
        return message
    }
}
コンストラクタ引数と依存性の注入 – (private val db: JdbcTemplate)
Kotlinのクラスにはプライマリコンストラクタがあります。また、1つ以上のセカンダリコンストラクタを持つこともできます。 プライマリコンストラクタはクラスヘッダーの一部であり、クラス名とオプションの型パラメータの後に続きます。この例では、コンストラクタは (val db: JdbcTemplate) です。
val db: JdbcTemplate はコンストラクタの引数です:
末尾のラムダ (Trailing lambda) と SAM変換
findMessages() 関数は JdbcTemplate クラスの query() 関数を呼び出します。query() 関数は、StringインスタンスとしてのSQLクエリと、各行を1つのオブジェクトにマッピングするコールバックの2つの引数を取ります:
RowMapper インターフェースはメソッドを1つしか宣言していないため、インターフェース名を省略してラムダ式で実装することが可能です。Kotlinコンパイラは、ラムダ式を変換する必要のあるインターフェースを認識しています。これは関数のパラメータとして使用されているためです。これはKotlinにおけるSAM変換として知られています:
SAM変換後、query関数は、最初の位置にString、最後の位置にラムダ式という2つの引数を持つことになります。Kotlinの慣習に従い、関数の最後のパラメータが関数である場合、対応する引数として渡されるラムダ式を括弧の外側に配置できます。このような構文は、末尾のラムダ (trailing lambda) としても知られています:
未使用のラムダ引数のためのアンダースコア
複数のパラメータを持つラムダの場合、使用しないパラメータの名前をアンダースコア _ 文字で置き換えることができます。
したがって、query関数の呼び出しの最終的な構文は次のようになります:
MessageControllerクラスの更新
新しい MessageService クラスを使用するように MessageController.kt を更新します:
// MessageController.kt
package com.example.demo

import org.springframework.http.ResponseEntity
import org.springframework.web.bind.annotation.GetMapping
import org.springframework.web.bind.annotation.PostMapping
import org.springframework.web.bind.annotation.RequestBody
import org.springframework.web.bind.annotation.RequestMapping
import org.springframework.web.bind.annotation.RestController
import java.net.URI

@RestController
@RequestMapping("/")
class MessageController(private val service: MessageService) {
    @GetMapping
    fun listMessages() = service.findMessages()

    @PostMapping
    fun post(@RequestBody message: Message): ResponseEntity<Message> {
        val savedMessage = service.save(message)
        return ResponseEntity.created(URI("/${savedMessage.id}")).body(savedMessage)
    }
}
@PostMapping アノテーション
HTTP POSTリクエストの処理を担当するメソッドには、@PostMapping アノテーションを付加する必要があります。HTTP Bodyコンテンツとして送信されたJSONをオブジェクトに変換できるようにするには、メソッド引数に @RequestBody アノテーションを使用する必要があります。アプリケーションのクラスパスにJacksonライブラリがあるため、変換は自動的に行われます。
ResponseEntity
ResponseEntity は、ステータスコード、ヘッダー、ボディを含むHTTPレスポンス全体を表します。
created() メソッドを使用して、レスポンス・ステータスコード (201) を構成し、作成されたリソースのコンテキストパスを示すlocationヘッダーを設定します。
MessageServiceクラスの更新
Message クラスの id は、NULL許容 (nullable) の String として宣言されていました:
data class Message(val id: String?, val text: String)しかし、データベースに id 値として null を保存するのは正しくありません。この状況を適切に処理する必要があります。
データベースにメッセージを保存する際、id が null の場合に新しい値を生成するように MessageService.kt ファイルのコードを更新します:
// MessageService.kt
package com.example.demo

import org.springframework.stereotype.Service
import org.springframework.jdbc.core.JdbcTemplate
import java.util.UUID

@Service
class MessageService(private val db: JdbcTemplate) {
    fun findMessages(): List<Message> = db.query("select * from messages") { response, _ ->
        Message(response.getString("id"), response.getString("text"))
    }

    fun save(message: Message): Message {
        val id = message.id ?: UUID.randomUUID().toString() // idがnullの場合は新しいidを生成する
        db.update(
            "insert into messages values ( ?, ? )",
            id, message.text
        )
        return message.copy(id = id) // 新しいidを持つメッセージのコピーを返す
    }
}
エルビス演算子 – ?:
コード message.id ?: UUID.randomUUID().toString() は、エルビス演算子(if-not-null-elseの省略形)?: を使用しています。?: の左側の式が null でない場合、エルビス演算子はそれを返します。そうでなければ、右側の式を返します。右側の式は、左側が null の場合にのみ評価されることに注意してください。
アプリケーションコードのデータベース対応が完了しました。次はデータソースを構成する必要があります。
データベースの構成
アプリケーションでデータベースを構成します:
src/main/resourcesディレクトリにschema.sqlファイルを作成します。これにはデータベース・オブジェクトの定義を保存します: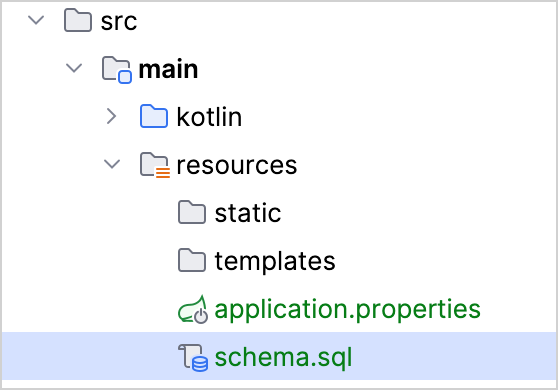
src/main/resources/schema.sqlファイルを以下のコードで更新します:sql-- schema.sql CREATE TABLE IF NOT EXISTS messages ( id VARCHAR(60) PRIMARY KEY, text VARCHAR NOT NULL );これにより、
idとtextの2つの列を持つmessagesテーブルが作成されます。テーブル構造はMessageクラスの構造と一致しています。src/main/resourcesフォルダにあるapplication.propertiesファイルを開き、以下のアプリケーション・プロパティを追加します:nonespring.application.name=demo spring.datasource.driver-class-name=org.h2.Driver spring.datasource.url=jdbc:h2:file:./data/testdb spring.datasource.username=name spring.datasource.password=password spring.sql.init.schema-locations=classpath:schema.sql spring.sql.init.mode=alwaysこれらの設定により、Spring Bootアプリケーションのデータベースが有効になります。
一般的なアプリケーション・プロパティの完全なリストについては、Springのドキュメントを参照してください。
HTTPリクエスト経由でデータベースにメッセージを追加する
作成済みのエンドポイントを操作するには、HTTPクライアントを使用する必要があります。IntelliJ IDEAでは、組み込みのHTTPクライアントを使用します:
アプリケーションを実行します。アプリケーションが起動して実行されたら、POSTリクエストを実行してデータベースにメッセージを保存できます。
プロジェクトのルート・フォルダに
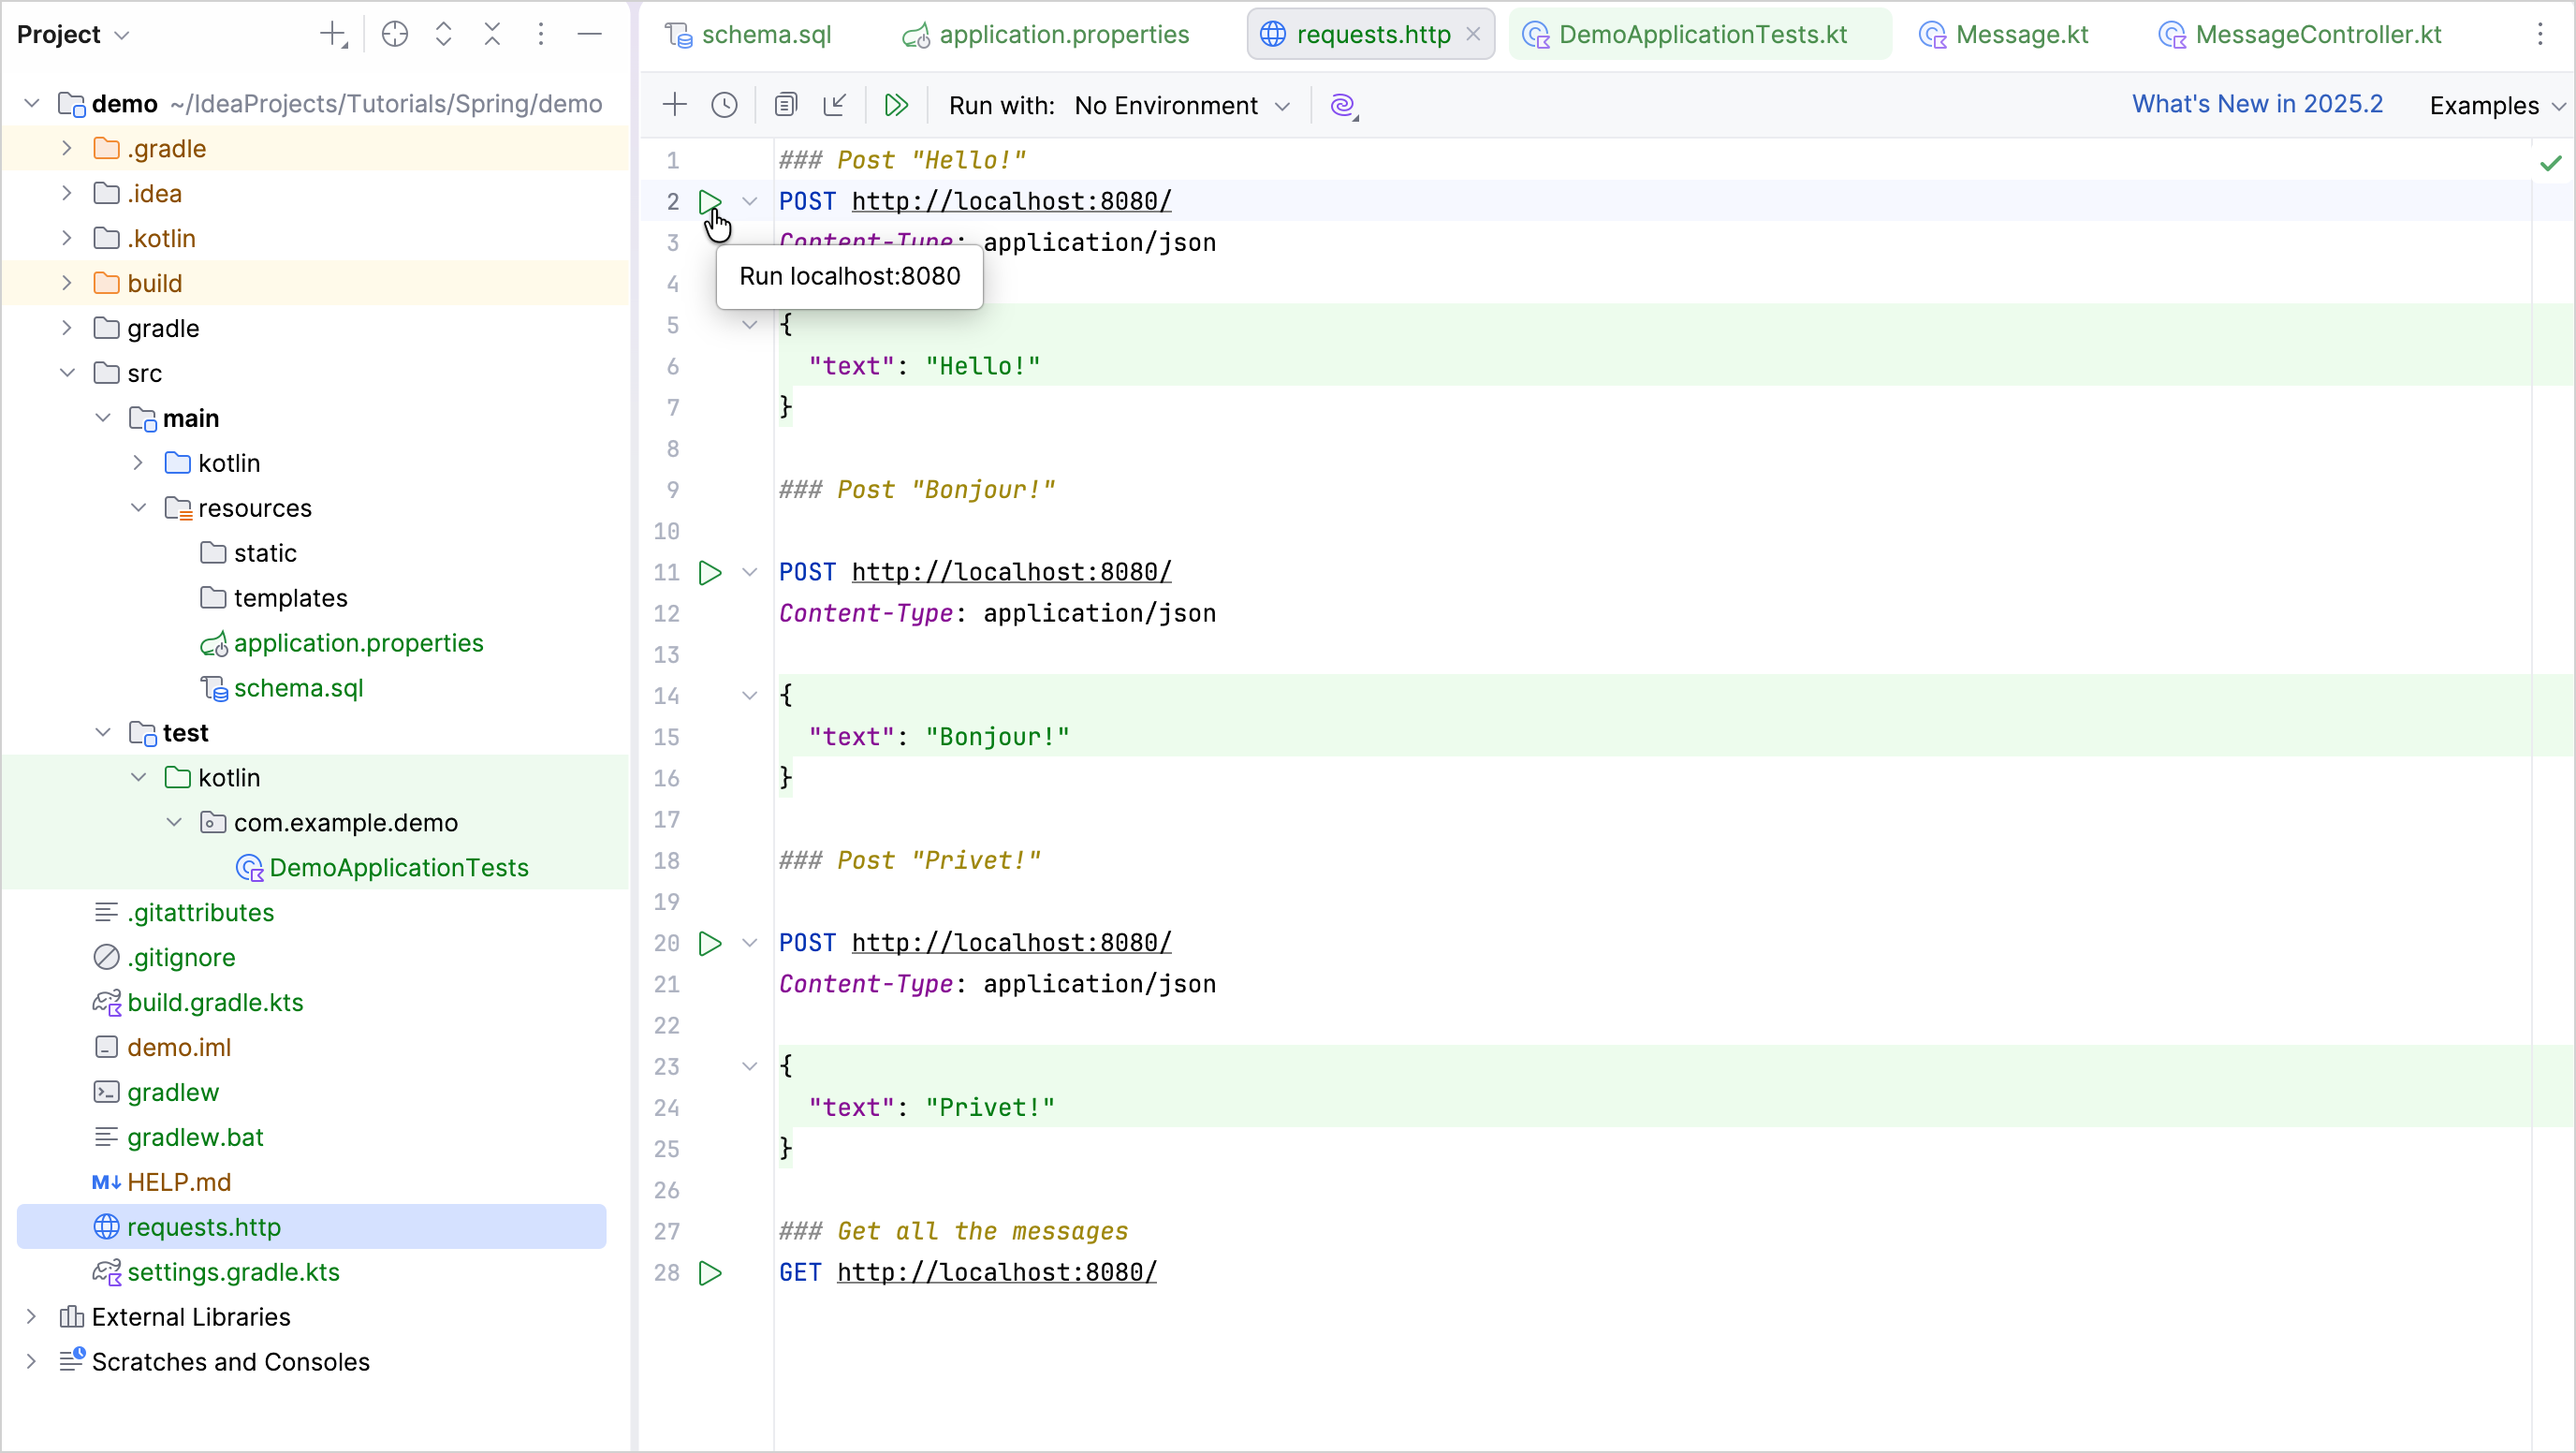
requests.httpファイルを作成し、以下のHTTPリクエストを追加します:http### Post "Hello!" POST http://localhost:8080/ Content-Type: application/json { "text": "Hello!" } ### Post "Bonjour!" POST http://localhost:8080/ Content-Type: application/json { "text": "Bonjour!" } ### Post "Privet!" POST http://localhost:8080/ Content-Type: application/json { "text": "Privet!" } ### Get all the messages GET http://localhost:8080/すべてのPOSTリクエストを実行します。ガターにある緑色の 実行 (Run) アイコンを使用します。 これらのリクエストは、テキスト・メッセージをデータベースに書き込みます:
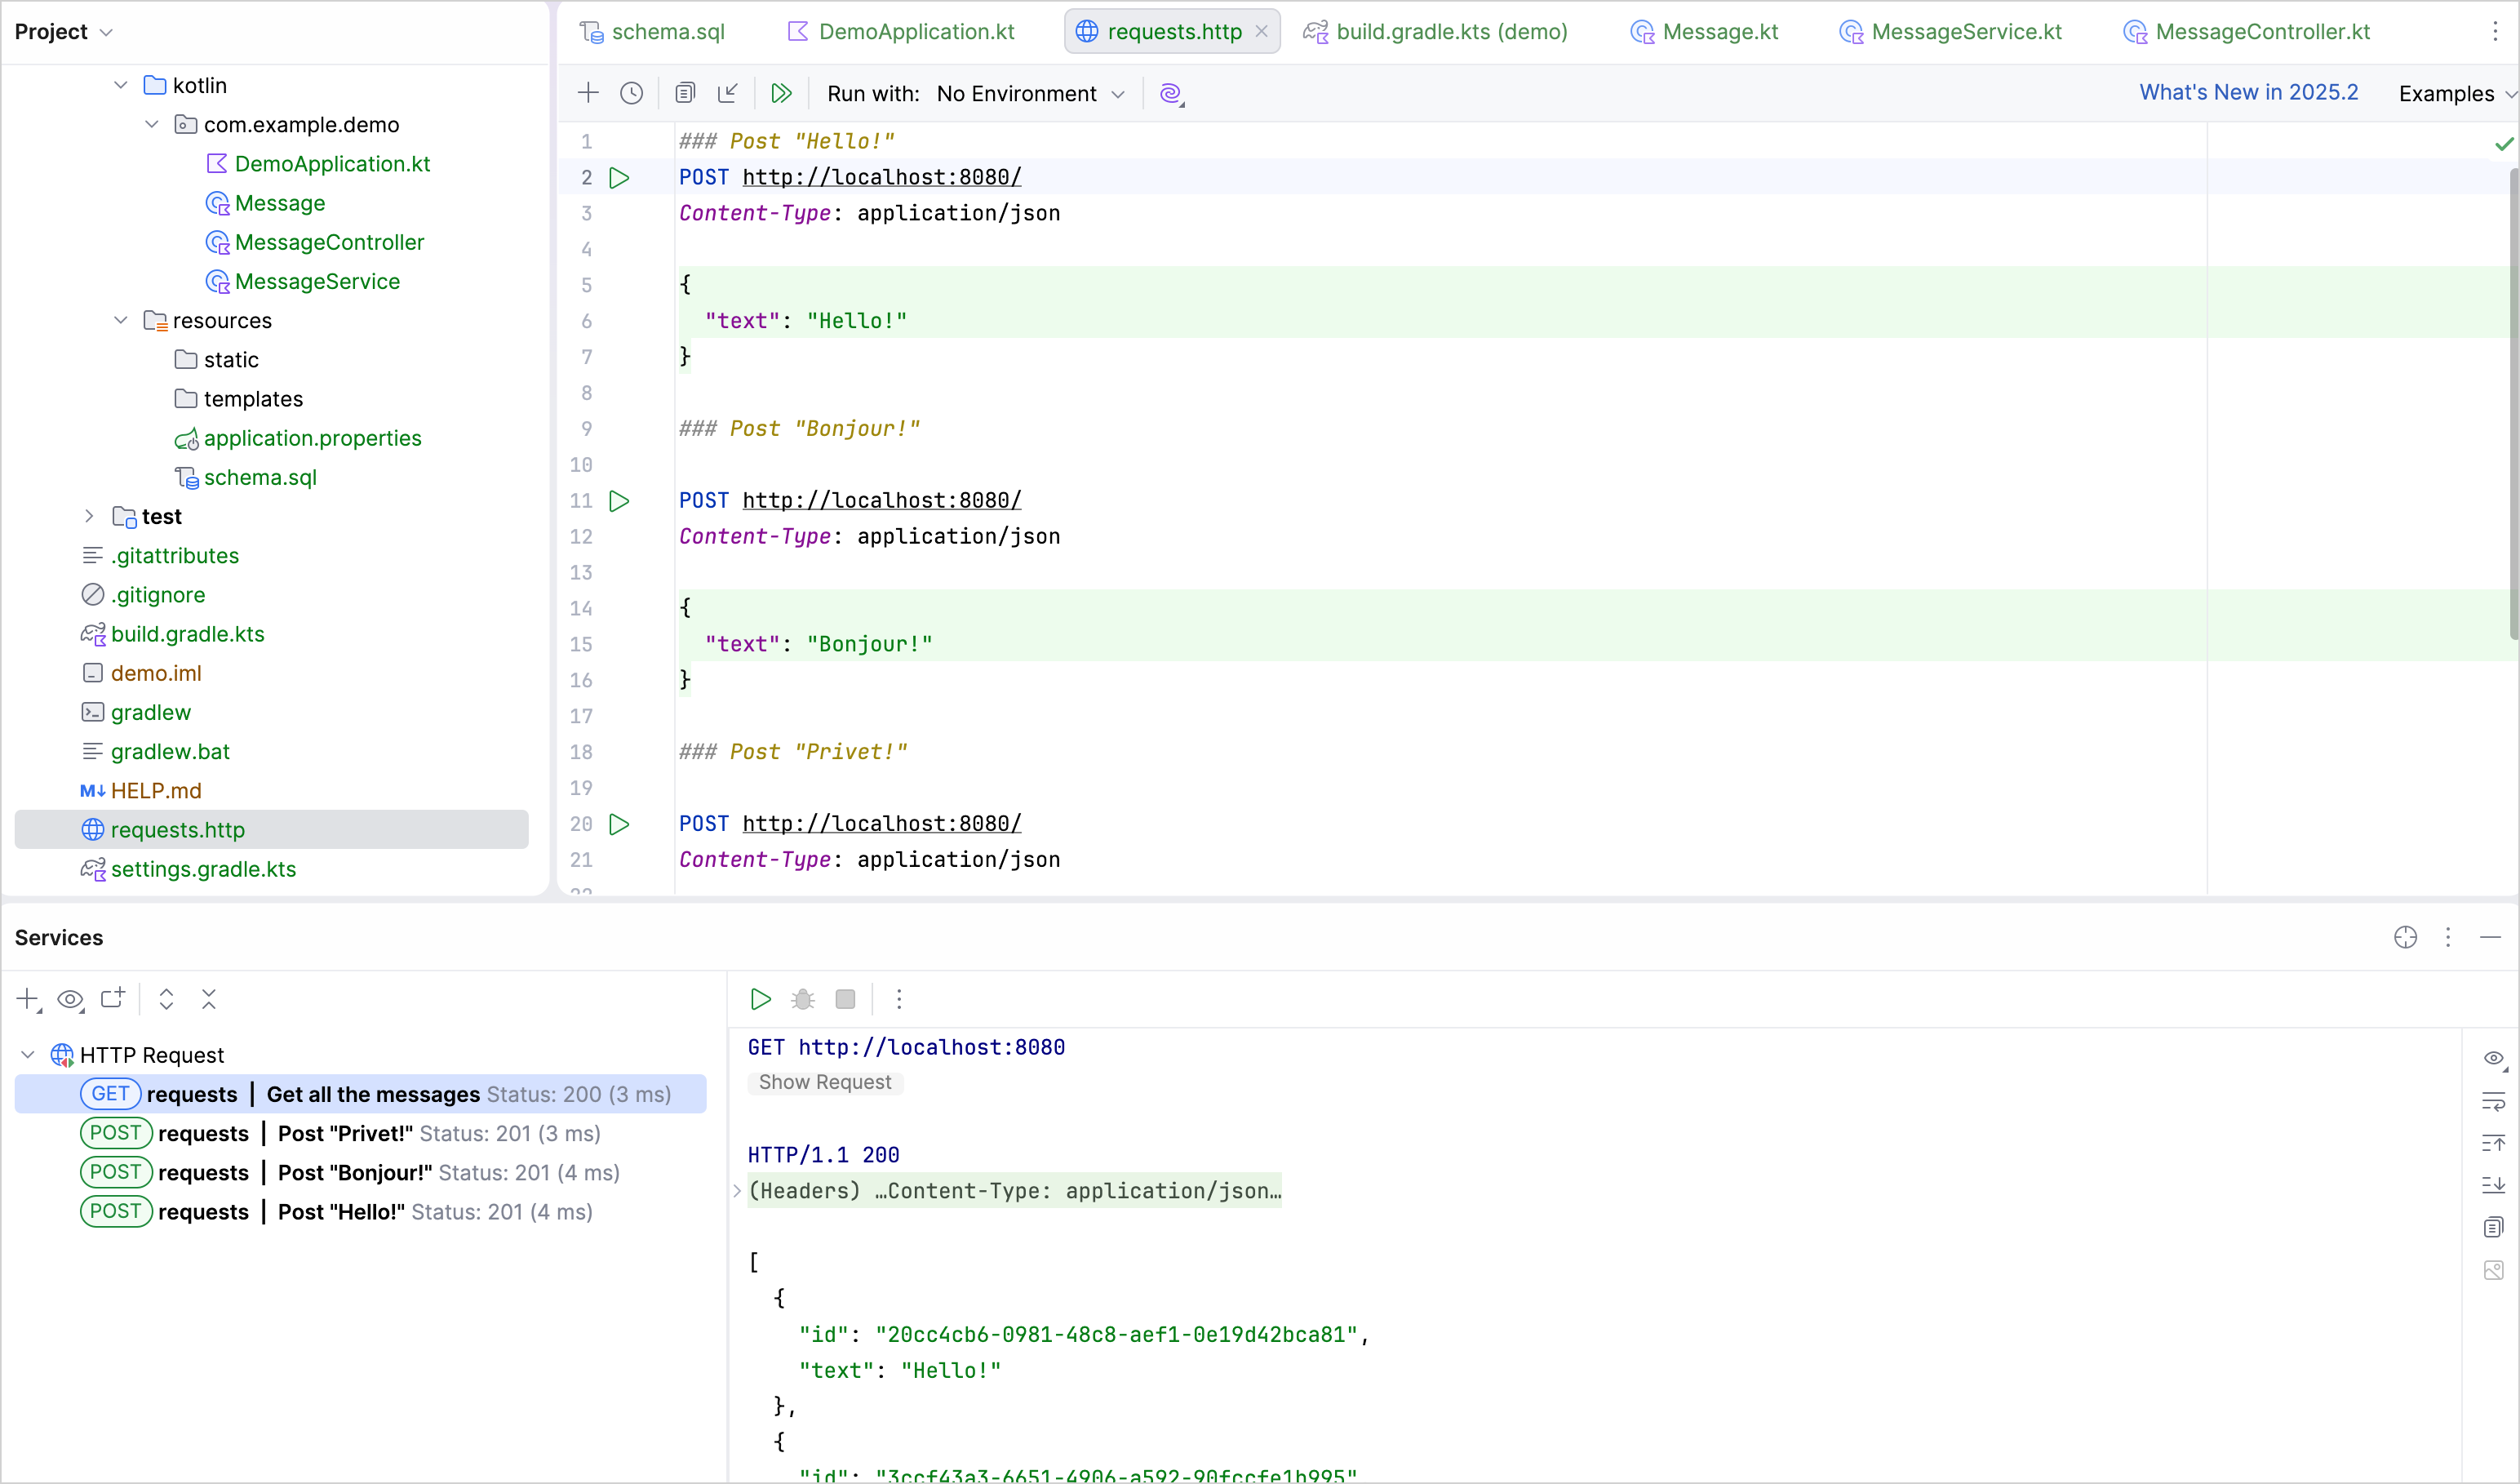
GETリクエストを実行し、実行 (Run) ツール・ウィンドウで結果を確認します:
リクエストを実行する別の方法
他のHTTPクライアントやcURLコマンドライン・ツールを使用することもできます。たとえば、ターミナルで次のコマンドを実行すると同じ結果が得られます:
curl -X POST --location "http://localhost:8080" -H "Content-Type: application/json" -d "{ \"text\": \"Hello!\" }"

curl -X POST --location "http://localhost:8080" -H "Content-Type: application/json" -d "{ \"text\": \"Bonjour!\" }"

curl -X POST --location "http://localhost:8080" -H "Content-Type: application/json" -d "{ \"text\": \"Privet!\" }"

curl -X GET --location "http://localhost:8080"
IDによるメッセージの取得
個々のメッセージをIDで取得できるように、アプリケーションの機能を拡張します。
MessageServiceクラスに、個々のメッセージをIDで取得するための新しい関数findMessageById(id: String)を追加します:kotlin// MessageService.kt package com.example.demo import org.springframework.stereotype.Service import org.springframework.jdbc.core.JdbcTemplate import org.springframework.jdbc.core.query import java.util.* @Service class MessageService(private val db: JdbcTemplate) { fun findMessages(): List<Message> = db.query("select * from messages") { response, _ -> Message(response.getString("id"), response.getString("text")) } fun findMessageById(id: String): Message? = db.query("select * from messages where id = ?", id) { response, _ -> Message(response.getString("id"), response.getString("text")) }.singleOrNull() fun save(message: Message): Message { val id = message.id ?: UUID.randomUUID().toString() // idがnullの場合は新しいidを生成する db.update( "insert into messages values ( ?, ? )", id, message.text ) return message.copy(id = id) // 新しいidを持つメッセージのコピーを返す } }引数リスト内での vararg 引数の位置
query()関数は3つの引数を取ります:- 実行にパラメータを必要とするSQLクエリ文字列
- String型のパラメータである
id - ラムダ式で実装された
RowMapperインスタンス
query()関数の2番目のパラメータは可変長引数 (vararg) として宣言されています。Kotlinでは、可変長引数パラメータの位置は引数リストの最後である必要はありません。singleOrNull() 関数
singleOrNull()関数は、要素が1つの場合はその要素を返し、配列が空であるか、同じ値を持つ要素が複数ある場合はnullを返します。メッセージをIDで取得するために使用される
.query()関数は、Spring Frameworkによって提供される Kotlin拡張関数 です。上記のコードに示すように、追加のインポートimport org.springframework.jdbc.core.queryが必要です。MessageControllerクラスにidパラメータを持つ新しいindex(...)関数を追加します:kotlin// MessageController.kt package com.example.demo import org.springframework.http.ResponseEntity import org.springframework.web.bind.annotation.GetMapping import org.springframework.web.bind.annotation.PathVariable import org.springframework.web.bind.annotation.PostMapping import org.springframework.web.bind.annotation.RequestBody import org.springframework.web.bind.annotation.RequestMapping import org.springframework.web.bind.annotation.RestController import java.net.URI @RestController @RequestMapping("/") class MessageController(private val service: MessageService) { @GetMapping fun listMessages() = ResponseEntity.ok(service.findMessages()) @PostMapping fun post(@RequestBody message: Message): ResponseEntity<Message> { val savedMessage = service.save(message) return ResponseEntity.created(URI("/${savedMessage.id}")).body(savedMessage) } @GetMapping("/{id}") fun getMessage(@PathVariable id: String): ResponseEntity<Message> = service.findMessageById(id).toResponseEntity() private fun Message?.toResponseEntity(): ResponseEntity<Message> = // メッセージがnull(見つからない)の場合、レスポンスコードを404に設定する this?.let { ResponseEntity.ok(it) } ?: ResponseEntity.notFound().build() }コンテキストパスからの値の取得
新しい関数に
@GetMapping("/{id}")をアノテーションしたことで、メッセージのidがSpring Frameworkによってコンテキストパスから取得されます。関数の引数に@PathVariableをアノテーションすることで、取得した値を関数の引数として使用するようにフレームワークに指示します。新しい関数はMessageServiceを呼び出して、IDによって個々のメッセージを取得します。NULL許容レシーバを持つ拡張関数
拡張関数は、NULL許容 (nullable) なレシーバ型で定義できます。レシーバが
nullの場合、thisもnullになります。そのため、NULL許容なレシーバ型で拡張を定義する場合は、関数本体の中でthis == nullチェックを行うことが推奨されます。上記の
toResponseEntity()関数のように、安全呼び出し演算子 (?.) を使用してNULLチェックを行うこともできます:kotlinResponseEntity
ResponseEntityは、ステータスコード、ヘッダー、ボディを含むHTTPレスポンスを表します。これは、コンテンツをより細かく制御して、カスタマイズされたHTTPレスポンスをクライアントに返送できるようにする汎用的なラッパーです。
以下は、アプリケーションの完全なコードです:
// DemoApplication.kt
package com.example.demo

import org.springframework.boot.autoconfigure.SpringBootApplication
import org.springframework.boot.runApplication

@SpringBootApplication
class DemoApplication

fun main(args: Array<String>) {
    runApplication<DemoApplication>(*args)
}// Message.kt
package com.example.demo
data class Message(val id: String?, val text: String)// MessageService.kt
package com.example.demo
import org.springframework.stereotype.Service
import org.springframework.jdbc.core.JdbcTemplate
import org.springframework.jdbc.core.query
import java.util.*
@Service
class MessageService(private val db: JdbcTemplate) {
fun findMessages(): List<Message> = db.query("select * from messages") { response, _ ->
Message(response.getString("id"), response.getString("text"))
}
fun findMessageById(id: String): Message? = db.query("select * from messages where id = ?", id) { response, _ ->
Message(response.getString("id"), response.getString("text"))
}.singleOrNull()
fun save(message: Message): Message {
val id = message.id ?: UUID.randomUUID().toString()
db.update(
"insert into messages values ( ?, ? )",
id, message.text
)
return message.copy(id = id)
}
}// MessageController.kt
package com.example.demo
import org.springframework.http.ResponseEntity
import org.springframework.web.bind.annotation.GetMapping
import org.springframework.web.bind.annotation.PathVariable
import org.springframework.web.bind.annotation.PostMapping
import org.springframework.web.bind.annotation.RequestBody
import org.springframework.web.bind.annotation.RequestMapping
import org.springframework.web.bind.annotation.RestController
import java.net.URI
@RestController
@RequestMapping("/")
class MessageController(private val service: MessageService) {
@GetMapping
fun listMessages() = ResponseEntity.ok(service.findMessages())
@PostMapping
fun post(@RequestBody message: Message): ResponseEntity<Message> {
val savedMessage = service.save(message)
return ResponseEntity.created(URI("/${savedMessage.id}")).body(savedMessage)
}
@GetMapping("/{id}")
fun getMessage(@PathVariable id: String): ResponseEntity<Message> =
service.findMessageById(id).toResponseEntity()
private fun Message?.toResponseEntity(): ResponseEntity<Message> =
this?.let { ResponseEntity.ok(it) } ?: ResponseEntity.notFound().build()
}アプリケーションの実行
Springアプリケーションの実行準備が整いました:
アプリケーションを再度実行します。
requests.httpファイルを開き、新しいGETリクエストを追加します:http### Get the message by its id GET http://localhost:8080/idGETリクエストを実行して、データベースからすべてのメッセージを取得します。
実行 (Run) ツール・ウィンドウで、IDの1つをコピーして、次のようにリクエストに追加します:
http### Get the message by its id GET http://localhost:8080/f910aa7e-11ee-4215-93ed-1aeeac822707上記の代わりに、実際のメッセージIDを入力してください。
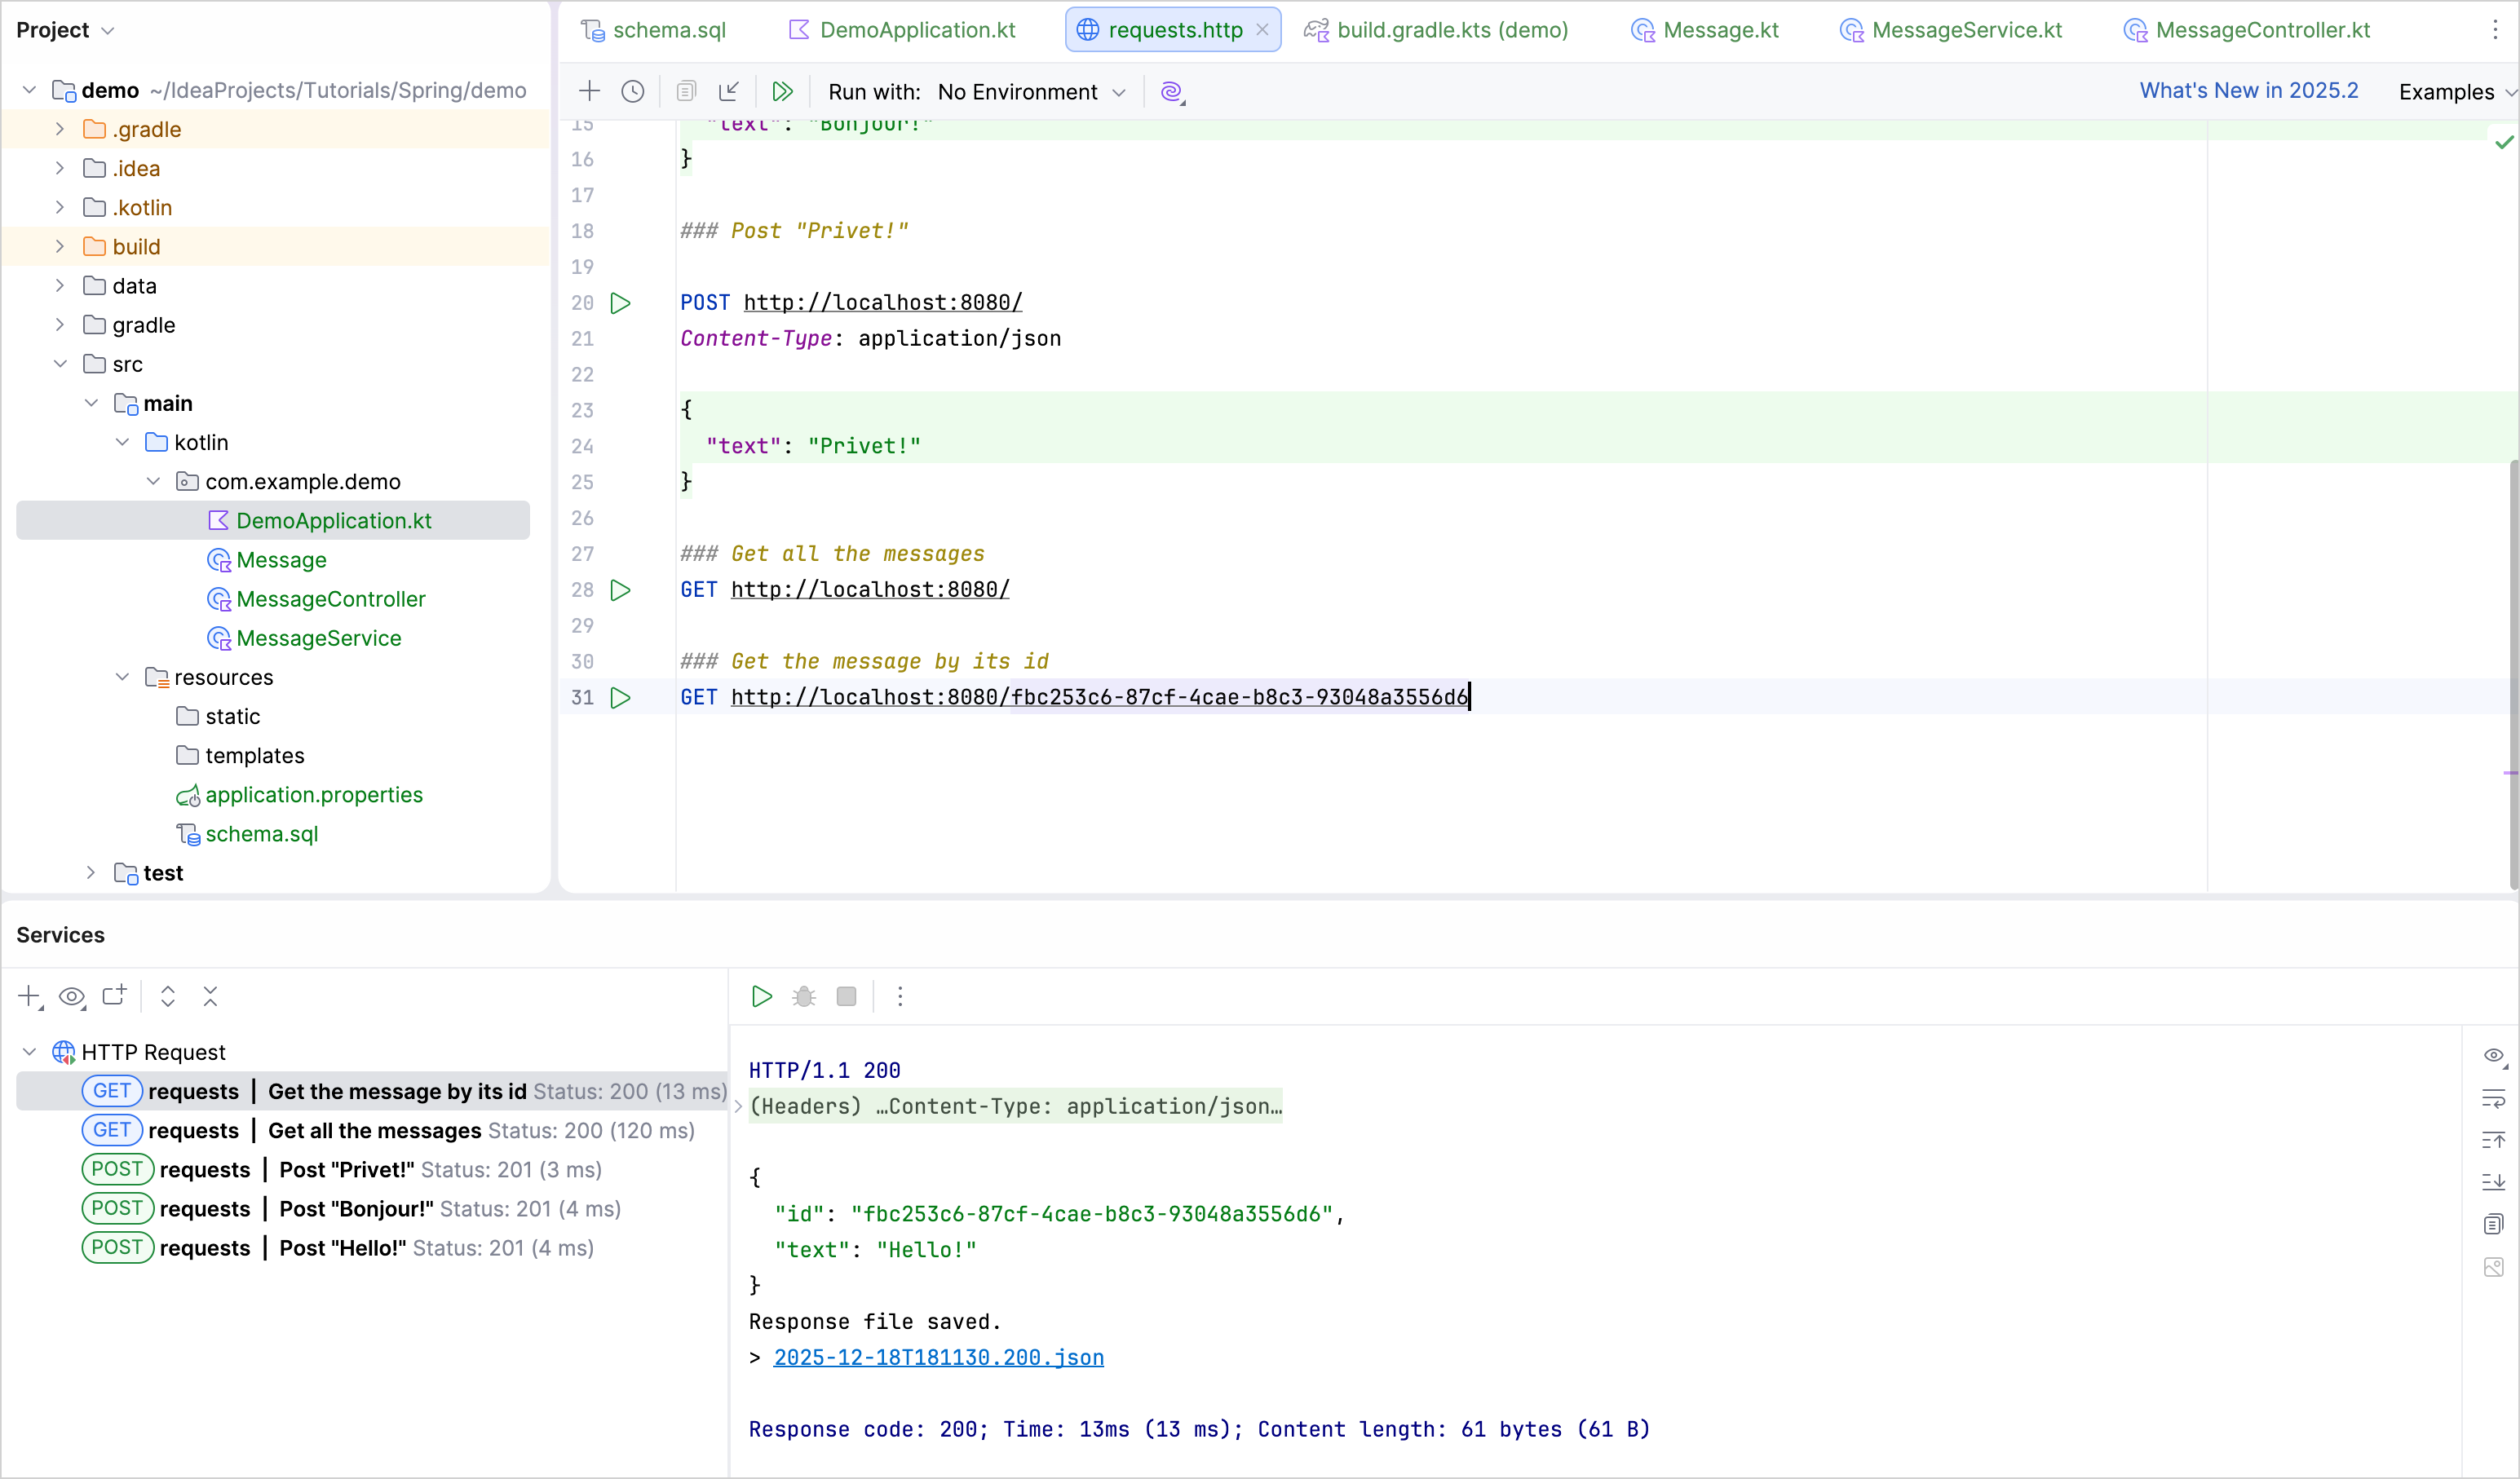
GETリクエストを実行し、実行 (Run) ツール・ウィンドウで結果を確認します:
次の手順
最後の手順では、Spring Dataを使用して、より一般的なデータベース接続方法を使用する方法について説明します。