
在你的應用程式中使用多平台資源
當你為專案設定好資源後, 組建專案即可產生提供資源存取功能的特殊 Res 類別。 若要重新產生 Res 類別及所有資源存取子(accessors),請重新組建專案或在 IDE 中重新匯入專案。
完成後,你便可以使用產生的類別,從程式碼或外部程式庫中存取已設定的多平台資源。
請繼續閱讀以下主題的詳細資訊:
- 匯入產生的
Res類別與存取子。 - 自訂存取子類別的產生方式:如何將其設為公開(public)、指派至特定套件,或無條件產生。
- 處理特定資源型別:
- Drawable 資源,例如簡單圖片、點陣化圖片或 XML 向量圖。
- 來自 Material Symbols 程式庫的 向量 Android XML 圖示。
- 字串,包含簡單字串、範本、陣列與複數形式(plurals)。
- 儲存與載入自訂字型。
- 原始檔案以及將位元組陣列轉換為圖片。
- 存取與字串 ID 對應的資源。
- 將多平台資源作為 Android 資產使用。
- 處理 Web 專用資源:
- 使用瀏覽器功能與預先載入 API 進行資源預先載入。
- 針對缺字問題的字型自動退回機制 (Automatic font fallback)。
- 快取 Web 資源。
- 處理外部資源: 來自外部程式庫、 遠端檔案以及 Java 資源。
匯入產生的類別
若要使用準備好的資源,請匯入產生的類別,例如:
import project.shared.generated.resources.Res
import project.shared.generated.resources.example_image
在此:
project是你的專案名稱shared是你放置資源目錄的模組Res是所產生類別的預設名稱example_image是composeResources/drawable目錄中的圖片檔案名稱(例如example_image.png)。
自訂存取子類別的產生方式
你可以使用 Gradle 設定自訂產生的 Res 類別,以符合你的需求。
在 build.gradle.kts 檔案的 compose.resources {} 區塊中,你可以指定數個會影響專案產生 Res 類別方式的設定。 範例組態如下所示:
compose.resources {
    publicResClass = false
    packageOfResClass = "me.sample.library.resources"
    generateResClass = auto
}publicResClass設為true會使產生的Res類別公開。預設情況下,產生的類別為 internal。packageOfResClass允許你將產生的Res類別指派給特定套件(以便在程式碼內存取, 以及在最終產物中進行隔離)。預設情況下,Compose Multiplatform 會將{group name}.{module name}.generated.resources套件指派給該類別。generateResClass設為always會讓專案無條件產生Res類別。這在資源程式庫僅透過傳遞依賴可用時非常有用。 預設情況下,Compose Multiplatform 使用auto值, 僅在目前專案對資源程式庫具有明確的implementation或api相依性時才產生Res類別。
資源使用
圖片
你可以將 drawable 資源作為簡單圖片、點陣化圖片或 XML 向量圖存取。 除了 Android 之外,所有平台均支援 SVG 圖片。
若要將 drawable 資源作為
Painter圖片存取,請使用painterResource()函式:kotlin@Composable fun painterResource(resource: DrawableResource): Painter {...}painterResource()函式接受資源路徑並傳回一個Painter值。該函式在除 Web 之外的所有目標平台上皆同步運作。 對於 Web 目標,它會在第一次重組時傳回一個空的Painter, 並在隨後的重組中替換為載入的圖片。painterResource()會針對點陣化圖片格式(如.png、.jpg、.bmp、.webp)載入BitmapPainter, 或針對 Android XML 向量 drawable 格式載入VectorPainter。- XML 向量 drawables 具有與 Android 相同的格式, 差別在於它們不支援對 Android 資源的外部參照。
若要將 drawable 資源作為
ImageBitmap點陣化圖片存取,請使用imageResource()函式:kotlin@Composable fun imageResource(resource: DrawableResource): ImageBitmap {...}若要將 drawable 資源作為
ImageVectorXML 向量圖存取,請使用vectorResource()函式:kotlin@Composable fun vectorResource(resource: DrawableResource): ImageVector {...}
以下是在 Compose Multiplatform 程式碼中存取圖片的範例:
Image(
    painter = painterResource(Res.drawable.my_image),
    contentDescription = null
)
在畫布(Canvas)上繪製圖片
若要自行繪製資源圖片而非使用 Image() composable 顯示,請將其載入為 ImageBitmap 或 ImageVector 並在 DrawScope 中使用:
- 若要繪製
ImageBitmap,請使用DrawScope.drawImage()。 - 若要繪製
ImageVector,請使用rememberVectorPainter()建立Painter,然後使用Painter.draw()。
在 DrawScope 中以像素為單位指定偏移量與大小:
val myImageRaster = imageResource(Res.drawable.my_image_raster)
val myImageVectorPainter = rememberVectorPainter(vectorResource(Res.drawable.my_image_vector))

Canvas(modifier = Modifier.fillMaxSize()) {
    // 在 Lambda 內部,`this` 是 `DrawScope` 的執行個體,提供 `drawImage()` 與 `translate()`
    drawImage(image = myImageRaster, topLeft = Offset(20f, 20f))
    translate(left = 20f, top = myImageRaster.height + 40f) {
        // `Painter.draw()` 函式同時將 `DrawScope` 與 `Painter` 作為接收者
        with(myImageVectorPainter) {
            draw(Size(200f, 200f))
        }
    }
}
圖示
你可以使用 Material Symbols 程式庫中的向量 Android XML 圖示:
開啟 Google Fonts Icons 資源庫,選擇一個圖示,切換到 Android 標籤頁,然後點擊 Download。
將下載的 XML 圖示檔案新增到多平台資源的
drawable目錄中。開啟 XML 圖示檔案並將
android:fillColor設定為#000000。 移除任何其他用於色彩調整的 Android 專屬屬性,例如android:tint。修改前:
xml<vector xmlns:android="http://schemas.android.com/apk/res/android" android:width="24dp" android:height="24dp" android:viewportWidth="960" android:viewportHeight="960" android:tint="?attr/colorControlNormal"> <path android:fillColor="@android:color/white" android:pathData="..."/> </vector>修改後:
xml<vector xmlns:android="http://schemas.android.com/apk/res/android" android:width="24dp" android:height="24dp" android:viewportWidth="960" android:viewportHeight="960"> <path android:fillColor="#000000" android:pathData="..."/> </vector>組建專案以產生資源存取子, 或讓 Kotlin Multiplatform IDE 外掛程式 自動處理。
以下範例示範如何在 Compose Multiplatform 程式碼中存取圖示,並使用 colorFilter 參數調整顏色:
Image(
    painter = painterResource(Res.drawable.ic_sample_icon),
    contentDescription = "Sample icon",
    modifier = Modifier.size(24.dp),
    colorFilter = ColorFilter.tint(Color.Blue)
)
字串
請將所有字串資源儲存在 composeResources/values 目錄中的 XML 檔案內。 系統會為每個檔案中的每個項目產生一個靜態存取子。
Kotlin Multiplatform IDE 外掛程式 支援 類似 Emmet 的速記語法,可直接在 XML 檔案中新增字串資源、字串陣列和複數形式。 例如,當你在 strings.xml 中輸入 test{Example} 或 s.test{Example} 並按下 Tab 鍵時,它會自動展開為 <string name="test">Example</string>。
若要了解如何為不同語言環境在地化字串,請參閱 字串在地化指南。
簡單字串
若要儲存簡單字串,請在 XML 中新增 <string> 元素:
<resources>
    <string name="app_name">My awesome app</string>
    <string name="title">Some title</string>
</resources>
若要將字串資源作為 String 取得,請使用以下程式碼:
@Composable
fun stringResource(resource: StringResource): String {...}

@Composable
fun stringResource(resource: StringResource, vararg formatArgs: Any): String {...}
例如:
Text(stringResource(Res.string.app_name))suspend fun getString(resource: StringResource): String
suspend fun getString(resource: StringResource, vararg formatArgs: Any): String例如:
coroutineScope.launch {
    val appName = getString(Res.string.app_name)
}
你可以在字串資源中使用特殊符號:
\n– 代表換行\t– 代表 Tab 符號\uXXXX– 代表特定的 Unicode 字元
你不需要像 在 Android 字串中 那樣轉義特殊 XML 字元(例如「@」或「?」)。
在裝有 Kotlin Multiplatform 外掛程式 的 IDE 中, 你可以按下 Tab 鍵將類似 Emmet 的縮寫展開為字串標籤:
test→<string name="test"></string>test{Example}→<string name="test">Example</string>
字串範本
目前,引數對字串資源提供基本支援。 建立範本時,使用 %<number> 格式在字串內放置引數,並加上 $d 或 $s 後綴 以表示它是變數占位符號而非一般文字。 例如:
<resources>
    <string name="str_template">Hello, %2$s! You have %1$d new messages.</string>
</resources>
建立並匯入字串範本資源後,你可以在依正確順序傳入占位符號引數的同時參照它:
Text(stringResource(Res.string.str_template, 100, "User_name"))$s 與 $d 後綴之間沒有差別,且不支援其他後綴。 你可以在資源字串中放入 %1$s 占位符號,並用它來顯示小數,例如:
Text(stringResource(Res.string.str_template, "User_name", 100.1f))在裝有 Kotlin Multiplatform 外掛程式 的 IDE 中, 你可以使用行內數字捷徑,而無需手動輸入占位符號 %1$s 或 %2$d。 例如,當你在字串值中輸入 1 或 1s 時,它會展開為 %1$s。 同理,當你輸入 2d 時,它會展開為 %2$d。
字串陣列
你可以將相關字串分組為陣列,並自動將它們作為 List<String> 物件存取:
<resources>
    <string name="app_name">My awesome app</string>
    <string name="title">Some title</string>
    <string-array name="str_arr">
        <item>item \u2605</item>
        <item>item \u2318</item>
        <item>item \u00BD</item>
    </string-array>
</resources>
若要取得對應的清單,請使用以下程式碼:
@Composable
fun stringArrayResource(resource: StringArrayResource): List<String> {...}
例如:
val arr = stringArrayResource(Res.array.str_arr)
if (arr.isNotEmpty()) Text(arr[0])suspend fun getStringArray(resource: StringArrayResource): List<String>例如:
coroutineScope.launch {
    val appName = getStringArray(Res.array.str_arr)
}
在裝有 Kotlin Multiplatform 外掛程式 的 IDE 中, 你可以使用類似 Emmet 的語法快速定義字串陣列。 使用 string-array、sa 或 > 運算子可產生空的陣列範本。 若要建立具有預定義項目數量與起始文字的具名陣列,請輸入 test>2{Hello} 並按下 Tab 鍵:
<string-array name="test">
   <item>Hello</item>
   <item>Hello</item>
</string-array>
複數形式(Plurals)
當 UI 顯示某些事物的數量時,你可能希望針對同一事物的不同數量支援文法一致性 (例如英文的一本 book、多本 books 等),而不需要在程式碼中建立毫無關聯的字串。
Compose Multiplatform 中的概念與基礎實作與 Android 上的數量字串相同。 請參閱 Android 文件 以深入了解在專案中使用複數的最佳實務與細微差異。
- 支援的變體包括
zero、one、two、few、many以及other。請注意,並非每種語言都會考量所有變體: 例如,英文會忽略zero,因為它與除 1 以外的任何複數相同。請依賴語言專家來確認該語言實際要求的區分方式。 - 在不影響使用者體驗的情況下,通常可以透過使用中性數量的表述(例如「Books: 1」)來避免使用數量字串。
若要定義複數,請在 composeResources/values 目錄中的任何 .xml 檔案新增 <plurals> 元素。 plurals 集合是一個簡單資源,使用 name 屬性進行參照(而非 XML 檔案名稱)。 因此,你可以在同一個 XML 檔案中,將 plurals 資源與其他簡單資源合併在同一個 <resources> 元素下:
<resources>
    <string name="app_name">My awesome app</string>
    <string name="title">Some title</string>
    <plurals name="new_message">
        <item quantity="one">%1$d new message</item>
        <item quantity="other">%1$d new messages</item>
    </plurals>
</resources>
若要將複數作為 String 存取,請使用以下程式碼:
@Composable
fun pluralStringResource(resource: PluralStringResource, quantity: Int): String {...}

@Composable
fun pluralStringResource(resource: PluralStringResource, quantity: Int, vararg formatArgs: Any): String {...}
例如:
Text(pluralStringResource(Res.plurals.new_message, 1, 1))suspend fun getPluralString(resource: PluralStringResource, quantity: Int): String
suspend fun getPluralString(resource: PluralStringResource, quantity: Int, vararg formatArgs: Any): String例如:
coroutineScope.launch {
    val appName = getPluralString(Res.plurals.new_message, 1, 1)
}
在裝有 Kotlin Multiplatform 外掛程式 的 IDE 中, 你可以使用類似 Emmet 的語法來產生複數資源。 例如,使用 plurals、p 或 : 可產生預設的空白字串範本。 如果你在 values-en/strings.xml 中作業,IDE 會自動偵測語系、所需的數量, 以及英文僅需要 one 和 other。 輸入 p.test 或 plurals.test 並按下 Tab 鍵,即可將縮寫展開為 plurals 區塊:
<plurals name="test">
    <item quantity="one"></item>
    <item quantity="other"></item>
</plurals>
字型
將自訂字型儲存在 composeResources/font 目錄中。 Compose Multiplatform 在所有平台上均支援 TTF、OTF、TTC 與可變字型格式。 WOFF 與 WOFF2 僅在 Web 與 macOS 上可用。
若要將字型載入為 Font 型別,請使用 Font() composable 函式:
@Composable
fun Font(
    resource: FontResource,
    weight: FontWeight = FontWeight.Normal,
    style: FontStyle = FontStyle.Normal
): Font
例如:
@Composable private fun InterTypography(): Typography { val interFont = FontFamily( {...}
@Composable
private fun InterTypography(): Typography {
    val interFont = FontFamily(
        Font(Res.font.Inter_24pt_Regular, FontWeight.Normal),
        Font(Res.font.Inter_24pt_SemiBold, FontWeight.Bold),
    )

    return with(MaterialTheme.typography) {
        copy(
            displayLarge = displayLarge.copy(fontFamily = interFont, fontWeight = FontWeight.Bold),
            displayMedium = displayMedium.copy(fontFamily = interFont, fontWeight = FontWeight.Bold),
            displaySmall = displaySmall.copy(fontFamily = interFont, fontWeight = FontWeight.Bold),
            headlineLarge = headlineLarge.copy(fontFamily = interFont, fontWeight = FontWeight.Bold),
            headlineMedium = headlineMedium.copy(fontFamily = interFont, fontWeight = FontWeight.Bold),
            headlineSmall = headlineSmall.copy(fontFamily = interFont, fontWeight = FontWeight.Bold),
            titleLarge = titleLarge.copy(fontFamily = interFont, fontWeight = FontWeight.Bold),
            titleMedium = titleMedium.copy(fontFamily = interFont, fontWeight = FontWeight.Bold),
            titleSmall = titleSmall.copy(fontFamily = interFont, fontWeight = FontWeight.Bold),
            labelLarge = labelLarge.copy(fontFamily = interFont, fontWeight = FontWeight.Normal),
            labelMedium = labelMedium.copy(fontFamily = interFont, fontWeight = FontWeight.Normal),
            labelSmall = labelSmall.copy(fontFamily = interFont, fontWeight = FontWeight.Normal),
            bodyLarge = bodyLarge.copy(fontFamily = interFont, fontWeight = FontWeight.Normal),
            bodyMedium = bodyMedium.copy(fontFamily = interFont, fontWeight = FontWeight.Normal),
            bodySmall = bodySmall.copy(fontFamily = interFont, fontWeight = FontWeight.Normal),
        )
    }
}
當 Font 是 composable 時,請確保其依賴的元件(例如 TextStyle 與 Typography)也是 composable。
Web 目標透過字型自動退回機制 (Automatic font fallback) 自動支援表情符號(emoji)和阿拉伯文等特殊字元,該機制會依需求下載所需的 Noto 字型。
如果你需要完全掌控所使用的字型,請隨附特定字型並透過 預先載入 API 手動註冊。
原始檔案
若要將任何原始檔案載入為位元組陣列,請使用 Res.readBytes(path) 函式:
suspend fun readBytes(path: String): ByteArray你可以將原始檔案放在 composeResources/files 目錄中,並在其內部建立任意階層架構。
例如,若要存取原始檔案,請使用以下程式碼:
var bytes by remember {
    mutableStateOf(ByteArray(0))
}
LaunchedEffect(Unit) {
    bytes = Res.readBytes("files/myDir/someFile.bin")
}
Text(bytes.decodeToString())coroutineScope.launch {
val bytes = Res.readBytes("files/myDir/someFile.bin")
}將位元組陣列轉換為圖片
如果你讀取的檔案是點陣圖(JPEG、PNG、BMP、WEBP)或 XML 向量圖,可以使用以下函式 將它們轉換為適用於 Image() composable 的 ImageBitmap 或 ImageVector 物件。
如原始檔案章節所示存取原始檔案,然後將結果傳遞給 composable:
// bytes = Res.readBytes("files/example.png")
Image(bytes.decodeToImageBitmap(), null)

// bytes = Res.readBytes("files/example.xml")
Image(bytes.decodeToImageVector(LocalDensity.current), null)
在除 Android 以外的所有平台上,你也可以將 SVG 檔案轉換為 Painter 物件:
// bytes = Res.readBytes("files/example.svg")
Image(bytes.decodeToSvgPainter(LocalDensity.current), null)
產生資源與字串 ID 的對應表
為了便於存取,Compose Multiplatform 也提供與字串 ID 對應的資源。你可以使用 檔案名稱作為索引鍵(key)來存取它們:
val Res.allDrawableResources: Map<String, DrawableResource>
val Res.allStringResources: Map<String, StringResource>
val Res.allStringArrayResources: Map<String, StringArrayResource>
val Res.allPluralStringResources: Map<String, PluralStringResource>
val Res.allFontResources: Map<String, FontResource>
將對應資源傳遞給 composable 的範例:
Image(painterResource(Res.allDrawableResources["compose_multiplatform"]!!), null)將 Compose Multiplatform 資源作為 Android 資產使用
從 Compose Multiplatform 1.7.0 開始,所有多平台資源都會打包到 Android 資產(assets)中。 這讓 Android Studio 能夠為 Android 原始碼集中的 Compose Multiplatform composables 產生預覽。
Android Studio 預覽僅適用於 Android 原始碼集中的 composables。 它們還需要最新版本的 AGP 之一:8.5.2、8.6.0-rc01 或 8.7.0-alpha04。
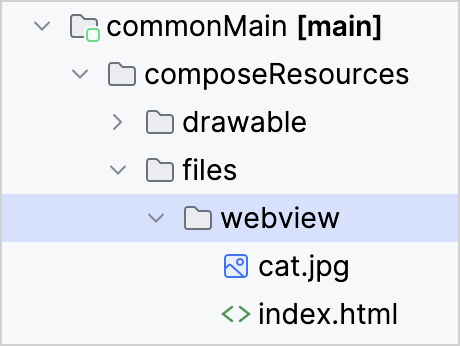
將多平台資源作為 Android 資產使用,也讓在 Android 上的 WebView 和媒體播放器元件可以直接存取這些資源, 因為資源可透過簡單路徑存取,例如 Res.getUri("files/index.html")。
以下範例展示了一個 Android composable 顯示含有資源圖片連結的資源 HTML 頁面:
AndroidView(factory = { WebView(it).apply {...}
// androidMain/kotlin/com/example/webview/App.kt
@OptIn(ExperimentalResourceApi::class)
@Composable
@Preview
fun App() {
    MaterialTheme {
        val uri = Res.getUri("files/webview/index.html")

        // 在 AndroidView 內部新增全螢幕配置的 WebView。
        AndroidView(factory = {
            WebView(it).apply {
                layoutParams = ViewGroup.LayoutParams(
                    ViewGroup.LayoutParams.MATCH_PARENT,
                    ViewGroup.LayoutParams.MATCH_PARENT
                )
            }
        }, update = {
            it.loadUrl(uri)
        })
    }
}
此範例適用於這個簡單的 HTML 檔案:
<title>Cat Resource</title> {...}
<html>
<header>
    <title>
        Cat Resource
    </title>
</header>
<body>
    <img src="cat.jpg">
</body>
</html>
此範例中的兩個資源檔案均位於 commonMain 原始碼集中:
與其他程式庫及資源的互動
從外部程式庫存取多平台資源
若你想使用專案中包含的其他程式庫來處理多平台資源,可以將平台特有的檔案路徑傳遞給這些其他 API。 若要取得平台特有的路徑,請以資源的專案路徑呼叫 Res.getUri() 函式:
val uri = Res.getUri("files/my_video.mp4")現在 uri 變數包含了該檔案的絕對路徑,任何外部程式庫都可以使用該路徑以適合其自身的方式存取檔案。
針對 Android 專屬的使用情境,多平台資源也已打包為 Android 資產。
遠端檔案
在資源程式庫的語境下,只有屬於應用程式一部分的檔案才被視為資源。
你可以使用專門的程式庫,透過遠端檔案的 URL 從網際網路載入它們:
如果你自行下載圖片或讀取其位元組,請使用資源程式庫的解碼函式將其轉換。 有關在桌面應用程式中載入網路圖片的範例,請參閱 在 Compose Multiplatform for Desktop 中使用圖片。
如果你自行下載或讀取圖片的位元組,請使用資源程式庫的解碼函式將其轉換為圖片。 有關在桌面應用程式中從網路載入圖片的範例,請參閱 在 Compose Multiplatform for Desktop 中使用圖片的教學。
使用 Java 資源
雖然你可以在 Compose Multiplatform 中使用 Java 資源,但它們無法享有該架構所提供的擴充功能:產生的存取子、多模組支援、在地化等。 建議完全轉移至多平台資源程式庫以發揮這些潛力。
自 Compose Multiplatform 1.7.0 起,compose.ui 套件中提供的資源 API 已棄用。 如果你仍需要使用 Java 資源,請將以下實作複製到專案中,以確保升級到 Compose Multiplatform 1.7.0 或以上版本後程式碼仍可正常運作:
internal fun painterResource(resourcePath: String): Painter {...}
@Composable
internal fun painterResource(
    resourcePath: String
): Painter = when (resourcePath.substringAfterLast(".")) {
    "svg" -> rememberSvgResource(resourcePath)
    "xml" -> rememberVectorXmlResource(resourcePath)
    else -> rememberBitmapResource(resourcePath)
}

@Composable
internal fun rememberBitmapResource(path: String): Painter {
    return remember(path) { BitmapPainter(readResourceBytes(path).decodeToImageBitmap()) }
}

@Composable
internal fun rememberVectorXmlResource(path: String): Painter {
    val density = LocalDensity.current
    val imageVector = remember(density, path) { readResourceBytes(path).decodeToImageVector(density) }
    return rememberVectorPainter(imageVector)
}

@Composable
internal fun rememberSvgResource(path: String): Painter {
    val density = LocalDensity.current
    return remember(density, path) { readResourceBytes(path).decodeToSvgPainter(density) }
}

private object ResourceLoader
private fun readResourceBytes(resourcePath: String) =
    ResourceLoader.javaClass.classLoader.getResourceAsStream(resourcePath).readAllBytes()