
在应用程序中使用多平台资源
当你为项目设置好资源后,构建项目即可生成用于访问资源的特殊 Res 类。 如需重新生成 Res 类及所有资源访问器,请再次构建项目或在 IDE 中重新导入项目。
之后,你便可以使用生成的类,从代码或外部库中访问已配置的多平台资源。
继续阅读以了解以下主题的详细信息:
- 导入生成的
Res类和访问器。 - 自定义访问器类的生成:如何将其设为公开、指定到软件包或无条件生成。
- 处理特定资源类型:
- Drawable 资源,如简单图像、光栅化图像或 XML 矢量图。
- 来自 Material Symbols 库的 Android XML 矢量图标。
- 字符串,包括简单字符串、模板、数组和复数。
- 存储和加载自定义字体。
- 原始文件以及将字节数组转换为图像。
- 访问映射了字符串 ID 的资源。
- 将多平台资源用作 Android 资产。
- 处理 Web 专属资源:
- 使用外部资源: 来自外部库、 远程文件以及 Java 资源。
导入生成的类
要使用准备好的资源,请导入生成的类,例如:
import project.shared.generated.resources.Res
import project.shared.generated.resources.example_image
其中:
project是你的项目名称shared是放置资源目录的模块Res是生成类的默认名称example_image是composeResources/drawable目录中图像文件的名称(例如example_image.png)。
自定义访问器类生成
你可以使用 Gradle 设置根据需求自定义生成的 Res 类。
在 build.gradle.kts 文件的 compose.resources {} 块中,你可以指定多个影响项目 Res 类生成方式的设置。 配置示例如下:
compose.resources {
    publicResClass = false
    packageOfResClass = "me.sample.library.resources"
    generateResClass = auto
}publicResClass设置为true会将生成的Res类设为公开(public)。默认情况下,生成的类是 internal。packageOfResClass允许你将生成的Res类分配到特定软件包(用于在代码中访问,以及在最终构件中进行隔离)。默认情况下,Compose Multiplatform 会为该类分配{group name}.{module name}.generated.resources软件包。generateResClass设置为always会使项目无条件生成Res类。当资源库仅通过传递依赖提供时,这会非常有用。默认情况下,Compose Multiplatform 使用auto值,仅在当前项目对资源库具有显式implementation或api依赖项时才生成Res类。
资源用法
图像
你可以将 drawable 资源作为简单图像、光栅化图像或 XML 矢量图进行访问。 除 Android 外的所有平台均支持 SVG 图像。
要将 drawable 资源作为
Painter图像访问,请使用painterResource()函数:kotlin@Composable fun painterResource(resource: DrawableResource): Painter {...}painterResource()函数接收资源路径并返回Painter值。该函数在除 Web 以外的所有目标平台上均以同步方式工作。对于 Web 目标,它会在首次重组时返回一个空的Painter,并在后续重组中替换为加载的图像。painterResource()对于光栅化图像格式(如.png、.jpg、.bmp、.webp)加载BitmapPainter,或者针对 Android XML 矢量 drawable 格式加载VectorPainter。- XML 矢量 drawables 与 Android 格式相同,不同之处在于它们不支持对 Android 资源的外部引用。
要将 drawable 资源作为
ImageBitmap光栅化图像访问,请使用imageResource()函数:kotlin@Composable fun imageResource(resource: DrawableResource): ImageBitmap {...}要将 drawable 资源作为
ImageVectorXML 矢量图访问,请使用vectorResource()函数:kotlin@Composable fun vectorResource(resource: DrawableResource): ImageVector {...}
以下是在 Compose Multiplatform 代码中访问图像的示例:
Image(
    painter = painterResource(Res.drawable.my_image),
    contentDescription = null
)
在画布上绘制图像
如果不想使用 Image() 可组合项展示图像,而是想自行绘制资源图像,可将其作为 ImageBitmap 或 ImageVector 加载并在 DrawScope 中使用:
- 要绘制
ImageBitmap,请使用DrawScope.drawImage()。 - 要绘制
ImageVector,请使用rememberVectorPainter()创建一个Painter,然后使用Painter.draw()。
在 DrawScope 中以像素为单位指定偏移量和大小:
val myImageRaster = imageResource(Res.drawable.my_image_raster)
val myImageVectorPainter = rememberVectorPainter(vectorResource(Res.drawable.my_image_vector))

Canvas(modifier = Modifier.fillMaxSize()) {
    // 在 lambda 内部,`this` 是 `DrawScope` 的实例,提供了 `drawImage()` 和 `translate()`
    drawImage(image = myImageRaster, topLeft = Offset(20f, 20f))
    translate(left = 20f, top = myImageRaster.height + 40f) {
        // `Painter.draw()` 函数同时使用 `DrawScope` 和 `Painter` 作为接收者
        with(myImageVectorPainter) {
            draw(Size(200f, 200f))
        }
    }
}
图标
你可以使用 Material Symbols 库中的矢量 Android XML 图标:
打开 Google Fonts Icons 图库,选择一个图标,转到 Android 标签页,然后点击 Download。
将下载的 XML 图标文件添加到多平台资源的
drawable目录中。打开 XML 图标文件并将
android:fillColor设置为#000000。 移除用于颜色调整的所有其他 Android 专属属性,例如android:tint。修改前:
xml<vector xmlns:android="http://schemas.android.com/apk/res/android" android:width="24dp" android:height="24dp" android:viewportWidth="960" android:viewportHeight="960" android:tint="?attr/colorControlNormal"> <path android:fillColor="@android:color/white" android:pathData="..."/> </vector>修改后:
xml<vector xmlns:android="http://schemas.android.com/apk/res/android" android:width="24dp" android:height="24dp" android:viewportWidth="960" android:viewportHeight="960"> <path android:fillColor="#000000" android:pathData="..."/> </vector>构建项目以生成资源访问器, 或者让 Kotlin Multiplatform IDE 插件自动处理。
以下是在 Compose Multiplatform 代码中访问图标并使用 colorFilter 参数调整颜色的示例:
Image(
    painter = painterResource(Res.drawable.ic_sample_icon),
    contentDescription = "Sample icon",
    modifier = Modifier.size(24.dp),
    colorFilter = ColorFilter.tint(Color.Blue)
)
字符串
将所有字符串资源存储在 composeResources/values 目录下的 XML 文件中。 会为每个文件中的每个条目生成一个静态访问器。
Kotlin Multiplatform IDE 插件支持使用类 Emmet 的简写语法,直接在 XML 文件中添加字符串资源、字符串数组和复数。 例如,在 strings.xml 中键入 test{Example} 或 s.test{Example} 并按 Tab 键,它将自动展开为 <string name="test">Example</string>。
要了解如何针对不同区域性本地化字符串,请参阅本地化字符串指南。
简单字符串
要存储简单字符串,请在 XML 中添加 <string> 元素:
<resources>
    <string name="app_name">My awesome app</string>
    <string name="title">Some title</string>
</resources>
要将字符串资源作为 String 获取,请使用以下代码:
@Composable
fun stringResource(resource: StringResource): String {...}

@Composable
fun stringResource(resource: StringResource, vararg formatArgs: Any): String {...}
例如:
Text(stringResource(Res.string.app_name))suspend fun getString(resource: StringResource): String
suspend fun getString(resource: StringResource, vararg formatArgs: Any): String例如:
coroutineScope.launch {
    val appName = getString(Res.string.app_name)
}
你可以在字符串资源中使用特殊符号:
\n– 换行\t– 制表符\uXXXX– 特定的 Unicode 字符
你无需像在 Android 字符串中那样转义特殊 XML 字符(如“@”或“?”)。
在安装了 Kotlin Multiplatform 插件的 IDE 中, 你可以按 Tab 键将类 Emmet 缩写展开为字符串标记:
test→<string name="test"></string>test{Example}→<string name="test">Example</string>
字符串模板
目前,字符串资源对实参提供基础支持。 创建模板时,使用 %<number> 格式在字符串中放置实参,并包含 $d 或 $s 后缀以指示它是变量占位符而非纯文本。 例如:
<resources>
    <string name="str_template">Hello, %2$s! You have %1$d new messages.</string>
</resources>
在创建并导入字符串模板资源后,你可以引用它并按正确顺序传递占位符实参:
Text(stringResource(Res.string.str_template, 100, "User_name"))$s 和 $d 后缀之间没有区别,并且不支持其他后缀。 你可以在资源字符串中放入 %1$s 占位符,并用它来显示小数,例如:
Text(stringResource(Res.string.str_template, "User_name", 100.1f))在安装了 Kotlin Multiplatform 插件的 IDE 中, 你可以使用内联数字快捷方式,而无需手动输入 %1$s 或 %2$d 等占位符。 例如,在字符串值中键入 1 或 1s 时,它会展开为 %1$s。 同样,键入 2d 时,它会展开为 %2$d。
字符串数组
你可以将相关字符串分组为数组,并自动将其作为 List<String> 对象进行访问:
<resources>
    <string name="app_name">My awesome app</string>
    <string name="title">Some title</string>
    <string-array name="str_arr">
        <item>item \u2605</item>
        <item>item \u2318</item>
        <item>item \u00BD</item>
    </string-array>
</resources>
要获取相应的列表,请使用以下代码:
@Composable
fun stringArrayResource(resource: StringArrayResource): List<String> {...}
例如:
val arr = stringArrayResource(Res.array.str_arr)
if (arr.isNotEmpty()) Text(arr[0])suspend fun getStringArray(resource: StringArrayResource): List<String>例如:
coroutineScope.launch {
    val appName = getStringArray(Res.array.str_arr)
}
在安装了 Kotlin Multiplatform 插件的 IDE 中, 你可以使用类 Emmet 语法快速定义字符串数组。 使用 string-array、sa 或 > 运算符生成空数组模板。 对于具有预定义项目数和起始文本的命名数组,键入 test>2{Hello} 并按 Tab:
<string-array name="test">
   <item>Hello</item>
   <item>Hello</item>
</string-array>
复数
当你的 UI 显示某物的数量时,你可能希望为相同事物的不同数量支持语法一致性(例如,一个 book,多个 books),而无需以编程方式创建无关的字符串。
Compose Multiplatform 中的概念和基础实现与 Android 上的数量字符串相同。 有关在项目中使用复数形式的最佳做法和细节,请参阅 Android 文档。
- 支持的变体包括
zero、one、two、few、many和other。请注意,并非每种语言都会考虑所有变体:例如,英语中会忽略zero,因为除了 1 之外,它与任何其他复数形式相同。请依赖语言专家来了解该语言实际坚持的区别。 - 如果不会降低用户体验,通常可以通过使用与数量无关的表述(例如“Books: 1”)来避免使用数量字符串。
要定义复数,请在 composeResources/values 目录下的任何 .xml 文件中添加 <plurals> 元素。 plurals 集合是使用 name 属性引用的简单资源(而不是 XML 文件的名称)。 因此,你可以在一个 XML 文件中的单个 <resources> 元素下将 plurals 资源与其他简单资源结合使用:
<resources>
    <string name="app_name">My awesome app</string>
    <string name="title">Some title</string>
    <plurals name="new_message">
        <item quantity="one">%1$d new message</item>
        <item quantity="other">%1$d new messages</item>
    </plurals>
</resources>
要将复数形式作为 String 访问,请使用以下代码:
@Composable
fun pluralStringResource(resource: PluralStringResource, quantity: Int): String {...}

@Composable
fun pluralStringResource(resource: PluralStringResource, quantity: Int, vararg formatArgs: Any): String {...}
例如:
Text(pluralStringResource(Res.plurals.new_message, 1, 1))suspend fun getPluralString(resource: PluralStringResource, quantity: Int): String
suspend fun getPluralString(resource: PluralStringResource, quantity: Int, vararg formatArgs: Any): String例如:
coroutineScope.launch {
    val appName = getPluralString(Res.plurals.new_message, 1, 1)
}
在安装了 Kotlin Multiplatform 插件的 IDE 中, 你可以使用类 Emmet 语法生成复数资源。 例如,使用 plurals、p 或 : 生成默认的空字符串模板。 如果在 values-en/strings.xml 中工作,IDE 会自动检测区域性、所需的数量,以及英语只需要 one 和 other。 键入 p.test 或 plurals.test 并按 Tab 键将缩写展开为 plurals 块:
<plurals name="test">
    <item quantity="one"></item>
    <item quantity="other"></item>
</plurals>
字体
将自定义字体存储在 composeResources/font 目录中。 Compose Multiplatform 在所有平台上均支持 TTF、OTF、TTC 以及可变字体格式。 WOFF 和 WOFF2 仅在 Web 和 macOS 上可用。
要将字体作为 Font 类型加载,请使用 Font() 可组合函数:
@Composable
fun Font(
    resource: FontResource,
    weight: FontWeight = FontWeight.Normal,
    style: FontStyle = FontStyle.Normal
): Font
例如:
@Composable private fun InterTypography(): Typography { val interFont = FontFamily( {...}
@Composable
private fun InterTypography(): Typography {
    val interFont = FontFamily(
        Font(Res.font.Inter_24pt_Regular, FontWeight.Normal),
        Font(Res.font.Inter_24pt_SemiBold, FontWeight.Bold),
    )

    return with(MaterialTheme.typography) {
        copy(
            displayLarge = displayLarge.copy(fontFamily = interFont, fontWeight = FontWeight.Bold),
            displayMedium = displayMedium.copy(fontFamily = interFont, fontWeight = FontWeight.Bold),
            displaySmall = displaySmall.copy(fontFamily = interFont, fontWeight = FontWeight.Bold),
            headlineLarge = headlineLarge.copy(fontFamily = interFont, fontWeight = FontWeight.Bold),
            headlineMedium = headlineMedium.copy(fontFamily = interFont, fontWeight = FontWeight.Bold),
            headlineSmall = headlineSmall.copy(fontFamily = interFont, fontWeight = FontWeight.Bold),
            titleLarge = titleLarge.copy(fontFamily = interFont, fontWeight = FontWeight.Bold),
            titleMedium = titleMedium.copy(fontFamily = interFont, fontWeight = FontWeight.Bold),
            titleSmall = titleSmall.copy(fontFamily = interFont, fontWeight = FontWeight.Bold),
            labelLarge = labelLarge.copy(fontFamily = interFont, fontWeight = FontWeight.Normal),
            labelMedium = labelMedium.copy(fontFamily = interFont, fontWeight = FontWeight.Normal),
            labelSmall = labelSmall.copy(fontFamily = interFont, fontWeight = FontWeight.Normal),
            bodyLarge = bodyLarge.copy(fontFamily = interFont, fontWeight = FontWeight.Normal),
            bodyMedium = bodyMedium.copy(fontFamily = interFont, fontWeight = FontWeight.Normal),
            bodySmall = bodySmall.copy(fontFamily = interFont, fontWeight = FontWeight.Normal),
        )
    }
}
当 Font 为可组合项时,请确保其依赖组件(例如 TextStyle 和 Typography)也是可组合项。
在 Web 目标中,通过字体自动回退机制可自动支持表情符号和阿拉伯文字等特殊字符,该机制会按需下载所需的 Noto 字体。
如果你需要完全控制所使用的字体,请捆绑特定字体并使用预加载 API手动注册它。
原始文件
要将任何原始文件作为字节数组加载,请使用 Res.readBytes(path) 函数:
suspend fun readBytes(path: String): ByteArray你可以将原始文件放在 composeResources/files 目录中,并在其中创建任何层级结构。
例如,要访问原始文件,请使用以下代码:
var bytes by remember {
    mutableStateOf(ByteArray(0))
}
LaunchedEffect(Unit) {
    bytes = Res.readBytes("files/myDir/someFile.bin")
}
Text(bytes.decodeToString())coroutineScope.launch {
val bytes = Res.readBytes("files/myDir/someFile.bin")
}将字节数组转换为图像
如果你读取的文件是位图(JPEG、PNG、BMP、WEBP)或 XML 矢量图像,可以使用以下函数将其转换为适用于 Image() 可组合项的 ImageBitmap 或 ImageVector 对象。
按照原始文件部分所示访问原始文件,然后将结果传递给可组合项:
// bytes = Res.readBytes("files/example.png")
Image(bytes.decodeToImageBitmap(), null)

// bytes = Res.readBytes("files/example.xml")
Image(bytes.decodeToImageVector(LocalDensity.current), null)
在除 Android 之外的所有平台上,你还可以将 SVG 文件转换为 Painter 对象:
// bytes = Res.readBytes("files/example.svg")
Image(bytes.decodeToSvgPainter(LocalDensity.current), null)
为资源和字符串 ID 生成的映射
为了便于访问,Compose Multiplatform 还提供了通过字符串 ID 映射资源的功能。你可以使用文件名作为键来访问它们:
val Res.allDrawableResources: Map<String, DrawableResource>
val Res.allStringResources: Map<String, StringResource>
val Res.allStringArrayResources: Map<String, StringArrayResource>
val Res.allPluralStringResources: Map<String, PluralStringResource>
val Res.allFontResources: Map<String, FontResource>
将映射资源传递给可组合项的示例:
Image(painterResource(Res.allDrawableResources["compose_multiplatform"]!!), null)将 Compose Multiplatform 资源用作 Android 资产
从 Compose Multiplatform 1.7.0 开始,所有多平台资源都会打包到 Android 资产(assets)中。 这使得 Android Studio 能够为 Android 源集中的 Compose Multiplatform 可组合项生成预览。
Android Studio 预览仅适用于 Android 源集中的可组合项。 它们还需要以下最新版本的 AGP 之一:8.5.2、8.6.0-rc01 或 8.7.0-alpha04。
将多平台资源用作 Android 资产还使得在 Android 上直接从 WebView 和媒体播放器组件进行访问成为可能,因为可以通过简单的路径访问资源,例如 Res.getUri("files/index.html")。
Android 可组合项显示带有指向资源图像链接的资源 HTML 页面的示例:
AndroidView(factory = { WebView(it).apply {...}
// androidMain/kotlin/com/example/webview/App.kt
@OptIn(ExperimentalResourceApi::class)
@Composable
@Preview
fun App() {
    MaterialTheme {
        val uri = Res.getUri("files/webview/index.html")

        // 在 AndroidView 中添加 WebView,布局设置为全屏。
        AndroidView(factory = {
            WebView(it).apply {
                layoutParams = ViewGroup.LayoutParams(
                    ViewGroup.LayoutParams.MATCH_PARENT,
                    ViewGroup.LayoutParams.MATCH_PARENT
                )
            }
        }, update = {
            it.loadUrl(uri)
        })
    }
}
该示例适用于以下简单 HTML 文件:
<title>Cat Resource</title> {...}
<html>
<header>
    <title>
        Cat Resource
    </title>
</header>
<body>
    <img src="cat.jpg">
</body>
</html>
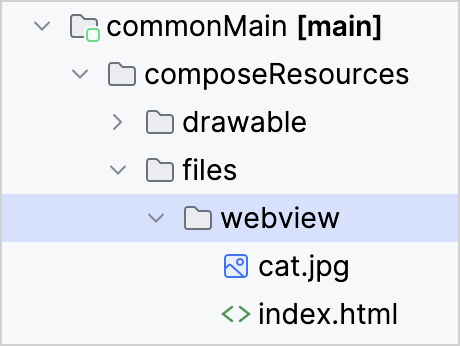
本例中的两个资源文件都位于 commonMain 源集中:
与其他库和资源的交互
从外部库访问多平台资源
如果你想使用项目中包含的其他库处理多平台资源,可以将平台专属的文件路径传递给这些其他 API。 要获取平台专属路径,请调用 Res.getUri() 函数并传入资源的项目路径:
val uri = Res.getUri("files/my_video.mp4")现在 uri 变量包含了文件的绝对路径,任何外部库都可以使用该路径以适合它的方式访问该文件。
针对 Android 专属的用法,多平台资源也会打包为 Android 资产。
远程文件
在资源库的上下文中,只有属于应用程序一部分的文件才被视为资源。
你可以使用专门的库通过其 URL 从互联网加载远程文件:
如果你手动下载图像或读取其字节,请使用资源库的解码函数进行转换。有关在桌面应用中加载网络图像的示例,请参阅在 Compose Multiplatform 桌面端中使用图像。
如果你自行下载或读取图像的字节,请使用资源库的解码函数将其转换为图像。 有关在桌面应用程序中从网络加载图像的示例,请参阅在 Compose Multiplatform 桌面端中使用图像教程。
使用 Java 资源
虽然可以在 Compose Multiplatform 中使用 Java 资源,但它们无法享受框架提供的扩展功能:生成的访问器、多模块支持、本地化等。 建议完全过渡到多平台资源库以释放这些潜力。
在 Compose Multiplatform 1.7.0 中,compose.ui 软件包中提供的资源 API 已弃用。 如果你仍需使用 Java 资源,请将以下实现复制到项目中,以确保在升级到 Compose Multiplatform 1.7.0 或更高版本后代码仍可正常工作:
internal fun painterResource(resourcePath: String): Painter {...}
@Composable
internal fun painterResource(
    resourcePath: String
): Painter = when (resourcePath.substringAfterLast(".")) {
    "svg" -> rememberSvgResource(resourcePath)
    "xml" -> rememberVectorXmlResource(resourcePath)
    else -> rememberBitmapResource(resourcePath)
}

@Composable
internal fun rememberBitmapResource(path: String): Painter {
    return remember(path) { BitmapPainter(readResourceBytes(path).decodeToImageBitmap()) }
}

@Composable
internal fun rememberVectorXmlResource(path: String): Painter {
    val density = LocalDensity.current
    val imageVector = remember(density, path) { readResourceBytes(path).decodeToImageVector(density) }
    return rememberVectorPainter(imageVector)
}

@Composable
internal fun rememberSvgResource(path: String): Painter {
    val density = LocalDensity.current
    return remember(density, path) { readResourceBytes(path).decodeToSvgPainter(density) }
}

private object ResourceLoader
private fun readResourceBytes(resourcePath: String) =
    ResourceLoader.javaClass.classLoader.getResourceAsStream(resourcePath).readAllBytes()