
코루틴 컨텍스트와 디스패처
코루틴은 항상 Kotlin 표준 라이브러리에 정의된 CoroutineContext 타입의 값으로 표현되는 특정 컨텍스트 안에서 실행됩니다.
코루틴 컨텍스트는 여러 요소의 집합입니다. 주요 요소로는 이전에 살펴본 코루틴의 Job과 이번 섹션에서 다룰 디스패처가 있습니다.
디스패처와 스레드
코루틴 컨텍스트에는 해당 코루틴의 실행에 사용할 스레드(들)를 결정하는 코루틴 디스패처(참조: CoroutineDispatcher)가 포함되어 있습니다. 코루틴 디스패처는 코루틴 실행을 특정 스레드로 제한하거나, 스레드 풀로 디스패치하거나, 제한 없이 실행되도록 둘 수 있습니다.
launch 및 async와 같은 모든 코루틴 빌더는 새로운 코루틴을 위한 디스패처 및 기타 컨텍스트 요소를 명시적으로 지정할 수 있는 선택적 CoroutineContext 파라미터를 허용합니다.
다음 예제를 살펴보세요:
import kotlinx.coroutines.*

fun main() = runBlocking<Unit> {
    launch { // context of the parent, main runBlocking coroutine
        println("main runBlocking      : I'm working in thread ${Thread.currentThread().name}")
    }
    launch(Dispatchers.Unconfined) { // not confined -- will work with main thread
        println("Unconfined            : I'm working in thread ${Thread.currentThread().name}")
    }
    launch(Dispatchers.Default) { // will get dispatched to DefaultDispatcher
        println("Default               : I'm working in thread ${Thread.currentThread().name}")
    }
    launch(newSingleThreadContext("MyOwnThread")) { // will get its own new thread
        println("newSingleThreadContext: I'm working in thread ${Thread.currentThread().name}")
    }
}
전체 코드는 여기에서 확인할 수 있습니다.
이 코드는 다음과 같은 출력을 생성합니다(순서는 다를 수 있습니다):
Unconfined            : I'm working in thread main
Default               : I'm working in thread DefaultDispatcher-worker-1
newSingleThreadContext: I'm working in thread MyOwnThread
main runBlocking      : I'm working in thread main
launch { ... }가 파라미터 없이 사용되면, 자신이 실행되는 CoroutineScope로부터 컨텍스트(따라서 디스패처도)를 상속받습니다. 이 경우, main 스레드에서 실행되는 메인 runBlocking 코루틴의 컨텍스트를 상속받습니다.
Dispatchers.Unconfined는 main 스레드에서 실행되는 것처럼 보이는 특수한 디스패처이지만, 실제로는 나중에 설명할 다른 메커니즘으로 동작합니다.
스코프에 다른 디스패처가 명시적으로 지정되지 않은 경우에는 기본 디스패처가 사용됩니다. 이는 Dispatchers.Default로 표현되며, 공유 백그라운드 스레드 풀을 사용합니다.
newSingleThreadContext는 코루틴이 실행될 전용 스레드를 생성합니다. 전용 스레드는 매우 값비싼 리소스입니다. 실제 애플리케이션에서는 더 이상 필요하지 않을 때 close 함수를 사용하여 해제하거나, 최상위 변수에 저장하여 애플리케이션 전반에서 재사용해야 합니다.
Unconfined 디스패처와 Confined 디스패처
Dispatchers.Unconfined 코루틴 디스패처는 호출자 스레드에서 코루틴을 시작하지만, 첫 번째 일시 중단점까지만 그렇게 동작합니다. 일시 중단 후에는 호출된 중단 함수에 의해 전적으로 결정되는 스레드에서 코루틴이 재개됩니다. Unconfined 디스패처는 CPU 시간을 소모하지 않거나 특정 스레드에 국한된 공유 데이터(예: UI)를 업데이트하지 않는 코루틴에 적합합니다.
반면에 디스패처는 기본적으로 외부 CoroutineScope로부터 상속됩니다. 특히 runBlocking 코루틴의 기본 디스패처는 호출자 스레드로 제한(confined)되므로, 이를 상속받으면 예측 가능한 FIFO 스케줄링을 통해 해당 스레드로 실행이 제한되는 효과가 있습니다.
import kotlinx.coroutines.*

fun main() = runBlocking<Unit> {
    launch(Dispatchers.Unconfined) { // not confined -- will work with main thread
        println("Unconfined      : I'm working in thread ${Thread.currentThread().name}")
        delay(500)
        println("Unconfined      : After delay in thread ${Thread.currentThread().name}")
    }
    launch { // context of the parent, main runBlocking coroutine
        println("main runBlocking: I'm working in thread ${Thread.currentThread().name}")
        delay(1000)
        println("main runBlocking: After delay in thread ${Thread.currentThread().name}")
    }
}
전체 코드는 여기에서 확인할 수 있습니다.
출력 결과는 다음과 같습니다:
Unconfined      : I'm working in thread main
main runBlocking: I'm working in thread main
Unconfined      : After delay in thread kotlinx.coroutines.DefaultExecutor
main runBlocking: After delay in thread main
따라서 runBlocking {...}에서 컨텍스트를 상속받은 코루틴은 main 스레드에서 계속 실행되는 반면, unconfined 코루틴은 delay 함수가 사용하는 기본 executor 스레드에서 재개됩니다.
Unconfined 디스패처는 코루틴 내의 일부 작업을 즉시 수행해야 해서 나중에 실행하도록 디스패치할 필요가 없거나 디스패치 시 바람직하지 않은 부작용이 발생하는 특수한 코너 케이스에 유용할 수 있는 고급 메커니즘입니다. 일반적인 코드에서는 Unconfined 디스패처를 사용하지 않는 것이 좋습니다.
코루틴 및 스레드 디버깅
코루틴은 한 스레드에서 일시 중단되었다가 다른 스레드에서 재개될 수 있습니다. 단일 스레드 디스패처를 사용하더라도 전용 도구가 없다면 코루틴이 무엇을, 어디서, 언제 수행하고 있었는지 파악하기 어려울 수 있습니다.
IDEA를 사용한 디버깅
Kotlin 플러그인의 Coroutine Debugger는 IntelliJ IDEA에서 코루틴을 쉽게 디버깅할 수 있도록 지원합니다.
디버깅 기능은 kotlinx-coroutines-core 1.3.8 이상 버전에서 동작합니다.
Debug 도구 창에는 Coroutines 탭이 포함되어 있습니다. 이 탭에서 현재 실행 중인 코루틴과 일시 중단된 코루틴 모두에 대한 정보를 확인할 수 있습니다. 코루틴은 실행 중인 디스패처별로 그룹화됩니다.
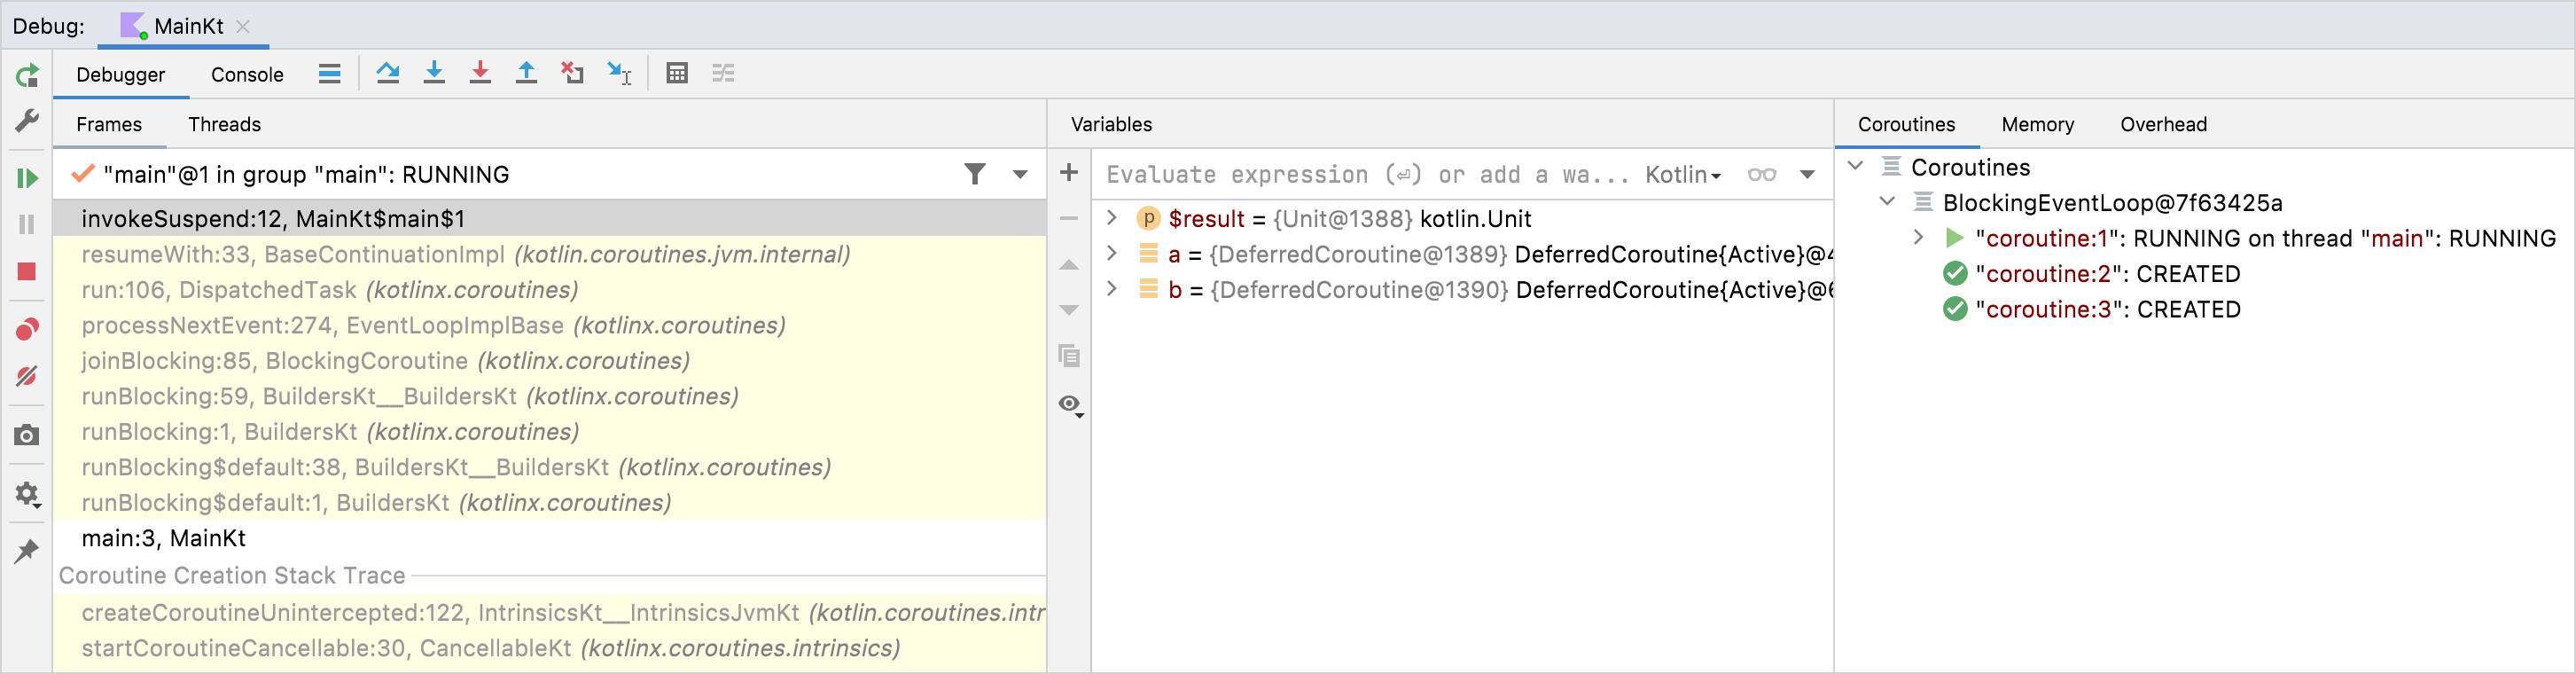
코루틴 디버거를 사용하면 다음과 같은 작업을 수행할 수 있습니다:
- 각 코루틴의 상태 확인.
- 실행 중인 코루틴과 일시 중단된 코루틴 모두에 대한 지역 변수 및 캡처된 변수 값 확인.
- 코루틴의 전체 생성 스택 및 코루틴 내부의 호출 스택 확인. 이 스택에는 표준 디버깅 중에 유실될 수 있는 변수 값이 포함된 모든 프레임이 포함됩니다.
- 각 코루틴의 상태와 스택이 포함된 전체 보고서 가져오기. 이를 얻으려면 Coroutines 탭 내부를 마우스 오른쪽 버튼으로 클릭한 후 Get Coroutines Dump를 클릭하세요.
코루틴 디버깅을 시작하려면 중단점(breakpoint)을 설정하고 애플리케이션을 디버그 모드로 실행하기만 하면 됩니다.
코루틴 디버깅에 대한 자세한 내용은 튜토리얼에서 확인할 수 있습니다.
로깅을 사용한 디버깅
Coroutine Debugger 없이 스레드를 사용하는 애플리케이션을 디버깅하는 또 다른 방법은 각 로그 출력 시 로그 파일에 스레드 이름을 출력하는 것입니다. 이 기능은 로깅 프레임워크에서 보편적으로 지원됩니다. 하지만 코루틴을 사용할 때는 스레드 이름만으로는 충분한 컨텍스트를 얻기 어려우므로, kotlinx.coroutines는 이를 더 쉽게 만들어 주는 디버깅 기능을 포함하고 있습니다.
-Dkotlinx.coroutines.debug JVM 옵션을 사용하여 다음 코드를 실행해 보세요:
import kotlinx.coroutines.*

fun log(msg: String) = println("[${Thread.currentThread().name}] $msg")

fun main() = runBlocking<Unit> {
    val a = async {
        log("I'm computing a piece of the answer")
        6
    }
    val b = async {
        log("I'm computing another piece of the answer")
        7
    }
    log("The answer is ${a.await() * b.await()}")
}
전체 코드는 여기에서 확인할 수 있습니다.
여기에는 세 개의 코루틴이 있습니다. runBlocking 내부의 메인 코루틴(#1)과 지연된 값(deferred value) a(#2) 및 b(#3)를 계산하는 두 개의 코루틴입니다. 이들은 모두 runBlocking 컨텍스트에서 실행되며 메인 스레드로 제한되어 있습니다. 이 코드의 출력 결과는 다음과 같습니다:
[main @coroutine#2] I'm computing a piece of the answer
[main @coroutine#3] I'm computing another piece of the answer
[main @coroutine#1] The answer is 42
log 함수는 대괄호 안에 스레드 이름을 출력하며, main 스레드 뒤에 현재 실행 중인 코루틴의 식별자가 덧붙여진 것을 확인할 수 있습니다. 디버깅 모드가 켜져 있을 때 이 식별자는 생성되는 모든 코루틴에 순차적으로 할당됩니다.
디버깅 모드는 JVM이 -ea 옵션으로 실행될 때도 활성화됩니다. 디버깅 기능에 대한 자세한 내용은 DEBUG_PROPERTY_NAME 프로퍼티 문서에서 확인할 수 있습니다.
스레드 간 이동
-Dkotlinx.coroutines.debug JVM 옵션을 사용하여 다음 코드를 실행해 보세요(디버깅 참조):
import kotlinx.coroutines.*

fun log(msg: String) = println("[${Thread.currentThread().name}] $msg")

fun main() {
    newSingleThreadContext("Ctx1").use { ctx1 ->
        newSingleThreadContext("Ctx2").use { ctx2 ->
            runBlocking(ctx1) {
                log("Started in ctx1")
                withContext(ctx2) {
                    log("Working in ctx2")
                }
                log("Back to ctx1")
            }
        }
    }
}
전체 코드는 여기에서 확인할 수 있습니다.
위 예제는 코루틴 사용에 있어 새로운 기법들을 보여줍니다.
첫 번째 기법은 지정된 컨텍스트와 함께 runBlocking을 사용하는 방법입니다.
두 번째 기법은 withContext를 호출하는 것으로, 새로운 컨텍스트가 기존 컨텍스트와 다를 경우 현재 코루틴을 일시 중단하고 새 컨텍스트로 전환할 수 있습니다. 구체적으로 다른 CoroutineDispatcher를 지정하면 추가적인 디스패치가 필요합니다. 즉, 블록이 새 디스패처에 스케줄링되고, 실행이 완료되면 원래 디스패처로 돌아갑니다.
그 결과, 위 코드의 출력은 다음과 같습니다:
[Ctx1 @coroutine#1] Started in ctx1
[Ctx2 @coroutine#1] Working in ctx2
[Ctx1 @coroutine#1] Back to ctx1
위 예제에서는 Kotlin 표준 라이브러리의 use 함수를 사용하여 newSingleThreadContext로 생성된 스레드 리소스가 더 이상 필요하지 않을 때 적절히 해제되도록 합니다.
컨텍스트 안의 Job
코루틴의 Job은 해당 컨텍스트의 일부이며, coroutineContext[Job] 표현식을 사용하여 컨텍스트로부터 조회할 수 있습니다:
import kotlinx.coroutines.*

fun main() = runBlocking<Unit> {
    println("My job is ${coroutineContext[Job]}")
}
전체 코드는 여기에서 확인할 수 있습니다.
디버그 모드에서는 다음과 같은 출력이 생성됩니다:
My job is "coroutine#1":BlockingCoroutine{Active}@6d311334CoroutineScope의 isActive는 coroutineContext[Job]?.isActive == true의 편리한 단축 표현일 뿐입니다.
자식 코루틴
코루틴이 다른 코루틴의 CoroutineScope 내에서 실행되면 CoroutineScope.coroutineContext를 통해 컨텍스트를 상속받으며, 새 코루틴의 Job은 부모 코루틴 Job의 _자식(child)_이 됩니다. 부모 코루틴이 취소되면 그 모든 자식 코루틴도 재귀적으로 취소됩니다.
그러나 이러한 부모-자식 관계는 다음 두 가지 방법 중 하나로 명시적으로 재정의할 수 있습니다:
- 코루틴을 실행할 때 다른 스코프를 명시적으로 지정하는 경우(예:
GlobalScope.launch), 부모 스코프로부터Job을 상속받지 않습니다. - 새 코루틴의 컨텍스트로 다른
Job객체를 전달하는 경우(아래 예제 참조), 부모 스코프의Job을 덮어씁니다.
두 경우 모두, 실행된 코루틴은 자신이 실행된 스코프에 묶이지 않고 독립적으로 작동합니다.
import kotlinx.coroutines.*

fun main() = runBlocking<Unit> {
    // launch a coroutine to process some kind of incoming request
    val request = launch {
        // it spawns two other jobs
        launch(Job()) {
            println("job1: I run in my own Job and execute independently!")
            delay(1000)
            println("job1: I am not affected by cancellation of the request")
        }
        // and the other inherits the parent context
        launch {
            delay(100)
            println("job2: I am a child of the request coroutine")
            delay(1000)
            println("job2: I will not execute this line if my parent request is cancelled")
        }
    }
    delay(500)
    request.cancel() // cancel processing of the request
    println("main: Who has survived request cancellation?")
    delay(1000) // delay the main thread for a second to see what happens
}
전체 코드는 여기에서 확인할 수 있습니다.
이 코드의 출력 결과는 다음과 같습니다:
job1: I run in my own Job and execute independently!
job2: I am a child of the request coroutine
main: Who has survived request cancellation?
job1: I am not affected by cancellation of the request
부모의 책임
부모 코루틴은 항상 모든 자식의 완료를 기다립니다. 부모는 자신이 실행한 모든 자식을 명시적으로 추적할 필요가 없으며, 마지막에 이들을 기다리기 위해 Job.join을 사용할 필요도 없습니다:
import kotlinx.coroutines.*

fun main() = runBlocking<Unit> {
    // launch a coroutine to process some kind of incoming request
    val request = launch {
        repeat(3) { i -> // launch a few children jobs
            launch  {
                delay((i + 1) * 200L) // variable delay 200ms, 400ms, 600ms
                println("Coroutine $i is done")
            }
        }
        println("request: I'm done and I don't explicitly join my children that are still active")
    }
    request.join() // wait for completion of the request, including all its children
    println("Now processing of the request is complete")
}
전체 코드는 여기에서 확인할 수 있습니다.
결과는 다음과 같이 출력됩니다:
request: I'm done and I don't explicitly join my children that are still active
Coroutine 0 is done
Coroutine 1 is done
Coroutine 2 is done
Now processing of the request is complete
디버깅을 위한 코루틴 명명
자동으로 할당되는 ID는 코루틴이 자주 로그를 남기고 동일한 코루틴에서 발생한 로그 기록을 서로 연결하기만 하면 될 때 유용합니다. 하지만 코루틴이 특정 요청의 처리나 특정한 백그라운드 작업을 전담하고 있는 경우에는 디버깅 목적으로 이름을 명시적으로 지정하는 것이 더 좋습니다. CoroutineName 컨텍스트 요소는 스레드 이름과 동일한 역할을 합니다. 디버깅 모드가 켜져 있을 때 이 코루틴을 실행하는 스레드 이름에 포함됩니다.
다음 예제는 이 개념을 보여줍니다:
import kotlinx.coroutines.*

fun log(msg: String) = println("[${Thread.currentThread().name}] $msg")

fun main() = runBlocking(CoroutineName("main")) {
    log("Started main coroutine")
    // run two background value computations
    val v1 = async(CoroutineName("v1coroutine")) {
        delay(500)
        log("Computing v1")
        6
    }
    val v2 = async(CoroutineName("v2coroutine")) {
        delay(1000)
        log("Computing v2")
        7
    }
    log("The answer for v1 * v2 = ${v1.await() * v2.await()}")
}
전체 코드는 여기에서 확인할 수 있습니다.
-Dkotlinx.coroutines.debug JVM 옵션과 함께 출력되는 결과는 다음과 유사합니다:
[main @main#1] Started main coroutine
[main @v1coroutine#2] Computing v1
[main @v2coroutine#3] Computing v2
[main @main#1] The answer for v1 * v2 = 42
컨텍스트 요소 결합
때로는 코루틴 컨텍스트에 여러 요소를 정의해야 할 때가 있습니다. 이를 위해 + 연산자를 사용할 수 있습니다. 예를 들어, 명시적으로 지정된 디스패처와 명시적으로 지정된 이름을 동시에 적용하여 코루틴을 실행할 수 있습니다:
import kotlinx.coroutines.*

fun main() = runBlocking<Unit> {
    launch(Dispatchers.Default + CoroutineName("test")) {
        println("I'm working in thread ${Thread.currentThread().name}")
    }
}
전체 코드는 여기에서 확인할 수 있습니다.
-Dkotlinx.coroutines.debug JVM 옵션을 적용한 이 코드의 출력 결과는 다음과 같습니다:
I'm working in thread DefaultDispatcher-worker-1 @test#2코루틴 스코프
컨텍스트, 자식 코루틴, Job에 대해 배운 지식을 종합해 봅시다. 수명 주기(lifecycle)를 갖는 객체가 애플리케이션에 있지만, 그 객체 자체가 코루틴은 아니라고 가정해 보겠습니다. 예를 들어 Android 애플리케이션을 작성하면서 Android 액티비티 컨텍스트에서 다양한 코루틴을 실행하여 데이터를 가져오고 업데이트하는 비동기 작업이나 애니메이션 등을 수행하는 경우가 있습니다. 이러한 코루틴은 메모리 누수를 방지하기 위해 액티비티가 파괴될 때 취소되어야 합니다. 물론 액티비티와 코루틴의 수명 주기를 연결하기 위해 컨텍스트와 Job을 수동으로 조작할 수도 있지만, kotlinx.coroutines는 이를 캡슐화한 추상화인 CoroutineScope를 제공합니다. 모든 코루틴 빌더가 이 스코프의 확장 함수로 선언되어 있으므로 이미 코루틴 스코프에 익숙할 것입니다.
우리는 액티비티의 수명 주기에 바인딩된 CoroutineScope 인스턴스를 생성하여 코루틴의 수명 주기를 관리합니다. CoroutineScope 인스턴스는 CoroutineScope() 또는 MainScope() 팩토리 함수를 통해 생성할 수 있습니다. 전자는 범용 스코프를 생성하는 반면, 후자는 UI 애플리케이션을 위한 스코프를 생성하며 Dispatchers.Main을 기본 디스패처로 사용합니다:
class Activity {
    private val mainScope = MainScope()

    fun destroy() {
        mainScope.cancel()
    }
    // to be continued ...
이제 정의된 mainScope를 사용하여 이 Activity 스코프 내에서 코루틴을 실행할 수 있습니다. 데모를 위해 서로 다른 시간 동안 대기하는 10개의 코루틴을 실행해 보겠습니다:
    // class Activity continues
    fun doSomething() {
        // launch ten coroutines for a demo, each working for a different time
        repeat(10) { i ->
            mainScope.launch {
                delay((i + 1) * 200L) // variable delay 200ms, 400ms, ... etc
                println("Coroutine $i is done")
            }
        }
    }
} // class Activity ends
메인 함수에서는 액티비티를 생성하고, 테스트 함수 doSomething을 호출한 뒤, 500ms 후에 액티비티를 파괴합니다. 이렇게 하면 doSomething에서 실행된 모든 코루틴이 취소됩니다. 조금 더 기다려 보아도 액티비티 파괴 이후에는 더 이상 메시지가 출력되지 않는 것을 통해 이를 확인할 수 있습니다.
import kotlinx.coroutines.*

class Activity {
    private val mainScope = CoroutineScope(Dispatchers.Default) // use Default for test purposes

    fun destroy() {
        mainScope.cancel()
    }

    fun doSomething() {
        // launch ten coroutines for a demo, each working for a different time
        repeat(10) { i ->
            mainScope.launch {
                delay((i + 1) * 200L) // variable delay 200ms, 400ms, ... etc
                println("Coroutine $i is done")
            }
        }
    }
} // class Activity ends

fun main() = runBlocking<Unit> {
    val activity = Activity()
    activity.doSomething() // run test function
    println("Launched coroutines")
    delay(500L) // delay for half a second
    println("Destroying activity!")
    activity.destroy() // cancels all coroutines
    delay(1000) // visually confirm that they don't work
}
전체 코드는 여기에서 확인할 수 있습니다.
이 예제의 출력은 다음과 같습니다:
Launched coroutines
Coroutine 0 is done
Coroutine 1 is done
Destroying activity!
보시다시피 처음 두 코루틴만 메시지를 출력하고, 나머지는 Activity.destroy() 내의 단 한 번의 mainScope.cancel() 호출로 취소되었습니다.
Android는 수명 주기를 갖는 모든 엔티티에 대해 코루틴 스코프를 기본적으로(first-party) 지원합니다. 해당 문서를 참조하세요.
스레드 로컬 데이터
때로는 스레드 로컬(Thread-local) 데이터를 코루틴에 전달하거나 코루틴 간에 전달할 수 있으면 편리합니다. 그러나 코루틴은 특정 스레드에 바인딩되지 않으므로, 이를 수동으로 처리하면 보일러플레이트 코드가 발생하기 쉽습니다.
ThreadLocal을 위해 asContextElement 확장 함수가 구원투수로 제공됩니다. 이 함수는 주어진 ThreadLocal의 값을 유지하고 코루틴이 컨텍스트를 전환할 때마다 이를 복원하는 추가 컨텍스트 요소를 생성합니다.
실제 동작 방식을 쉽게 확인할 수 있습니다:
import kotlinx.coroutines.*

val threadLocal = ThreadLocal<String?>() // declare thread-local variable

fun main() = runBlocking<Unit> {
    threadLocal.set("main")
    println("Pre-main, current thread: ${Thread.currentThread()}, thread local value: '${threadLocal.get()}'")
    val job = launch(Dispatchers.Default + threadLocal.asContextElement(value = "launch")) {
        println("Launch start, current thread: ${Thread.currentThread()}, thread local value: '${threadLocal.get()}'")
        yield()
        println("After yield, current thread: ${Thread.currentThread()}, thread local value: '${threadLocal.get()}'")
    }
    job.join()
    println("Post-main, current thread: ${Thread.currentThread()}, thread local value: '${threadLocal.get()}'")
}
전체 코드는 여기에서 확인할 수 있습니다.
이 예제에서는 Dispatchers.Default를 사용하여 백그라운드 스레드 풀에서 새 코루틴을 실행하므로 스레드 풀의 서로 다른 스레드에서 작업이 수행되지만, 코루틴이 어느 스레드에서 실행되든 상관없이 threadLocal.asContextElement(value = "launch")로 지정한 스레드 로컬 변수의 값을 계속 유지합니다. 따라서 디버그 모드에서의 출력 결과는 다음과 같습니다:
Pre-main, current thread: Thread[main @coroutine#1,5,main], thread local value: 'main'
Launch start, current thread: Thread[DefaultDispatcher-worker-1 @coroutine#2,5,main], thread local value: 'launch'
After yield, current thread: Thread[DefaultDispatcher-worker-2 @coroutine#2,5,main], thread local value: 'launch'
Post-main, current thread: Thread[main @coroutine#1,5,main], thread local value: 'main'
해당 컨텍스트 요소를 설정하는 것을 잊어버리기 쉽습니다. 코루틴을 실행하는 스레드가 다른 경우 코루틴에서 접근한 스레드 로컬 변수가 예상치 못한 값을 가질 수 있습니다. 이러한 상황을 방지하려면 ensurePresent 메서드를 사용하여 올바르지 않은 사용에 대해 즉각적인 실패(fail-fast) 처리를 하는 것이 좋습니다.
ThreadLocal은 최고 수준의 지원(first-class support)을 받으며 kotlinx.coroutines가 제공하는 모든 기본 요소와 함께 사용할 수 있습니다. 그러나 한 가지 중요한 제한 사항이 있습니다. 스레드 로컬 변수가 변경(mutate)되더라도 새 값이 코루틴 호출자에게 전파되지 않으며(컨텍스트 요소가 모든 ThreadLocal 객체 접근을 추적할 수 없기 때문), 업데이트된 값은 다음 일시 중단 시 손실됩니다. 코루틴에서 스레드 로컬 값을 업데이트하려면 withContext를 사용하세요. 자세한 내용은 asContextElement를 참조하세요.
또는 class Counter(var i: Int)와 같은 가변 박스에 값을 저장한 후, 이를 스레드 로컬 변수에 저장할 수도 있습니다. 그러나 이 경우 이 가변 박스에 있는 변수에 대한 잠재적인 동시 수정을 동기화할 책임은 전적으로 사용자에게 있습니다.
로깅 MDC 연동, 트랜잭션 컨텍스트 또는 데이터 전달을 위해 내부적으로 스레드 로컬을 사용하는 기타 라이브러리와의 통합과 같은 고급 사용법의 경우, 구현해야 하는 ThreadContextElement 인터페이스 문서를 참조하세요.