
Kotlin と JUnit を使用して Java コードをテストする – チュートリアル
Kotlin は Java と完全な相互運用性があるため、Kotlin を使用して Java コードのテストを記述し、同じプロジェクト内で既存の Java テストと一緒に実行できます。
このチュートリアルでは、次の方法を学びます:
- JUnit を使用してテストを実行するように Java と Kotlin の混在プロジェクトを設定する。
- Java コードを検証する Kotlin テストを追加する。
- Maven または Gradle を使用してテストを実行する。
開始する前に、以下が準備されていることを確認してください:
- IntelliJ IDEA、または Kotlin 拡張機能 がインストールされた VS Code。
- Java 17 以降。
プロジェクトの設定
IDE で、バージョン管理からサンプルプロジェクトをクローンします:
texthttps://github.com/kotlin-hands-on/kotlin-junit-sample.gitinitialモジュールに移動し、プロジェクト構造を確認します:textkotlin-junit-sample/ ├── initial/ │ ├── src/ │ │ ├── main/java/ # Java source code │ │ └── test/java/ # JUnit test in Java │ ├── pom.xml # Maven configuration │ └── build.gradle.kts # Gradle configurationinitialモジュールには、単一のテストを含む Java のシンプルな Todo アプリケーションが含まれています。同じディレクトリでビルドファイルを開き、Kotlin をサポートするように内容を更新します:
pom.xml file {...}
xml<?xml version="1.0" encoding="UTF-8"?> <project xmlns="http://maven.apache.org/POM/4.0.0" xmlns:xsi="http://www.w3.org/2001/XMLSchema-instance" xsi:schemaLocation="http://maven.apache.org/POM/4.0.0 http://maven.apache.org/xsd/maven-4.0.0.xsd"> <modelVersion>4.0.0</modelVersion> <groupId>org.jetbrains.kotlin</groupId> <artifactId>kotlin-junit-complete</artifactId> <version>1.0-SNAPSHOT</version> <name>kotlin-junit-complete</name> <url>https://kotlinlang.org/docs/jvm-test-using-junit.htm</url> <properties> <project.build.sourceEncoding>UTF-8</project.build.sourceEncoding> <maven.compiler.release>17</maven.compiler.release> <jexer.version>1.6.0</jexer.version> <kotlin.version>2.4.21</kotlin.version> </properties> <dependencyManagement> <dependencies> <dependency> <groupId>org.junit</groupId> <artifactId>junit-bom</artifactId> <version>6.0.3</version> <type>pom</type> <scope>import</scope> </dependency> </dependencies> </dependencyManagement> <dependencies> <dependency> <groupId>org.junit.jupiter</groupId> <artifactId>junit-jupiter-api</artifactId> <scope>test</scope> </dependency> <!-- Add JUnit Jupiter engine for test runtime --> <dependency> <groupId>org.junit.jupiter</groupId> <artifactId>junit-jupiter-engine</artifactId> <scope>test</scope> </dependency> <!-- Optionally: parameterized tests support --> <dependency> <groupId>org.junit.jupiter</groupId> <artifactId>junit-jupiter-params</artifactId> <scope>test</scope> </dependency> <dependency> <groupId>com.gitlab.klamonte</groupId> <artifactId>jexer</artifactId> <version>${jexer.version}</version> </dependency> </dependencies> <build> <pluginManagement><!-- Lock down plugin versions to avoid using Maven defaults (can be moved to a parent pom file) --> <plugins> <!-- Clean lifecycle, see https://maven.apache.org/ref/current/maven-core/lifecycles.html#clean_Lifecycle --> <plugin> <artifactId>maven-clean-plugin</artifactId> <version>3.4.0</version> </plugin> <!-- Default lifecycle, jar packaging: see https://maven.apache.org/ref/current/maven-core/default-bindings.html#Plugin_bindings_for_jar_packaging --> <plugin> <artifactId>maven-resources-plugin</artifactId> <version>3.3.1</version> </plugin> <plugin> <artifactId>maven-surefire-plugin</artifactId> <version>3.3.0</version> </plugin> <plugin> <artifactId>maven-jar-plugin</artifactId> <version>3.4.2</version> </plugin> <plugin> <artifactId>maven-install-plugin</artifactId> <version>3.1.2</version> </plugin> <plugin> <artifactId>maven-deploy-plugin</artifactId> <version>3.1.2</version> </plugin> <!-- Site lifecycle, see https://maven.apache.org/ref/current/maven-core/lifecycles.html#site_Lifecycle --> <plugin> <artifactId>maven-site-plugin</artifactId> <version>3.12.1</version> </plugin> <plugin> <artifactId>maven-project-info-reports-plugin</artifactId> <version>3.6.1</version> </plugin> <!-- No maven-compiler-plugin needed with Kotlin extensions --> </plugins> </pluginManagement> <plugins> <!-- Activate Kotlin Maven plugin for main and test sources --> <plugin> <groupId>org.jetbrains.kotlin</groupId> <artifactId>kotlin-maven-plugin</artifactId> <version>${kotlin.version}</version> <extensions>true</extensions> </plugin> </plugins> </build> </project><properties>セクションで、Kotlin のバージョンを設定します。<dependencies>セクションで、テストを実行するための JUnit Jupiter の依存関係を追加します。<build><plugins>セクションで、<extensions>をtrueに設定してkotlin-maven-pluginを適用します。これにより、対応する execution とkotlin-stdlibの依存関係がビルドに自動的に追加されます。- extensions を有効にした Kotlin Maven プラグインを使用する場合、
<build><pluginManagement>セクションにmaven-compiler-pluginを追加する必要はありません。
build.gradle.kts {...}
kotlin// build.gradle.kts group = "org.jetbrains.kotlin" version = "1.0-SNAPSHOT" description = "kotlin-junit-complete" java.sourceCompatibility = JavaVersion.VERSION_17 plugins { application kotlin("jvm") version "2.4.21" } kotlin { jvmToolchain(17) } application { mainClass.set("org.jetbrains.kotlin.junit.App") } repositories { mavenCentral() } dependencies { implementation("com.gitlab.klamonte:jexer:1.6.0") testImplementation(kotlin("test")) testImplementation(libs.org.junit.jupiter.junit.jupiter.api) testImplementation(libs.org.junit.jupiter.junit.jupiter.params) testRuntimeOnly(libs.org.junit.jupiter.junit.jupiter.engine) testRuntimeOnly(libs.org.junit.platform.junit.platform.launcher) } tasks.test { useJUnitPlatform() }plugins {}ブロックで、kotlin("jvm")プラグインを追加します。- Java のバージョンに合わせて JVM ツールチェーンのバージョンを設定します。
dependencies {}ブロックで、Kotlin のテストユーティリティを提供し、JUnit と統合するkotlin.testライブラリを追加します。
Kotlin/JVM は最新の安定版 JUnit バージョンである JUnit 6 をサポートしています。これは
gradle/libs.versions.tomlバージョンカタログで確認できます。バージョンカタログの使用を好む場合は、そこに
kotlin("jvm")プラグインを追加することもできます:libs.versions.toml {...}
toml# gradle/libs.versions.toml [versions] kotlin = "2.4.21" junit = "6.0.3" [libraries] org-junit-jupiter-junit-jupiter-api = { module = "org.junit.jupiter:junit-jupiter-api", version.ref = "junit" } org-junit-jupiter-junit-jupiter-params = { module = "org.junit.jupiter:junit-jupiter-params", version.ref = "junit" } org-junit-jupiter-junit-jupiter-engine = { module = "org.junit.jupiter:junit-jupiter-engine", version.ref = "junit" } org-junit-platform-junit-platform-launcher = { module = "org.junit.platform:junit-platform-launcher" } [plugins] kotlinJvm = { id = "org.jetbrains.kotlin.jvm", version.ref = "kotlin" }IDE でビルドファイルを再読み込みします。
ビルドファイルの設定に関する詳細な手順については、プロジェクトの設定 を参照してください。
初めての Kotlin テストを追加する
initial/src/test/java 内の TodoItemTest.java テストは、アイテムの作成、デフォルト値、一意の ID、状態の変化など、アプリの基本的な動作をすでに検証しています。
リポジトリレベルの振る舞いを検証する Kotlin テストを追加することで、テストカバレッジを広げることができます:
同じテストソースディレクトリである
initial/src/test/javaに移動します。Java テストと同じパッケージ内に
TodoRepositoryTest.ktファイルを作成します。フィールド宣言とセットアップ関数を含むテストクラスを作成します:
kotlinpackage org.jetbrains.kotlin.junit import org.junit.jupiter.api.BeforeEach import org.junit.jupiter.api.Assertions import org.junit.jupiter.api.Test import org.junit.jupiter.api.DisplayName internal class TodoRepositoryTest { lateinit var repository: TodoRepository lateinit var testItem1: TodoItem lateinit var testItem2: TodoItem @BeforeEach fun setUp() { repository = TodoRepository() testItem1 = TodoItem("Task 1", "Description 1") testItem2 = TodoItem("Task 2", "Description 2") } }- JUnit のアノテーションは Java と同様に Kotlin でも動作します。
- Kotlin では、
lateinitキーワード により、後から初期化される非 null プロパティを宣言できます。これにより、テスト内で null 許容型(TodoRepository?)を使用する必要がなくなります。
リポジトリの初期状態とそのサイズを確認するテストを
TodoRepositoryTestクラス内に追加します:kotlin@Test @DisplayName("Should start with empty repository") fun shouldStartEmpty() { Assertions.assertEquals(0, repository.size()) Assertions.assertTrue(repository.all.isEmpty()) }- Java の static インポートとは異なり、Jupiter の
Assertionsはクラスとしてインポートされ、アサーション関数の修飾子として使用されます。 .getAll()を呼び出す代わりに、Kotlin ではrepository.allのようにプロパティとして Java のゲッターにアクセスできます。
- Java の static インポートとは異なり、Jupiter の
すべてのアイテムのコピーの振る舞いを検証する別のテストを記述します:
kotlin@Test @DisplayName("Should return defensive copy of items") fun shouldReturnDefensiveCopy() { repository.add(testItem1) val items1 = repository.all val items2 = repository.all Assertions.assertNotSame(items1, items2) Assertions.assertThrows( UnsupportedOperationException::class.java ) { items1.clear() } Assertions.assertEquals(1, repository.size()) }- Kotlin クラスから Java のクラスオブジェクトを取得するには、
::class.javaを使用します。 - 複雑なアサーションは、特殊な行継続文字を使用せずに複数行に分割できます。
- Kotlin クラスから Java のクラスオブジェクトを取得するには、
ID によるアイテムの検索を検証するテストを追加します:
kotlin@Test @DisplayName("Should find item by ID") fun shouldFindItemById() { repository.add(testItem1) repository.add(testItem2) val found = repository.getById(testItem1.id()) Assertions.assertTrue(found.isPresent) Assertions.assertEquals(testItem1, found.get()) }Kotlin は Java の
OptionalAPI とスムーズに連携します。ゲッターメソッドが自動的にプロパティに変換されるため、ここではisPresent()メソッドがプロパティとしてアクセスされています。アイテムの削除メカニズムを検証するテストを記述します:
kotlin@Test @DisplayName("Should remove item by ID") fun shouldRemoveItemById() { repository.add(testItem1) repository.add(testItem2) val removed = repository.remove(testItem1.id()) Assertions.assertTrue(removed) Assertions.assertEquals(1, repository.size()) Assertions.assertTrue(repository.getById(testItem1.id()).isEmpty) Assertions.assertTrue(repository.getById(testItem2.id()).isPresent) } @Test @DisplayName("Should return false when removing non-existent item") fun shouldReturnFalseForNonExistentRemoval() { repository.add(testItem1) val removed = repository.remove("non-existent-id") Assertions.assertFalse(removed) Assertions.assertEquals(1, repository.size()) }Kotlin では、
repository.getById(id).isEmptyのようにメソッド呼び出しとプロパティアクセスをチェーンさせることができます。
TodoRepositoryTest テストクラスにさらにテストを追加して、追加機能をカバーすることもできます。完全なソースコードは、サンプルプロジェクトの complete モジュールで確認できます。
テストの実行
Java と Kotlin の両方のテストを実行して、プロジェクトが期待どおりに動作することを確認します:
ガターアイコンを使用してテストを実行します:
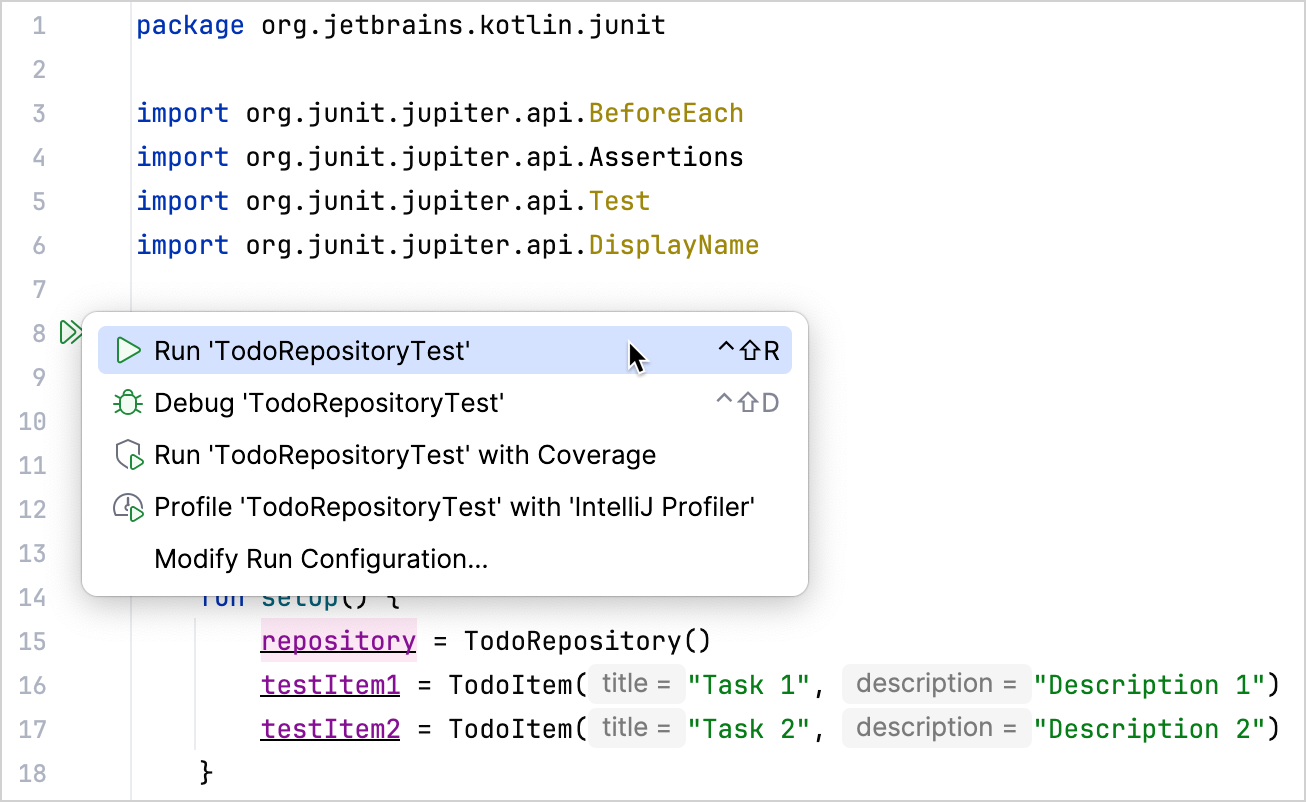
コマンドラインを使用して、
initialディレクトリからプロジェクトのすべてのテストを実行することもできます:bashmvn testbash./gradlew test変数の値の 1 つを変更して、テストが正しく動作することを確認します。たとえば、
shouldAddItemテストを変更して、誤ったリポジトリサイズを期待するようにします:kotlin@Test @DisplayName("Should add item to repository") fun shouldAddItem() { repository.add(testItem1) Assertions.assertEquals(2, repository.size()) // Changed from 1 to 2 Assertions.assertTrue(repository.all.contains(testItem1)) }テストを再度実行し、失敗することを確認します:
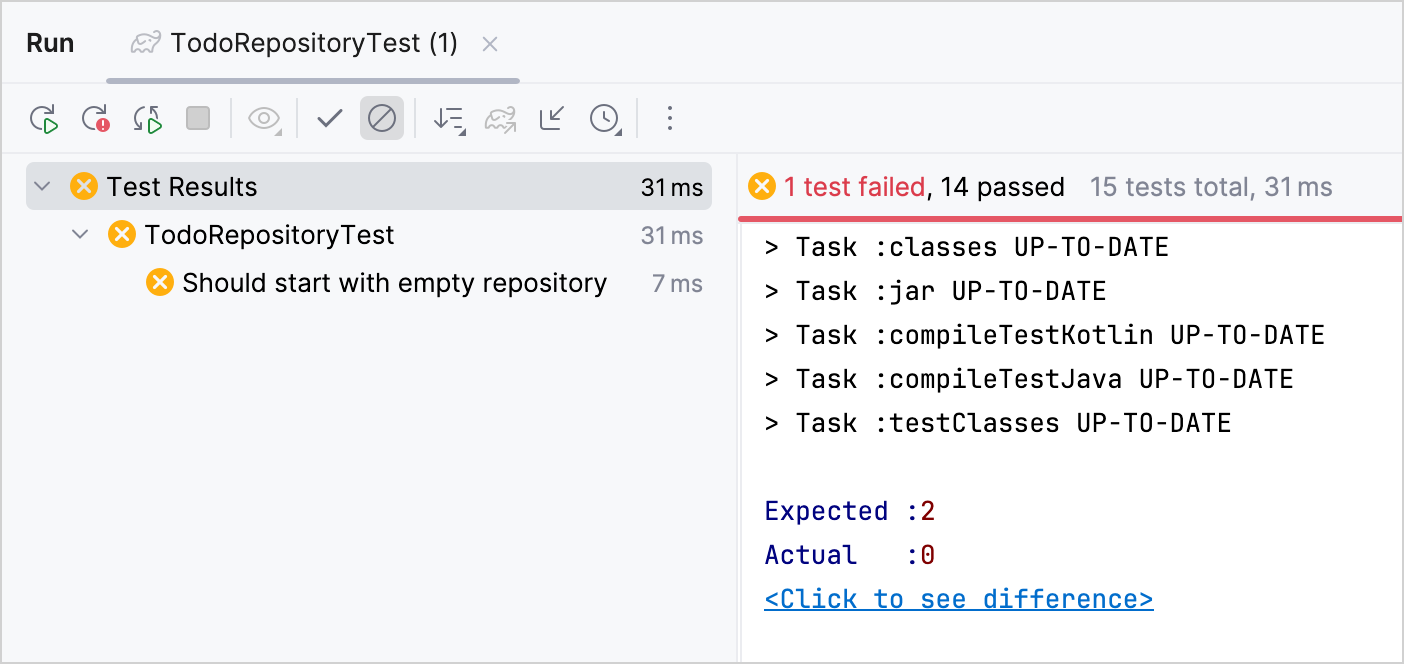
テストを含め完全に設定されたプロジェクトは、サンプルプロジェクトの complete モジュールで確認できます。
次のステップ
- Maven を使用した Kotlin プロジェクトのテスト について詳しく学ぶ。
- Kotlin バックエンド開発の FAQ でよくある質問の回答を見つける。