
将数据库与 Kotlin、Ktor 和 Exposed 集成
代码示例: tutorial-server-db-integration
所用插件:Static Content了解如何提供静态内容,例如样式表、脚本、图像等。、 Content NegotiationContentNegotiation 插件有两个主要用途:在客户端和服务器之间协商媒体类型,以及以特定格式序列化/反序列化内容。、Status PagesStatusPages 允许 Ktor 应用程序根据抛出的异常或状态码对任何失败状态做出适当响应。、 kotlinx.serializationContentNegotiation 插件有两个主要用途:在客户端和服务器之间协商媒体类型,以及以特定格式序列化/反序列化内容。、 Dependency Injection所需依赖项:io.ktor:ktor-server-di、 Exposed、 PostgreSQL
在本文中,你将学习如何使用适用于 Kotlin 的 SQL 库 Exposed,将 Ktor 服务与关系型数据库相集成。
完成本教程后,你将学会如何执行以下操作:
- 创建使用 JSON 序列化的 RESTful 服务。
- 将不同的仓库注入到这些服务中。
- 使用内存仓库为服务创建单元测试。
- 使用 Exposed 和依赖注入 (DI) 构建可用的仓库。
- 部署访问外部数据库的服务。
在先前的教程中,我们使用任务管理器示例介绍了基础知识,例如处理请求、创建 RESTful API 或使用 Thymeleaf 模板构建 Web 应用。
虽然这些教程侧重于使用简单的内存版 TaskRepository 实现前端功能,但本指南将重点转向展示 Ktor 服务如何通过 Exposed SQL 库与关系型数据库进行交互。
尽管本指南篇幅更长、更复杂,你仍然可以快速生成可运行的代码,并逐步引入新功能。
本指南由两部分组成:
前提条件
你可以独立完成本教程,但是,我们建议你先完成创建 RESTful API 教程,以熟悉内容协商和 REST。
我们建议安装 IntelliJ IDEA,但也可以使用你选择的其他 IDE。
创建 RESTful 服务和内存仓库
首先,你将重新创建任务管理器的 RESTful 服务。起初,你将使用内存仓库,但你会构建一种能以极小代价将其替换的设计结构。
你将分六个阶段完成此操作:
使用插件创建新项目
要使用 Ktor 项目生成器创建新项目,请按照以下步骤操作:
在 Project artifact 字段中,输入
com.example.ktor-exposed-task-app作为项目工件的名称。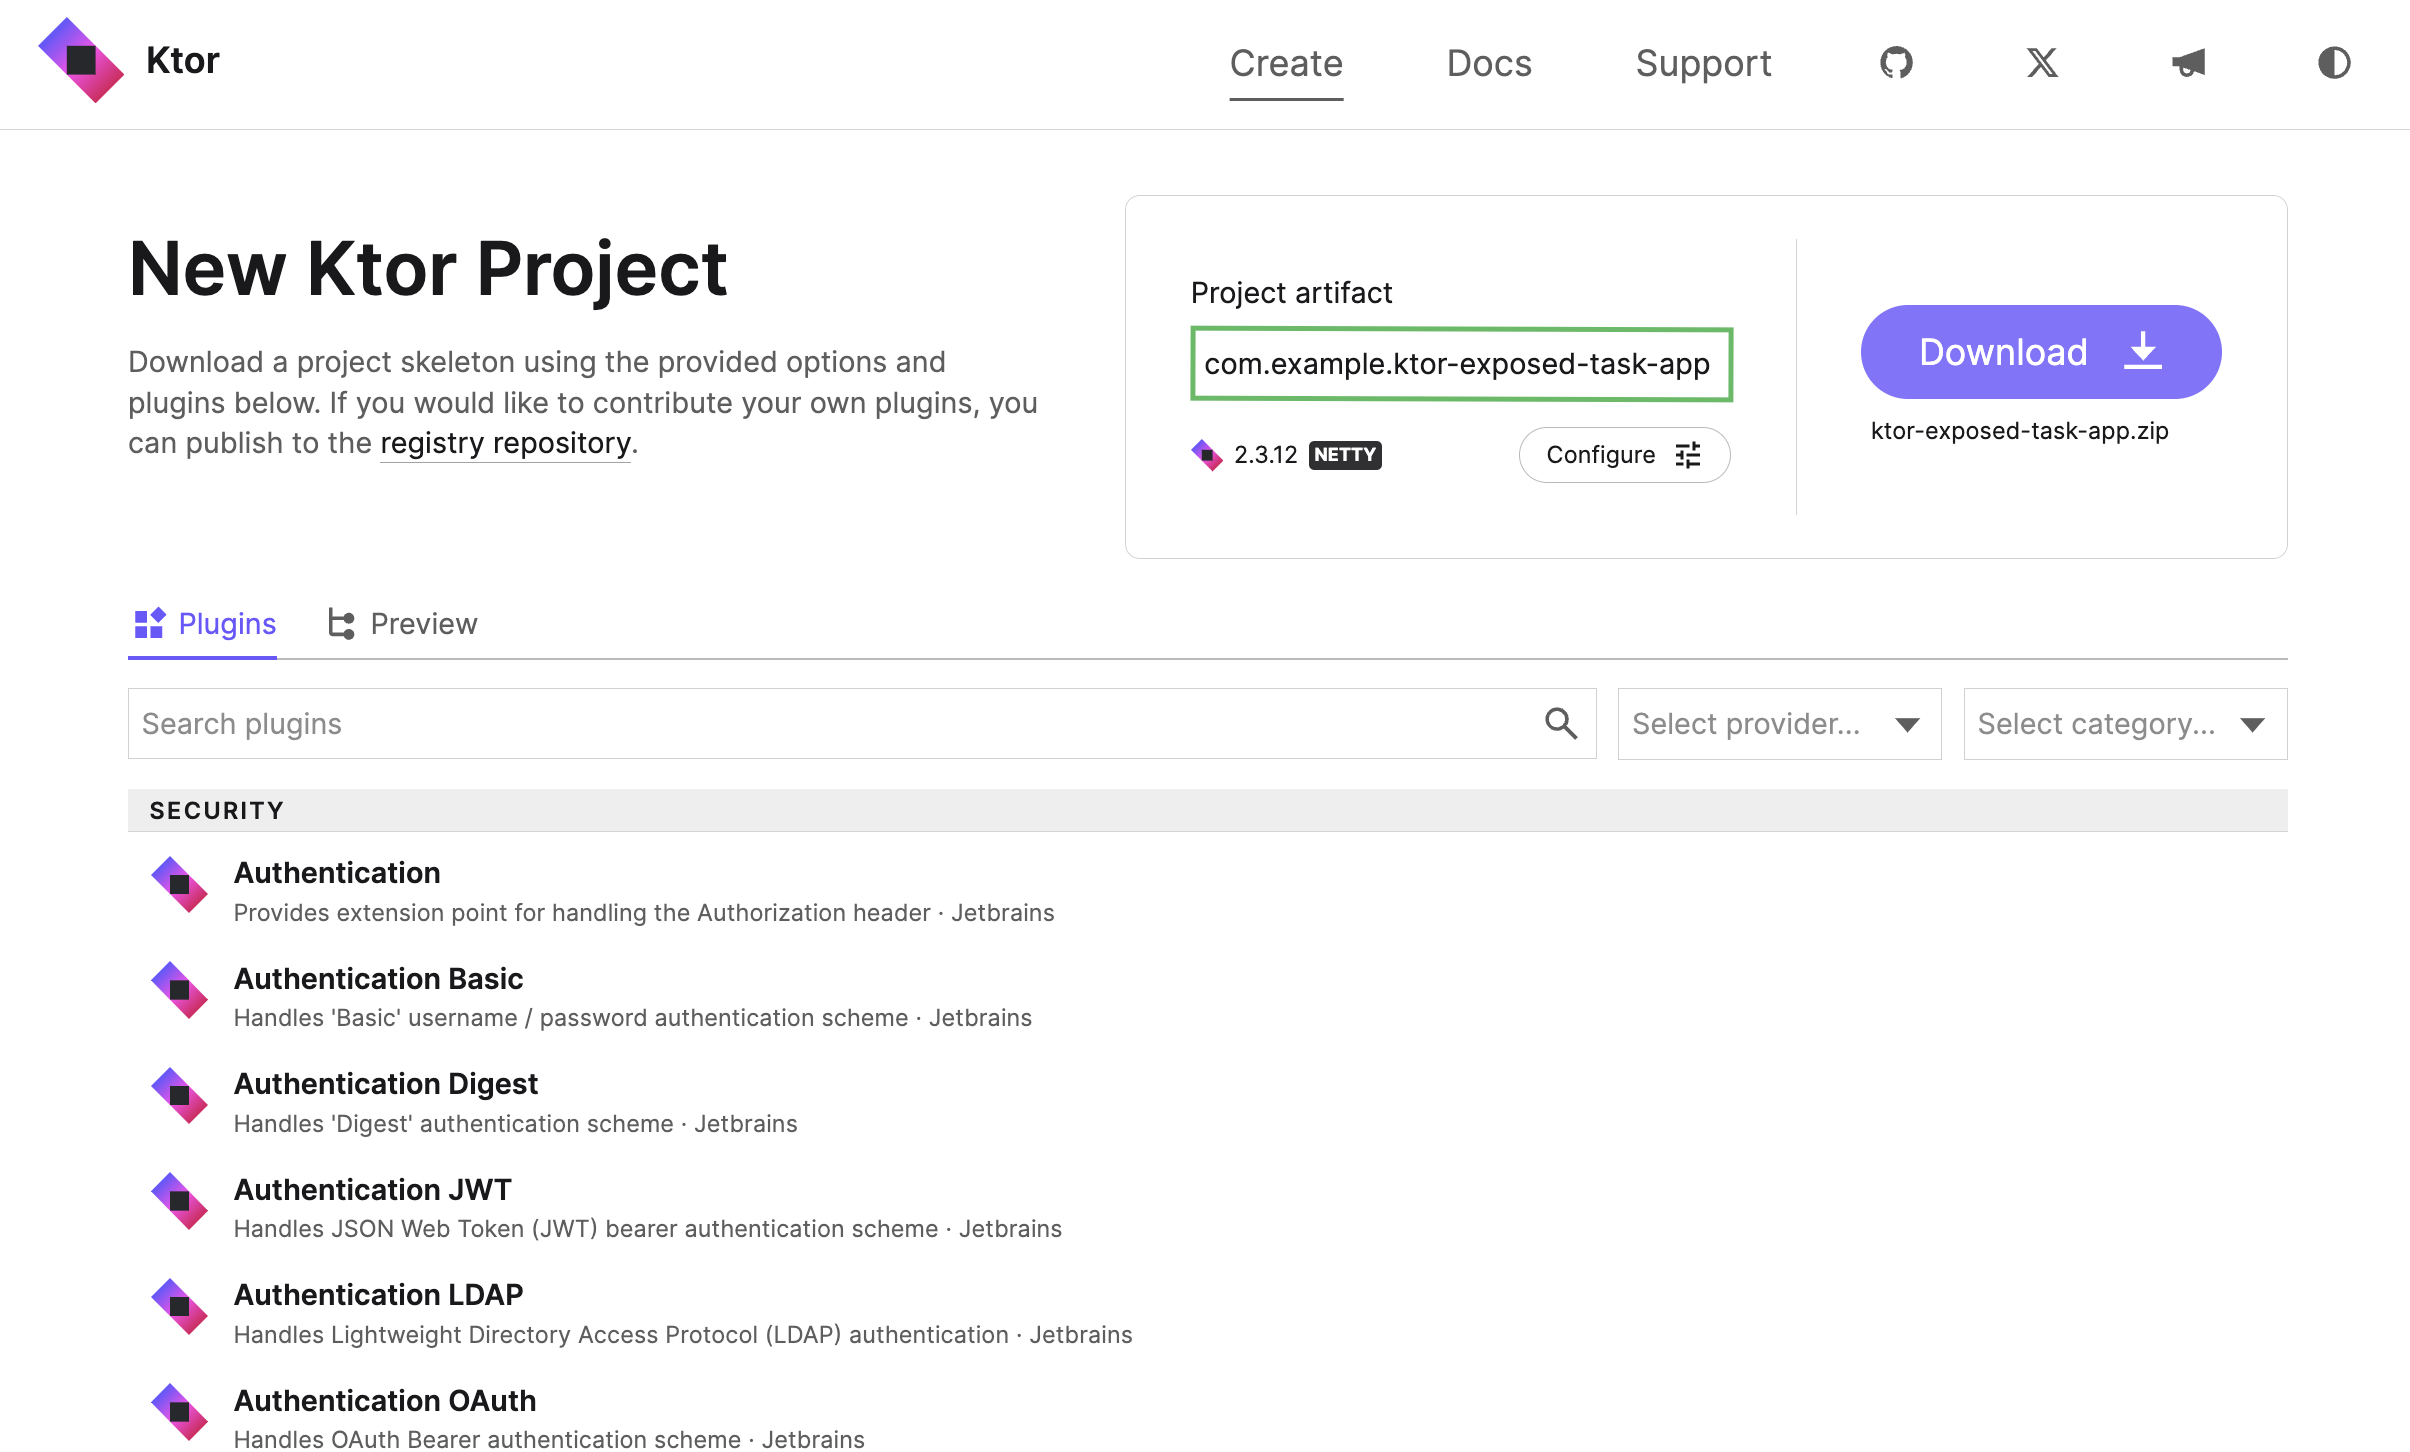
在插件部分,通过点击 Add 按钮搜索并添加以下插件:
- Content Negotiation
- kotlinx.serialization
- Static Content
- Status Pages
- Dependency Injection
- Exposed
- PostgreSQL
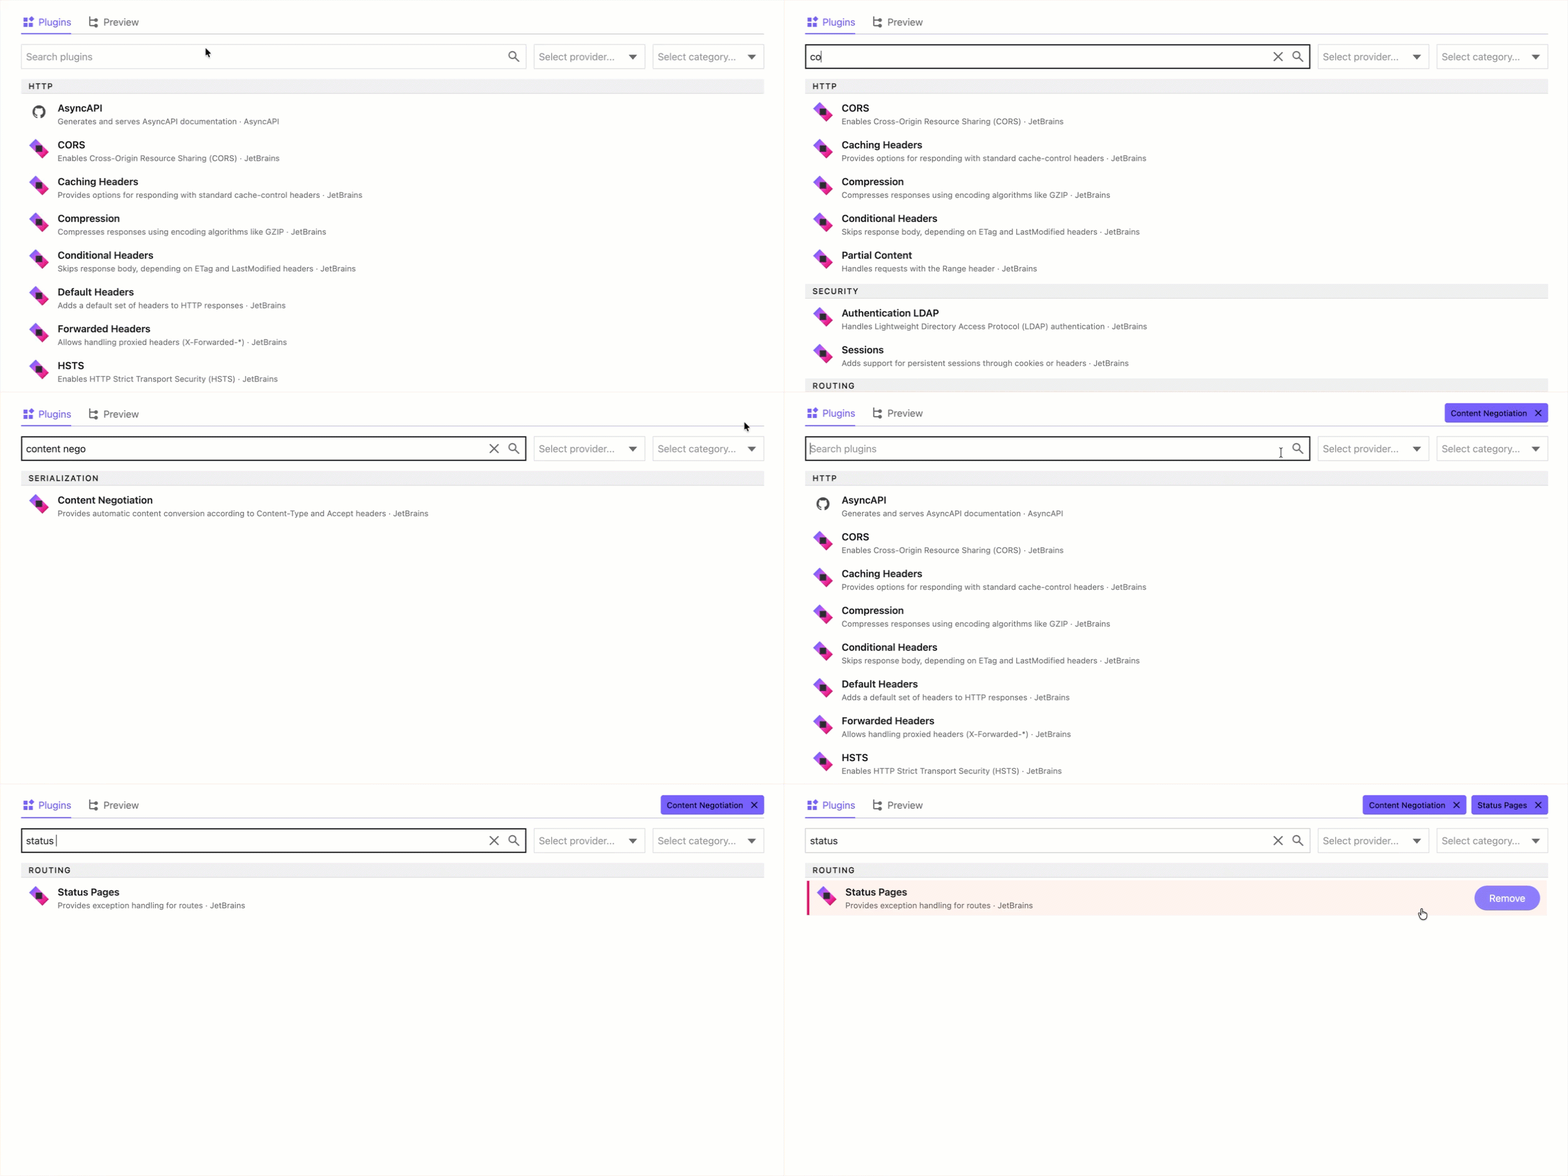
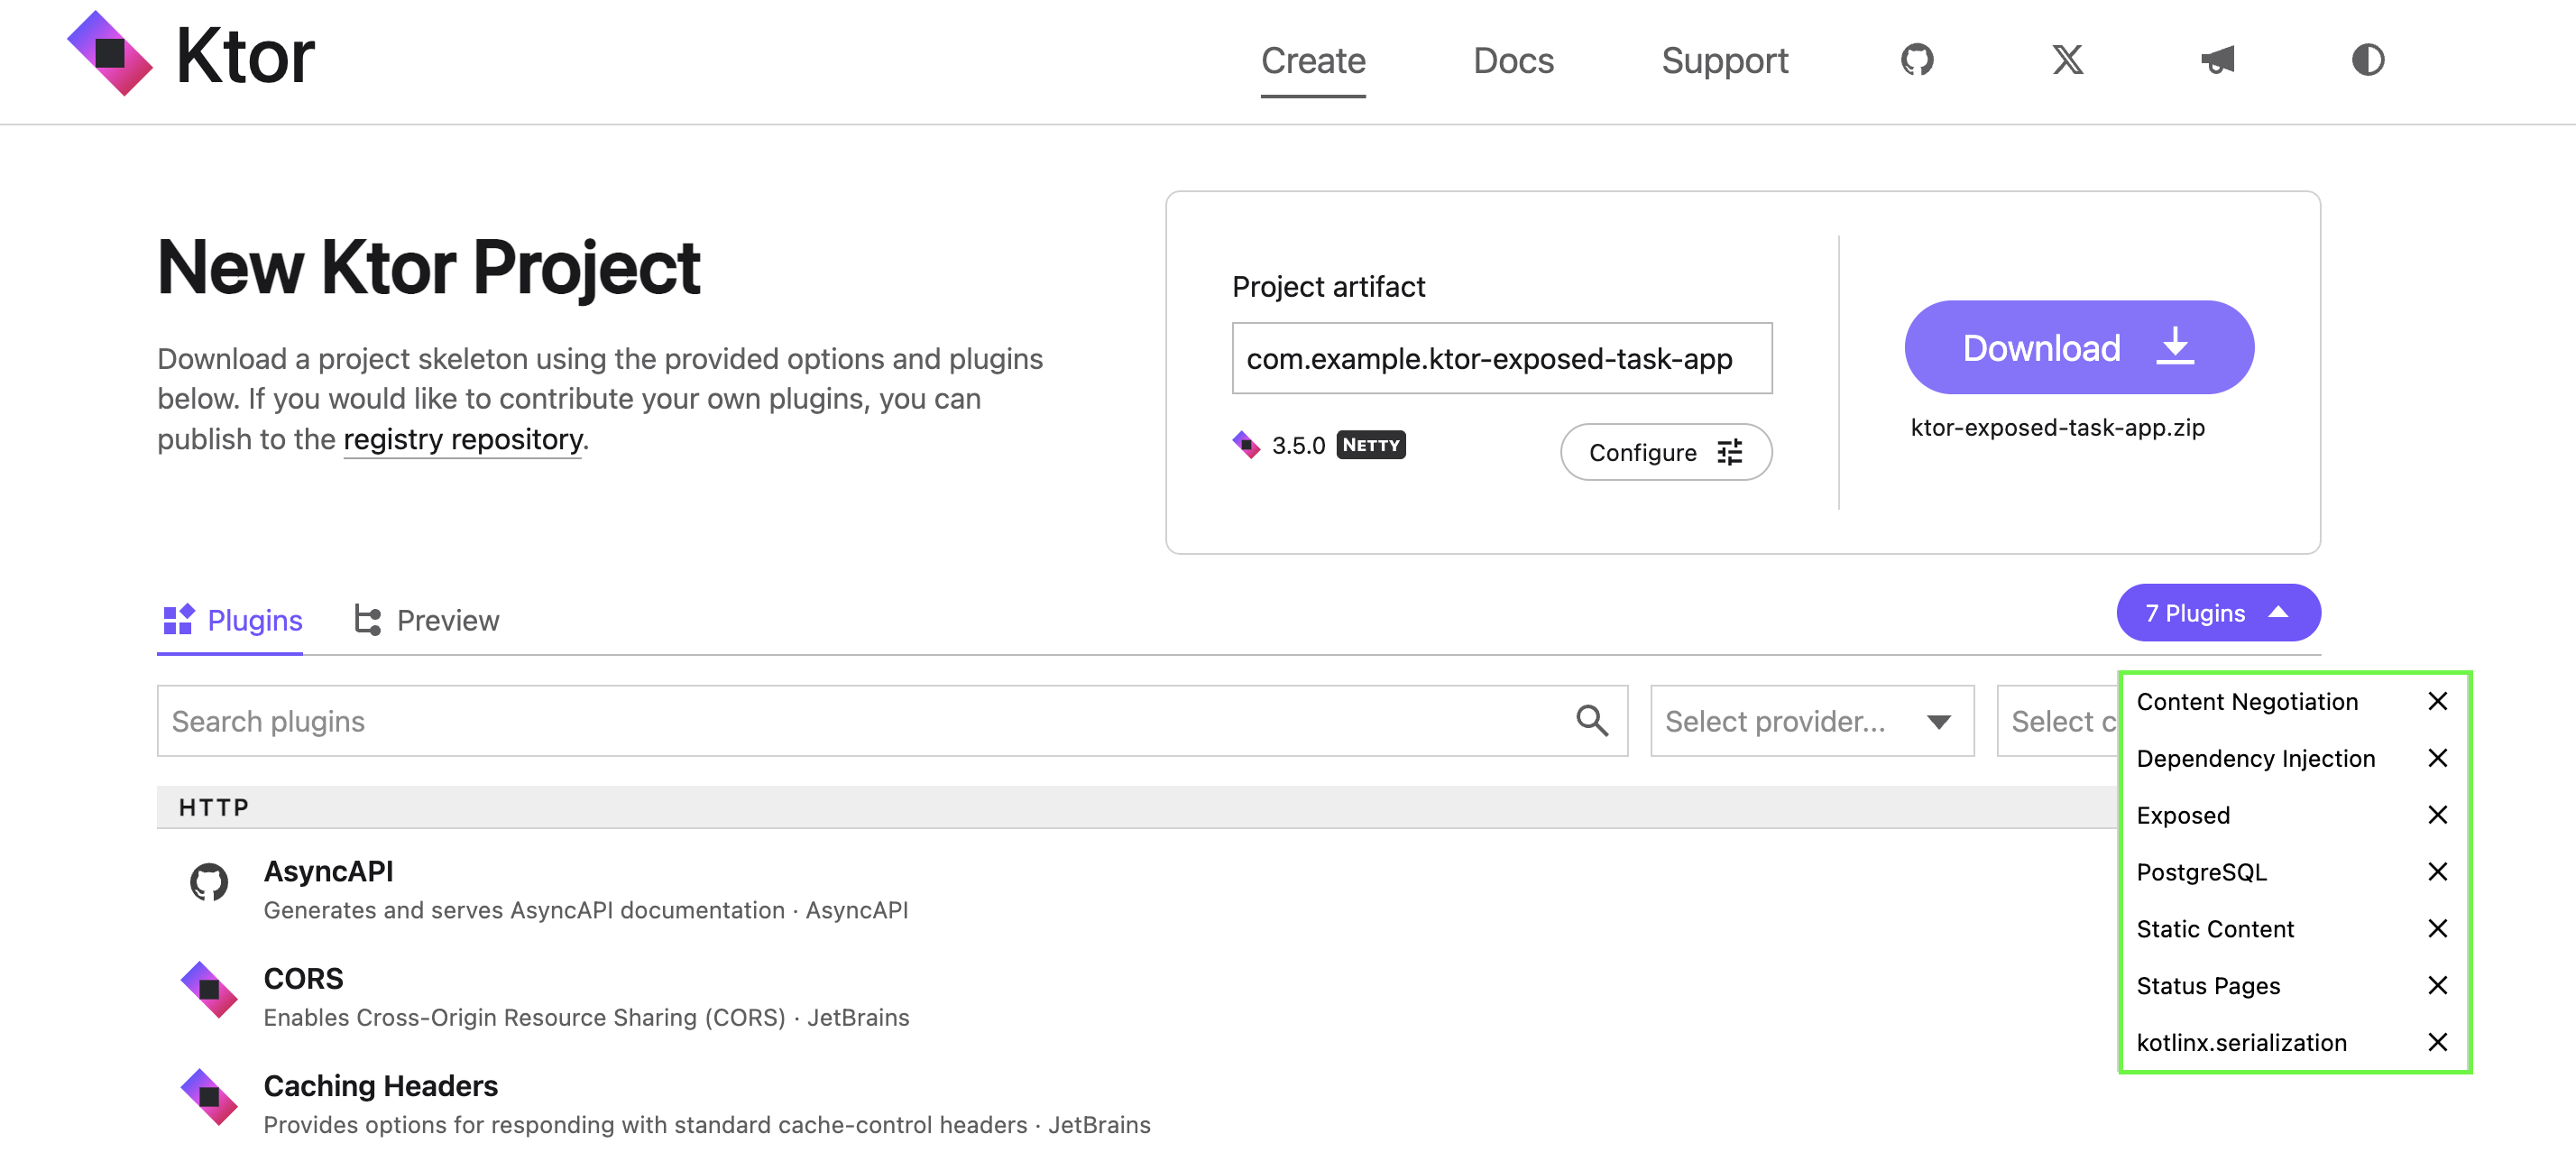
添加插件后,点击插件部分右上角的 7 plugins 按钮以查看已添加的插件。
随后你将看到将添加到项目中的所有插件的列表:
点击 Download 按钮以生成并下载你的 Ktor 项目。
在 IntelliJ IDEA 或你选择的其他 IDE 中打开生成的项目。
转到 src/main/kotlin 并删除 CitySchema.kt、UsersService.kt、GreetingService.kt 和 Postgres.kt 文件。
打开 Exposed.kt 文件并移除
.configureExposed()函数的内容:kotlinsuspend fun Application.configureExposed() { }移除此功能的原因是 Ktor 项目生成器添加了示例代码,用于展示如何将用户和城市的数据持久化到 HSQLDB 或 PostgreSQL。在本教程中不需要该示例代码。
打开 gradle/libs.versions.toml 文件并确保指定了最新的 Exposed 版本:
kotlin[versions] #... exposed = 1.6.0
添加起始代码
转到 src/main/kotlin 并创建一个名为 model 的子包。
在 model 包内,创建一个新的 Task.kt 文件。
打开 Task.kt 并添加一个表示优先级的枚举以及一个表示任务的类:
kotlinpackage com.example.model import kotlinx.serialization.Serializable enum class Priority { Low, Medium, High, Vital } @Serializable data class Task( val name: String, val description: String, val priority: Priority )Task类使用了来自kotlinx.serialization库的Serializable类型进行注解。与先前的教程一样,你将创建一个内存仓库。不过,这次仓库将实现一个接口,以便稍后可以轻松替换它。
在 model 子包中,创建一个新的 TaskRepository.kt 文件。
打开 TaskRepository.kt 并添加以下接口:
kotlinpackage com.example.model interface TaskRepository { fun allTasks(): List<Task> fun tasksByPriority(priority: Priority): List<Task> fun taskByName(name: String): Task? fun addTask(task: Task) fun removeTask(name: String): Boolean }在同一目录下创建一个新的 FakeTaskRepository.kt 文件。
打开 FakeTaskRepository.kt 并添加以下类:
kotlinpackage com.example.model class FakeTaskRepository : TaskRepository { private val tasks = mutableListOf( Task("cleaning", "Clean the house", Priority.Low), Task("gardening", "Mow the lawn", Priority.Medium), Task("shopping", "Buy the groceries", Priority.High), Task("painting", "Paint the fence", Priority.Medium) ) override fun allTasks(): List<Task> = tasks override fun tasksByPriority(priority: Priority) = tasks.filter { it.priority == priority } override fun taskByName(name: String) = tasks.find { it.name.equals(name, ignoreCase = true) } override fun addTask(task: Task) { if (taskByName(task.name) != null) { throw IllegalStateException("Cannot duplicate task names!") } tasks.add(task) } override fun removeTask(name: String): Boolean { return tasks.removeIf { it.name == name } } }
添加路由
打开 src/main/kotlin 中的 Serialization.kt 文件。
将现有的
Application.configureSerialization()函数替换为以下实现:kotlinpackage com.example import com.example.model.Priority import com.example.model.Task import com.example.model.TaskRepository import io.ktor.http.* import io.ktor.serialization.* import io.ktor.serialization.kotlinx.json.* import io.ktor.server.application.* import io.ktor.server.plugins.contentnegotiation.* import io.ktor.server.plugins.di.dependencies import io.ktor.server.request.* import io.ktor.server.response.* import io.ktor.server.routing.* suspend fun Application.configureSerialization() { val repository = dependencies.resolve<TaskRepository>() install(ContentNegotiation) { json() } routing { route("/tasks") { get { val tasks = repository.allTasks() call.respond(tasks) } get("/byName/{taskName}") { val name = call.parameters["taskName"] if (name == null) { call.respond(HttpStatusCode.BadRequest) return@get } val task = repository.taskByName(name) if (task == null) { call.respond(HttpStatusCode.NotFound) return@get } call.respond(task) } get("/byPriority/{priority}") { val priorityAsText = call.parameters["priority"] if (priorityAsText == null) { call.respond(HttpStatusCode.BadRequest) return@get } try { val priority = Priority.valueOf(priorityAsText) val tasks = repository.tasksByPriority(priority) if (tasks.isEmpty()) { call.respond(HttpStatusCode.NotFound) return@get } call.respond(tasks) } catch (ex: IllegalArgumentException) { call.respond(HttpStatusCode.BadRequest) } } post { try { val task = call.receive<Task>() repository.addTask(task) call.respond(HttpStatusCode.NoContent) } catch (ex: IllegalStateException) { call.respond(HttpStatusCode.BadRequest) } catch (ex: JsonConvertException) { call.respond(HttpStatusCode.BadRequest) } } delete("/{taskName}") { val name = call.parameters["taskName"] if (name == null) { call.respond(HttpStatusCode.BadRequest) return@delete } if (repository.removeTask(name)) { call.respond(HttpStatusCode.NoContent) } else { call.respond(HttpStatusCode.NotFound) } } } } }这与你在创建 RESTful API 教程中实现的路由相同,不同之处在于你现在从 Ktor 的依赖注入容器中解析仓库。由于依赖项的类型是一个接口 (
interface),因此可以注入许多不同的实现。由于
dependencies.resolve()是一个挂起函数,因此.configureSerialization()也必须声明为 suspend。现在你已为
.configureSerialization()添加了依赖项,现有的调用将无法再编译。幸运的是,该函数只被调用一次。打开 src/main/kotlin 中的 DI.kt 文件。
将
.configureDependencyInjection()函数的内容替换为以下实现:kotlinimport com.example.model.FakeTaskRepository import com.example.model.TaskRepository // ... fun Application.configureDependencyInjection() { dependencies { provide<TaskRepository> { FakeTaskRepository() } } }你现在将
FakeTaskRepository注册为TaskRepository的实现。长期目标是能够将其替换为PostgresTaskRepository。打开位于 src/main/resources 文件夹中的 application.yaml 文件,并确保
.configureDependencyInjection()函数列在.configureSerialization()之前:yamlktor: deployment: port: 8080 application: modules: - com.example.DIKt.configureDependencyInjection - com.example.SerializationKt.configureSerialization - com.example.ExposedKt.configureExposed - com.example.StatusPagesKt.configureStatusPages - com.example.RoutingKt.configureRouting
添加客户端页面
打开 src/main/resources/static 中的 index.html 文件。
将当前内容替换为以下实现:
html<html> <head> <title>A Simple SPA For Tasks</title> <script type="application/javascript"> function displayAllTasks() { clearTasksTable(); fetchAllTasks().then(displayTasks) } function displayTasksWithPriority() { clearTasksTable(); const priority = readTaskPriority(); fetchTasksWithPriority(priority).then(displayTasks) } function displayTask(name) { fetchTaskWithName(name).then(t => taskDisplay().innerHTML = `${t.priority} priority task ${t.name} with description "${t.description}"` ) } function deleteTask(name) { deleteTaskWithName(name).then(() => { clearTaskDisplay(); displayAllTasks(); }) } function deleteTaskWithName(name) { return sendDELETE(`/tasks/${name}`) } function addNewTask() { const task = buildTaskFromForm(); sendPOST("/tasks", task).then(displayAllTasks); } function buildTaskFromForm() { return { name: getTaskFormValue("newTaskName"), description: getTaskFormValue("newTaskDescription"), priority: getTaskFormValue("newTaskPriority") } } function getTaskFormValue(controlName) { return document.addTaskForm[controlName].value; } function taskDisplay() { return document.getElementById("currentTaskDisplay"); } function readTaskPriority() { return document.priorityForm.priority.value } function fetchTasksWithPriority(priority) { return sendGET(`/tasks/byPriority/${priority}`); } function fetchTaskWithName(name) { return sendGET(`/tasks/byName/${name}`); } function fetchAllTasks() { return sendGET("/tasks") } function sendGET(url) { return fetch( url, {headers: {'Accept': 'application/json'}} ).then(response => { if (response.ok) { return response.json() } return []; }); } function sendPOST(url, data) { return fetch(url, { method: 'POST', headers: {'Content-Type': 'application/json'}, body: JSON.stringify(data) }); } function sendDELETE(url) { return fetch(url, { method: "DELETE" }); } function tasksTable() { return document.getElementById("tasksTableBody"); } function clearTasksTable() { tasksTable().innerHTML = ""; } function clearTaskDisplay() { taskDisplay().innerText = "None"; } function displayTasks(tasks) { const tasksTableBody = tasksTable() tasks.forEach(task => { const newRow = taskRow(task); tasksTableBody.appendChild(newRow); }); } function taskRow(task) { return tr([ td(task.name), td(task.priority), td(viewLink(task.name)), td(deleteLink(task.name)), ]); } function tr(children) { const node = document.createElement("tr"); children.forEach(child => node.appendChild(child)); return node; } function td(content) { const node = document.createElement("td"); if (content instanceof Element) { node.appendChild(content) } else { node.appendChild(document.createTextNode(content)); } return node; } function viewLink(taskName) { const node = document.createElement("a"); node.setAttribute( "href", `javascript:displayTask("${taskName}")` ) node.appendChild(document.createTextNode("view")); return node; } function deleteLink(taskName) { const node = document.createElement("a"); node.setAttribute( "href", `javascript:deleteTask("${taskName}")` ) node.appendChild(document.createTextNode("delete")); return node; } </script> </head> <body onload="displayAllTasks()"> <h1>Task Manager Client</h1> <form action="javascript:displayAllTasks()"> <span>View all the tasks</span> <input type="submit" value="Go"> </form> <form name="priorityForm" action="javascript:displayTasksWithPriority()"> <span>View tasks with priority</span> <select name="priority"> <option name="Low">Low</option> <option name="Medium">Medium</option> <option name="High">High</option> <option name="Vital">Vital</option> </select> <input type="submit" value="Go"> </form> <form name="addTaskForm" action="javascript:addNewTask()"> <span>Create new task with</span> <label for="newTaskName">name</label> <input type="text" id="newTaskName" name="newTaskName" size="10"> <label for="newTaskDescription">description</label> <input type="text" id="newTaskDescription" name="newTaskDescription" size="20"> <label for="newTaskPriority">priority</label> <select id="newTaskPriority" name="newTaskPriority"> <option name="Low">Low</option> <option name="Medium">Medium</option> <option name="High">High</option> <option name="Vital">Vital</option> </select> <input type="submit" value="Go"> </form> <hr> <div> Current task is <em id="currentTaskDisplay">None</em> </div> <hr> <table> <thead> <tr> <th>Name</th> <th>Priority</th> <th></th> <th></th> </tr> </thead> <tbody id="tasksTableBody"> </tbody> </table> </body> </html>这是先前教程中使用的同一个 SPA。因为它是用 JavaScript 编写的,并且只使用浏览器中可用的库,所以你不必担心客户端依赖项。
手动测试应用程序
在 IntelliJ IDEA 中,点击运行按钮 (
 ) 以启动应用程序。
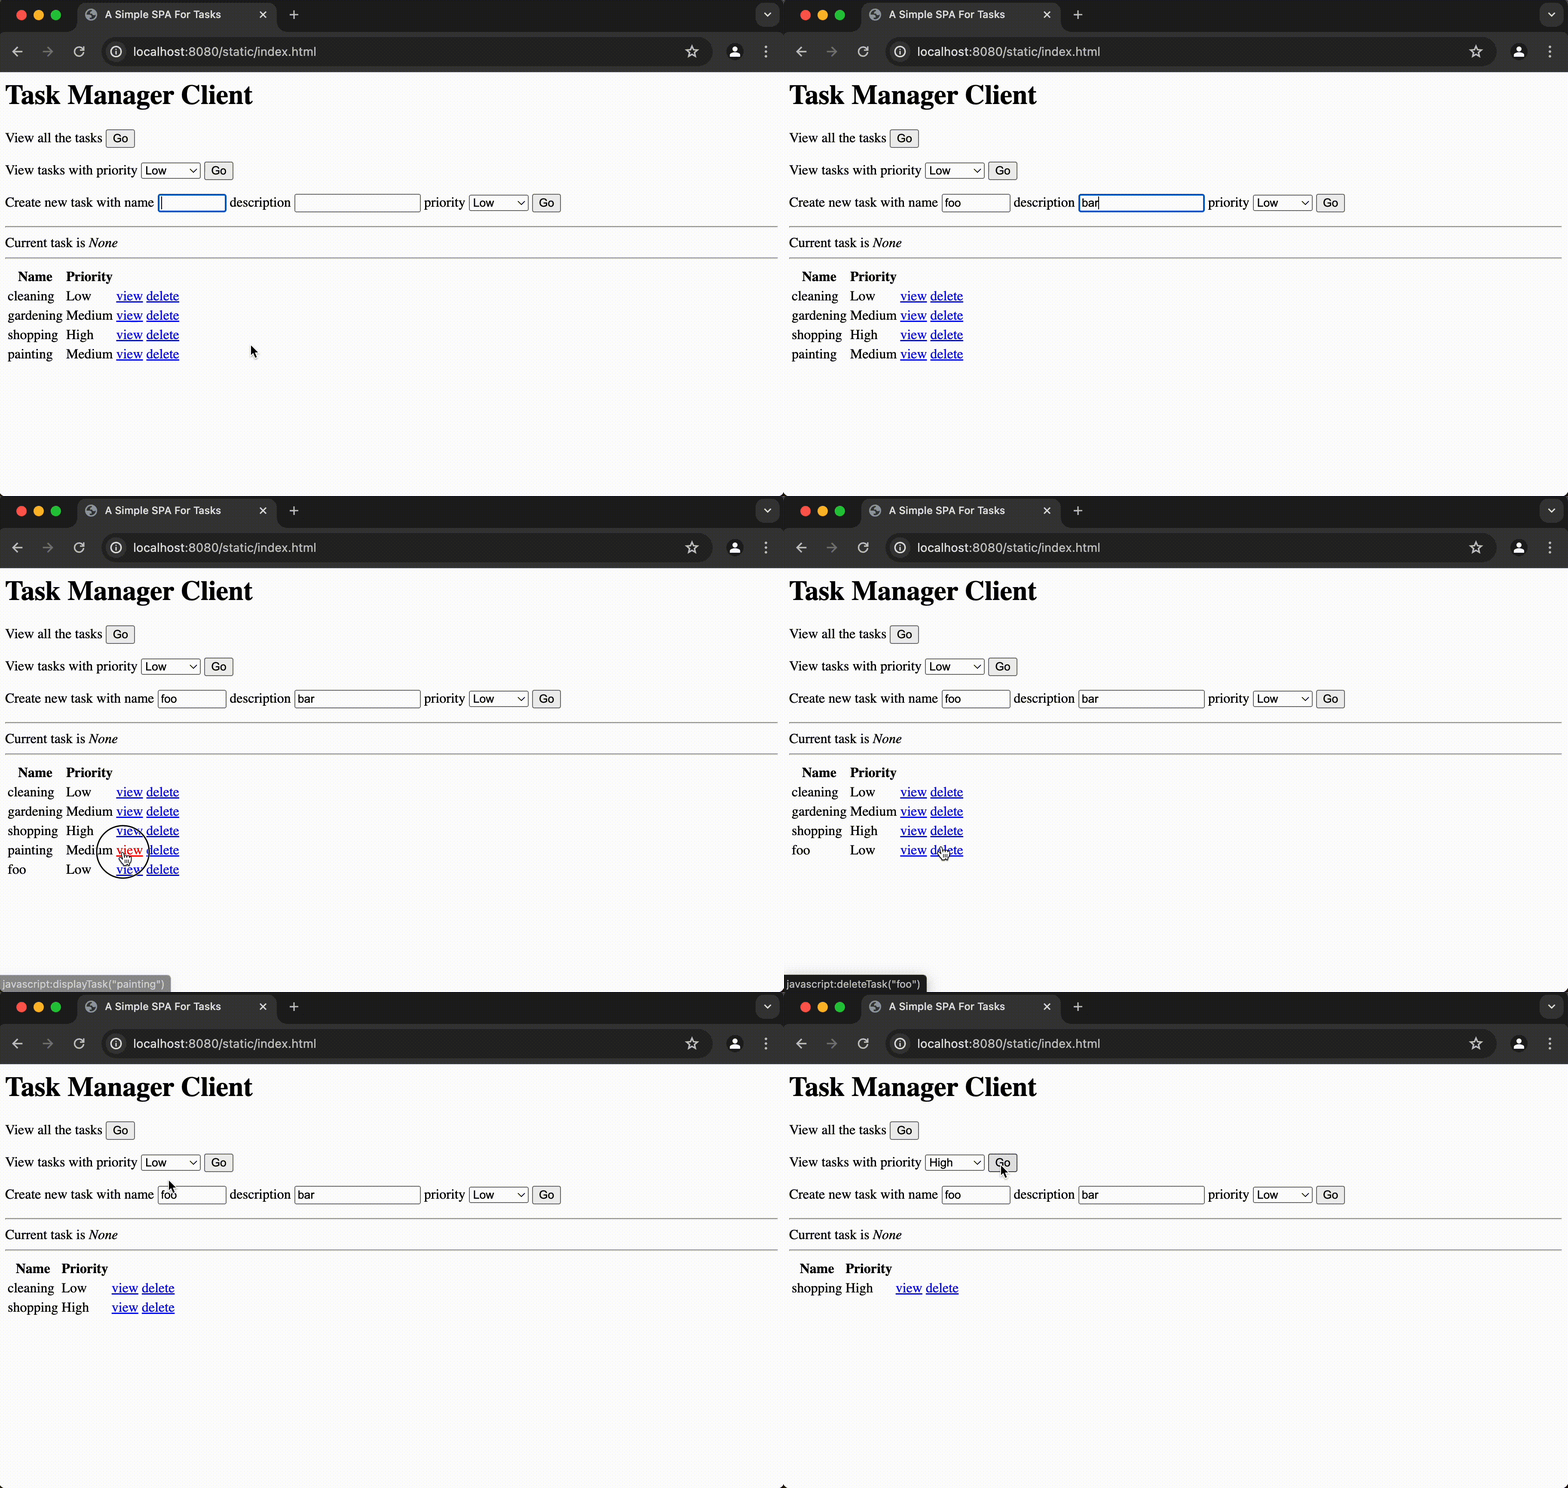
在浏览器中访问 http://0.0.0.0:8080/static/index.html。你应该会看到由三个表单和一个显示过滤结果的表格组成的客户端页面。
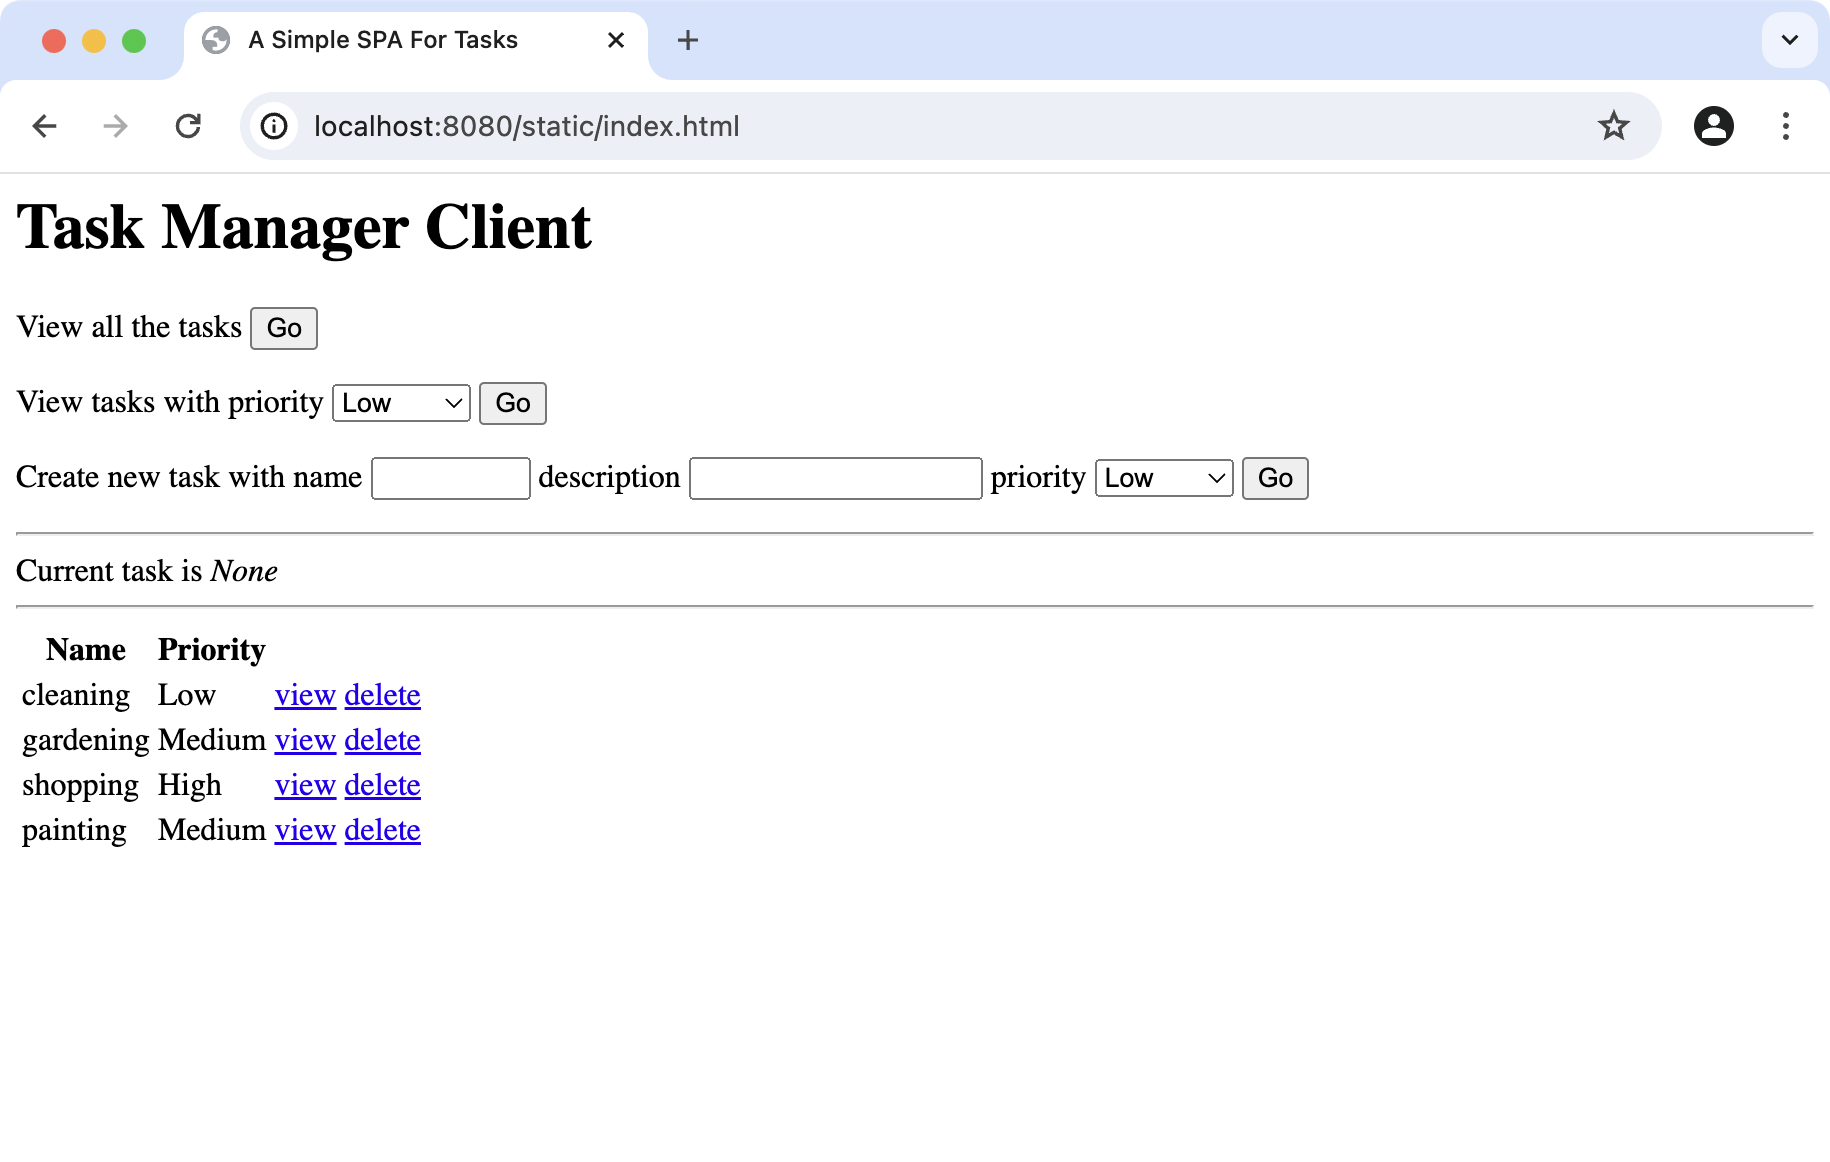
通过使用 Go 按钮填写并提交表单来测试应用程序。对表格项使用 View 和 Delete 按钮。
添加自动化单元测试
打开 src/test/kotlin 中的 ServerTest.kt 文件并添加以下测试:
kotlinpackage com.example import com.example.model.Priority import com.example.model.Task import com.example.model.TaskRepository import io.ktor.client.call.* import io.ktor.client.plugins.contentnegotiation.* import io.ktor.server.plugins.di.dependencies import io.ktor.client.request.* import io.ktor.http.* import io.ktor.serialization.kotlinx.json.* import io.ktor.server.application.* import io.ktor.server.testing.* import kotlin.test.* suspend fun Application.configureTestApp() { dependencies { provide<TaskRepository> { FakeTaskRepository() } } configureSerialization() configureStatusPages() configureRouting() } class ServerTest { @Test fun tasksCanBeFoundByPriority() = testApplication { application { configureTestApp() } val client = createClient { install(ContentNegotiation) { json() } } val response = client.get("/tasks/byPriority/Medium") val results = response.body<List<Task>>() assertEquals(HttpStatusCode.OK, response.status) val expectedTaskNames = listOf("gardening", "painting") val actualTaskNames = results.map(Task::name) assertContentEquals(expectedTaskNames, actualTaskNames) } @Test fun invalidPriorityProduces400() = testApplication { application { configureTestApp() } val response = client.get("/tasks/byPriority/Invalid") assertEquals(HttpStatusCode.BadRequest, response.status) } @Test fun unusedPriorityProduces404() = testApplication { application { configureTestApp() } val response = client.get("/tasks/byPriority/Vital") assertEquals(HttpStatusCode.NotFound, response.status) } @Test fun newTasksCanBeAdded() = testApplication { application { configureTestApp() } val client = createClient { install(ContentNegotiation) { json() } } val task = Task("swimming", "Go to the beach", Priority.Low) val response1 = client.post("/tasks") { header( HttpHeaders.ContentType, ContentType.Application.Json ) setBody(task) } assertEquals(HttpStatusCode.NoContent, response1.status) val response2 = client.get("/tasks") assertEquals(HttpStatusCode.OK, response2.status) val taskNames = response2 .body<List<Task>>() .map { it.name } assertContains(taskNames, "swimming") } }为了使这些测试能够编译并运行,你需要为 Ktor Client 添加对 Content Negotiation 插件的依赖项。
打开 build.gradle.kts 文件并添加以下依赖项:
kotlindependencies { //... testImplementation(ktorLibs.client.contentNegotiation) }在 IntelliJ IDEA 中,点击编辑器右侧的 Gradle 通知图标 (
 ) 以加载 Gradle 更改。
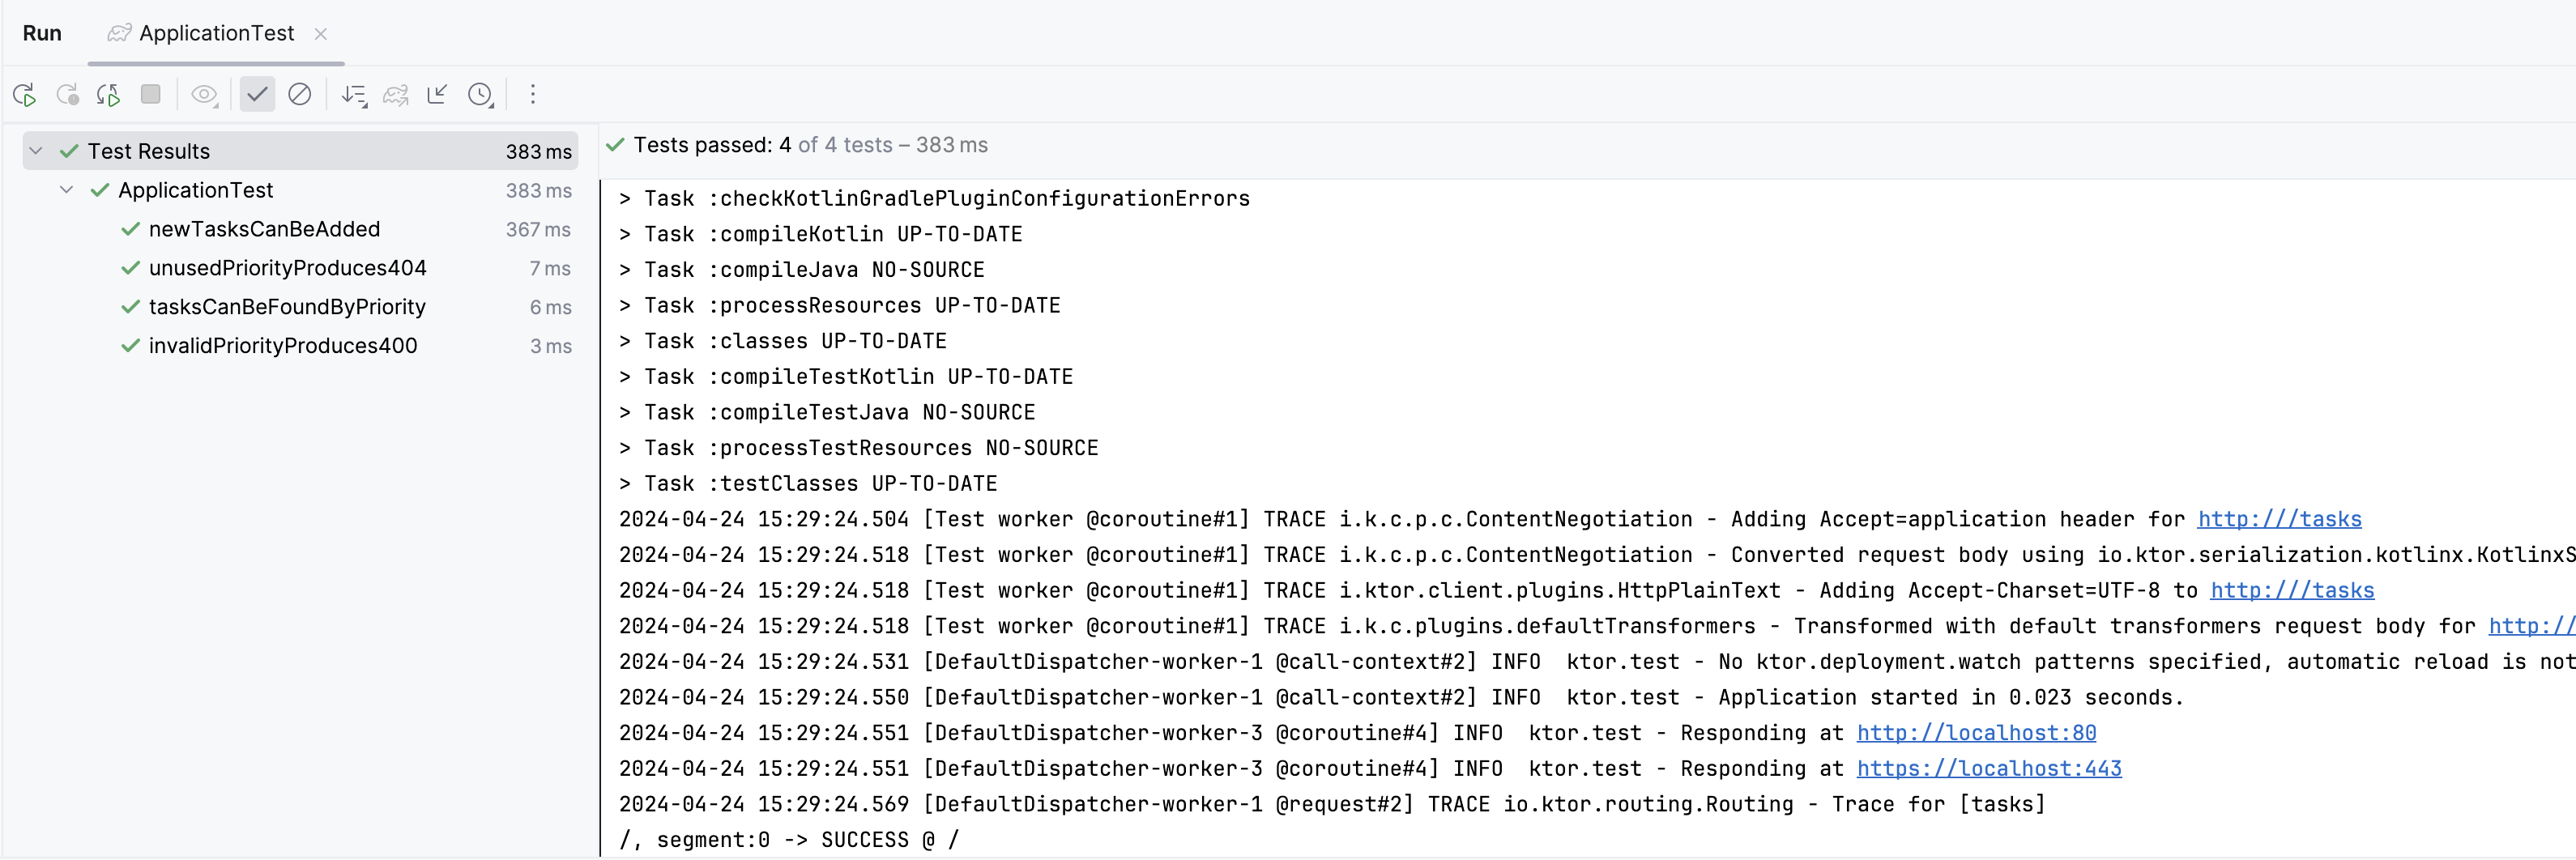
在 IntelliJ IDEA 中,点击测试类定义旁边的运行按钮 (
) 以运行测试。然后,你应该会在 Run 窗格中看到测试已成功运行:
添加 PostgreSQL 仓库
现在你已经有了一个使用内存数据的可用应用程序,下一步是将数据存储外部化到 PostgreSQL 数据库。
你将通过执行以下操作来实现这一点:
- 在 PostgreSQL 中创建数据库架构。
- 改造
TaskRepository以支持异步访问。 - 在应用程序中配置数据库连接。
- 将
Task类型映射到关联的数据库表。 - 基于该映射创建新仓库。
- 在启动代码中切换到新仓库。
创建数据库架构
使用你选择的数据库管理工具,在 PostgreSQL 中创建一个新数据库。名称无关紧要,只要你记住它即可。在此示例中,我们将使用
ktor_tutorial_db。有关 PostgreSQL 的更多信息,请参阅官方文档。
在 IntelliJ IDEA 中,你可以使用 Database Tools 来连接并管理你的 PostgreSQL 数据库。
对数据库运行以下 SQL 命令。这些命令将创建并填充数据库架构:
sqlDROP TABLE IF EXISTS task; CREATE TABLE task(id SERIAL PRIMARY KEY, name VARCHAR(50), description VARCHAR(50), priority VARCHAR(50)); INSERT INTO task (name, description, priority) VALUES ('cleaning', 'Clean the house', 'Low'); INSERT INTO task (name, description, priority) VALUES ('gardening', 'Mow the lawn', 'Medium'); INSERT INTO task (name, description, priority) VALUES ('shopping', 'Buy the groceries', 'High'); INSERT INTO task (name, description, priority) VALUES ('painting', 'Paint the fence', 'Medium'); INSERT INTO task (name, description, priority) VALUES ('exercising', 'Walk the dog', 'Medium'); INSERT INTO task (name, description, priority) VALUES ('meditating', 'Contemplate the infinite', 'High');请注意以下几点:
- 你正在创建一个名为
task的单独表,其中包含name、description和priority列。这些列需要映射到Task类的属性。 - 如果该表已存在,你将重新创建它,因此你可以重复运行该脚本。
- 还有一个名为
id的额外列,类型为SERIAL。这将是一个整数值,用作每行的主键。这些值将由数据库代表你分配。
- 你正在创建一个名为
改造现有仓库
在对数据库执行查询时,最好异步运行它们,以避免阻塞处理 HTTP 请求的线程。在 Kotlin 中,这最好通过协程来管理。
打开 src/main/kotlin/model 中的 TaskRepository.kt 文件。
为所有接口方法添加
suspend关键字:kotlininterface TaskRepository { suspend fun allTasks(): List<Task> suspend fun tasksByPriority(priority: Priority): List<Task> suspend fun taskByName(name: String): Task? suspend fun addTask(task: Task) suspend fun removeTask(name: String): Boolean }这将允许接口方法的实现将工作任务调度在不同的协程调度器上启动。
现在你需要调整
FakeTaskRepository的方法以与之匹配,尽管在该实现中不需要切换调度器。打开 FakeTaskRepository.kt 文件并为所有方法添加
suspend关键字:kotlinclass FakeTaskRepository : TaskRepository { //... override suspend fun allTasks(): List<Task> = tasks override suspend fun tasksByPriority(priority: Priority) = tasks.filter { //... } override suspend fun taskByName(name: String) = tasks.find { //... } override suspend fun addTask(task: Task) { //... } override suspend fun removeTask(name: String): Boolean { //... } }到目前为止,你还没有引入任何新功能。相反,你已经为创建将对数据库异步运行查询的
PostgresTaskRepository奠定了基础。
配置数据库连接
在本教程的第一部分中,你删除了 Exposed.kt 中 .configureExposed() 函数内的示例代码。现在你已准备好添加自己的实现。
Ktor 项目生成器尚未添加对 DAO 类型的支持,因此你首先需要在 Gradle 构建文件中添加相关依赖项。
在你的 gradle/libs.versions.toml 文件中,添加
exposed-jdbc和exposed-dao库:toml[libraries] exposed-jdbc = { module = "org.jetbrains.exposed:exposed-jdbc", version.ref = "exposed" } exposed-dao = { module = "org.jetbrains.exposed:exposed-dao", version.ref = "exposed" }这将允许你使用 Exposed 数据访问对象 (DAO) 模式。
在你的 build.gradle.kts 文件中,添加以下依赖项:
kotlindependencies { // ... implementation(libs.exposed.jdbc) implementation(libs.exposed.dao) }你只需要一个传输模块 –
exposed-jdbc或exposed-r2dbc。如果 Ktor 项目生成器添加了exposed-r2dbc依赖项,请在继续之前将其移除。在 IntelliJ IDEA 中,点击编辑器右侧的 Gradle 通知图标 (
) 以加载 Gradle 更改。打开 src/main/kotlin 中的 Exposed.kt 文件。
使用
Database.connect()函数连接到你的数据库,根据你的环境调整设置的值:kotlinsuspend fun Application.configureExposed() { Database.connect( "jdbc:postgresql://localhost:5432/ktor_tutorial_db", user = "postgres", password = "password" ) }请注意,
url包含以下组件:localhost:5432是 PostgreSQL 数据库运行所在的主机和端口。ktor_tutorial_db是运行服务时创建的数据库的名称。
有关更多信息,请参阅 Exposed 中的数据库操作。
创建对象/关系映射
转到 src/main/kotlin 并创建一个名为 db 的新包。
在 db 包内,创建一个新的 mapping.kt 文件。
打开 mapping.kt 并添加
TaskTable和TaskDAO类型:kotlinpackage com.example.db import org.jetbrains.exposed.v1.core.dao.id.EntityID import org.jetbrains.exposed.v1.core.dao.id.IntIdTable import org.jetbrains.exposed.v1.dao.IntEntity import org.jetbrains.exposed.v1.dao.IntEntityClass object TaskTable : IntIdTable("task") { val name = varchar("name", 50) val description = varchar("description", 50) val priority = varchar("priority", 50) } class TaskDAO(id: EntityID<Int>) : IntEntity(id) { companion object : IntEntityClass<TaskDAO>(TaskTable) var name by TaskTable.name var description by TaskTable.description var priority by TaskTable.priority }这些类型使用 Exposed 库将
Task类型中的属性映射到数据库中task表的列。TaskTable类型定义了基本映射,而TaskDAO类型添加了创建、查找、更新和删除任务的帮助程序方法。在同一个 mapping.kt 文件中,添加以下帮助程序函数:
kotlinpackage com.example.db import com.example.model.Priority import com.example.model.Task import kotlinx.coroutines.Dispatchers import kotlinx.coroutines.withContext import org.jetbrains.exposed.v1.core.dao.id.EntityID import org.jetbrains.exposed.v1.core.dao.id.IntIdTable import org.jetbrains.exposed.v1.dao.IntEntity import org.jetbrains.exposed.v1.dao.IntEntityClass import org.jetbrains.exposed.v1.jdbc.JdbcTransaction import org.jetbrains.exposed.v1.jdbc.transactions.inTopLevelSuspendTransaction object TaskTable : IntIdTable("task") { val name = varchar("name", 50) val description = varchar("description", 50) val priority = varchar("priority", 50) } class TaskDAO(id: EntityID<Int>) : IntEntity(id) { companion object : IntEntityClass<TaskDAO>(TaskTable) var name by TaskTable.name var description by TaskTable.description var priority by TaskTable.priority } suspend fun <T> withTransaction(block: suspend JdbcTransaction.() -> T): T = withContext(Dispatchers.IO) { inTopLevelSuspendTransaction { block() } } fun daoToModel(dao: TaskDAO) = Task( dao.name, dao.description, Priority.valueOf(dao.priority) )withTransaction()函数在新的顶级数据库事务中运行挂起代码块。协程上下文被切换到Dispatchers.IO,以便阻塞式 JDBC 操作在针对 IO 任务优化的线程池上运行。daoToModel()函数将TaskDAO类型的实例转换为Task对象。
添加以下缺失的导入:
kotlinimport com.example.model.Priority import com.example.model.Task import kotlinx.coroutines.Dispatchers import kotlinx.coroutines.withContext import org.jetbrains.exposed.v1.jdbc.JdbcTransaction import org.jetbrains.exposed.v1.jdbc.transactions.inTopLevelSuspendTransaction
编写新仓库
你现在拥有创建特定于数据库的仓库所需的所有资源。
转到 src/main/kotlin/model 并创建一个新的 PostgresTaskRepository.kt 文件。
打开 PostgresTaskRepository.kt 文件并使用以下实现创建一个新类型:
kotlinpackage com.example.model import com.example.db.TaskDAO import com.example.db.TaskTable import com.example.db.daoToModel import com.example.db.withTransaction import org.jetbrains.exposed.v1.core.eq import org.jetbrains.exposed.v1.jdbc.deleteWhere class PostgresTaskRepository : TaskRepository { override suspend fun allTasks(): List<Task> = withTransaction { TaskDAO.all().map(::daoToModel) } override suspend fun tasksByPriority(priority: Priority): List<Task> = withTransaction { TaskDAO .find { (TaskTable.priority eq priority.toString()) } .map(::daoToModel) } override suspend fun taskByName(name: String): Task? = withTransaction { TaskDAO .find { (TaskTable.name eq name) } .limit(1) .map(::daoToModel) .firstOrNull() } override suspend fun addTask(task: Task): Unit = withTransaction { TaskDAO.new { name = task.name description = task.description priority = task.priority.toString() } } override suspend fun removeTask(name: String): Boolean = withTransaction { val rowsDeleted = TaskTable.deleteWhere { TaskTable.name eq name } rowsDeleted == 1 } }在此实现中,你使用
TaskDAO和TaskTable类型的帮助程序方法与数据库进行交互。创建此新仓库后,剩下的唯一任务就是在路由中切换为使用它。
切换到新仓库
要切换到外部数据库,只需更改仓库类型。
打开 src/main/kotlin 中的 DI.kt 文件。
在
Application.configureDependencyInjection()函数中,将FakeTaskRepository替换为PostgresTaskRepository:kotlin//... import com.example.model.PostgresTaskRepository //... fun Application.configureDependencyInjection() { dependencies { provide<TaskRepository> { PostgresTaskRepository() } } }因为你通过接口注入依赖项,所以实现的切换对于管理路由的代码是透明的。
在 IntelliJ IDEA 中,点击重新运行按钮 (
 ) 以重启应用程序。
导航到 http://0.0.0.0:8080/static/index.html。UI 保持不变,但现在从数据库中获取数据。
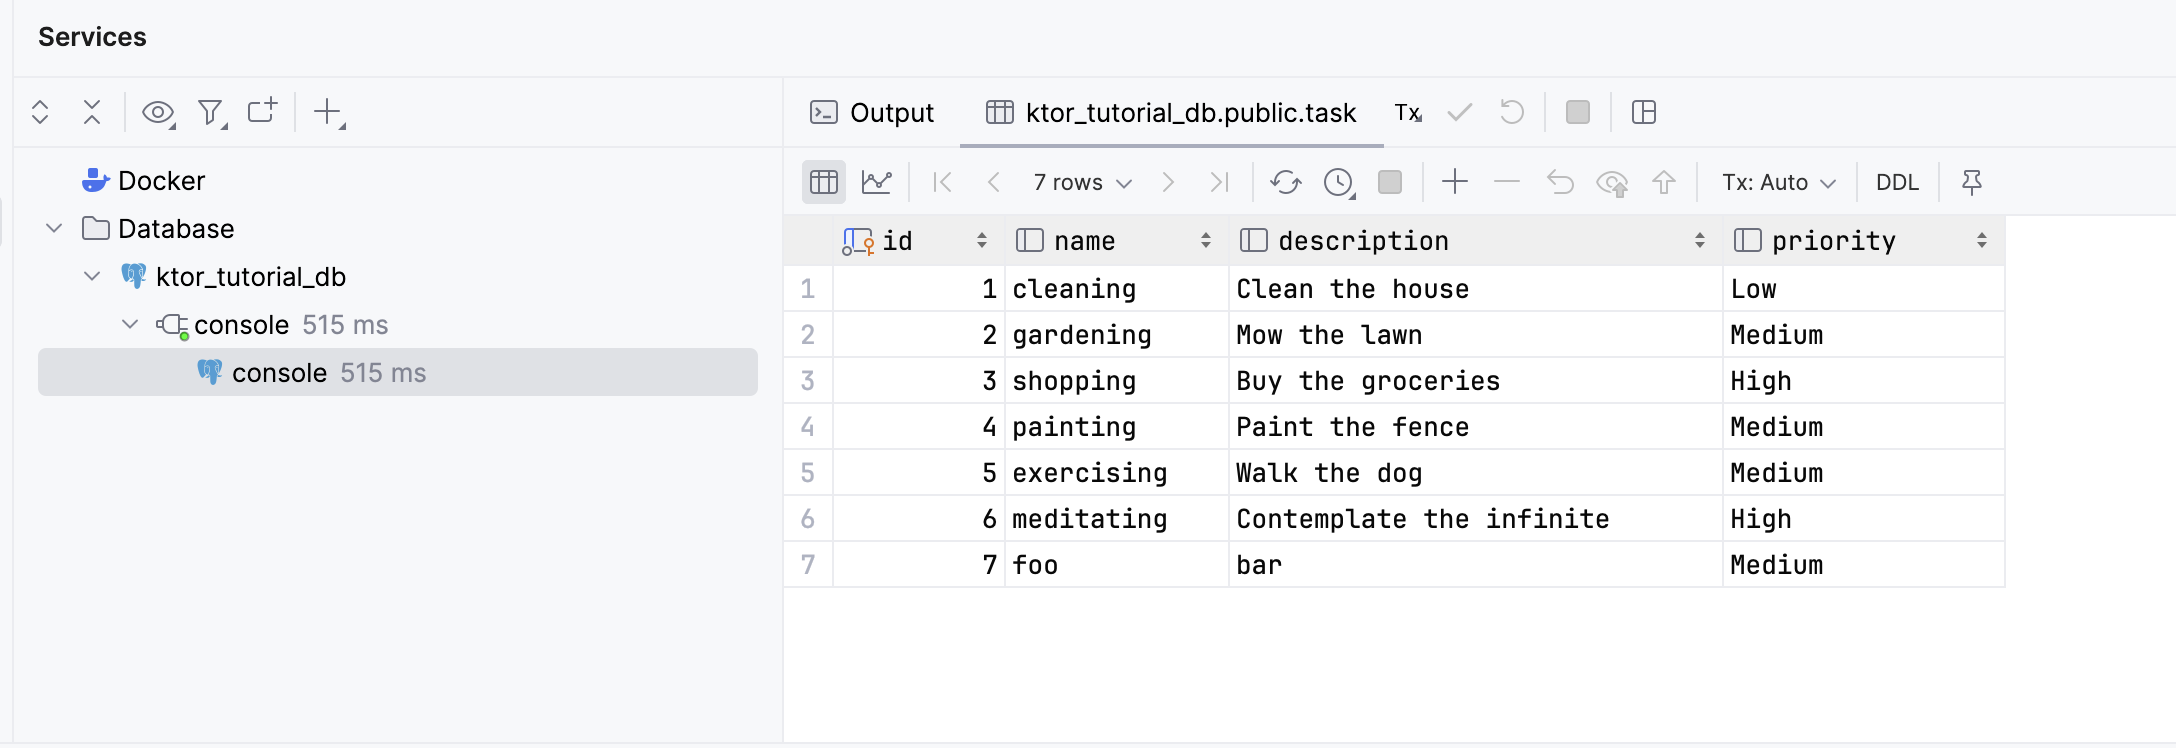
要验证这一点,请使用表单添加新任务,并查询 PostgreSQL 中 tasks 表中保存的数据。
在 IntelliJ IDEA 中,可以使用查询控制台和
SELECTSQL 语句来查询表格数据:sqlSELECT * FROM task;查询后,数据应显示在 Service 窗格中,包括新任务:
至此,你已成功将数据库集成到应用程序中。
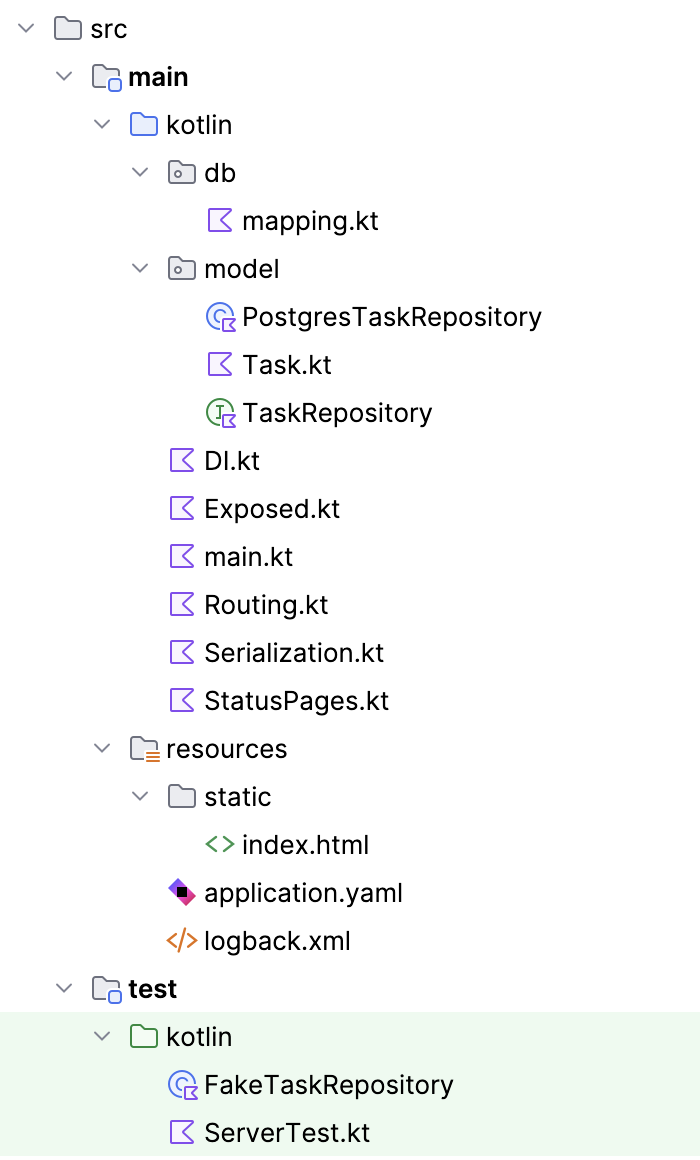
由于生产代码中不再需要 FakeTaskRepository 类型,因此可以将其移动到 src/test 中的测试源集中。
最终的项目结构应类似于:
后续步骤
现在,你拥有了一个与 Ktor RESTful 服务通信的应用程序。该服务反过来使用通过 Exposed 编写的仓库来访问 PostgreSQL。你还拥有一套测试套件,可在不需要 Web 服务器或数据库的情况下验证核心功能。
可以根据需要扩展此结构以支持任意功能,但是,你可能希望先考虑设计的非功能性方面,例如容错性、安全性和可扩展性。你可以首先将数据库连接设置提取到配置文件。