
使用 Kotlin、Ktor 和 Exposed 整合資料庫
程式碼範例: tutorial-server-db-integration
使用的外掛程式:Static Content了解如何服務靜態內容,例如樣式表、指令碼、圖片等。、 Content NegotiationContentNegotiation 外掛程式有兩個主要用途:在用戶端與伺服器之間協商媒體類型,以及將內容以特定格式進行序列化/反序列化。、Status PagesStatusPages 允許 Ktor 應用程式根據擲出的例外或狀態碼,對任何失敗狀態做出適當的回應。、 kotlinx.serializationContentNegotiation 外掛程式有兩個主要用途:在用戶端與伺服器之間協商媒體類型,以及將內容以特定格式進行序列化/反序列化。、 Dependency Injection必要相依性:io.ktor:ktor-server-di、 Exposed、 PostgreSQL
在本文中,你將學習如何使用 Kotlin 的 SQL 程式庫 Exposed,將 Ktor 服務與關聯式資料庫進行整合。
完成本教學後,你將學會如何執行以下操作:
- 建立使用 JSON 序列化的 RESTful 服務。
- 將不同的存儲庫注入到這些服務中。
- 使用記憶體內存儲庫為你的服務建立單元測試。
- 使用 Exposed 和相依注入 (DI) 建置可運作的存儲庫。
- 部署存取外部資料庫的服務。
在先前的教學中,我們使用工作管理員範例介紹了基礎知識,例如處理請求、建立 RESTful API 或使用 Thymeleaf 範本建置 Web 應用程式。
雖然這些教學重點放在使用簡單的記憶體內 TaskRepository 實現前端功能,但本指南將重點轉移到展示 Ktor 服務如何透過 Exposed SQL 程式庫與關聯式資料庫進行互動。
即使本指南篇幅較長且更為複雜,你仍然可以快速產出可執行的程式碼,並逐步引入新功能。
本指南包含兩個部分:
先決條件
你可以獨立完成本教學,但我們建議你先完成建立 RESTful API 教學,以熟悉內容交涉與 REST。
我們建議你安裝 IntelliJ IDEA,但你也可以使用自選的其他 IDE。
建立 RESTful 服務和記憶體內存儲庫
首先,你將重新建立工作管理員的 RESTful 服務。一開始你將使用記憶體內存儲庫,但你會構建一個易於替換的架構設計。
你將分六個階段進行:
使用外掛程式建立新專案
若要使用 Ktor 專案產生器建立新專案,請遵循以下步驟:
前往 Ktor 專案產生器 。
在 Project artifact 欄位中,輸入
com.example.ktor-exposed-task-app作為專案產物的名稱。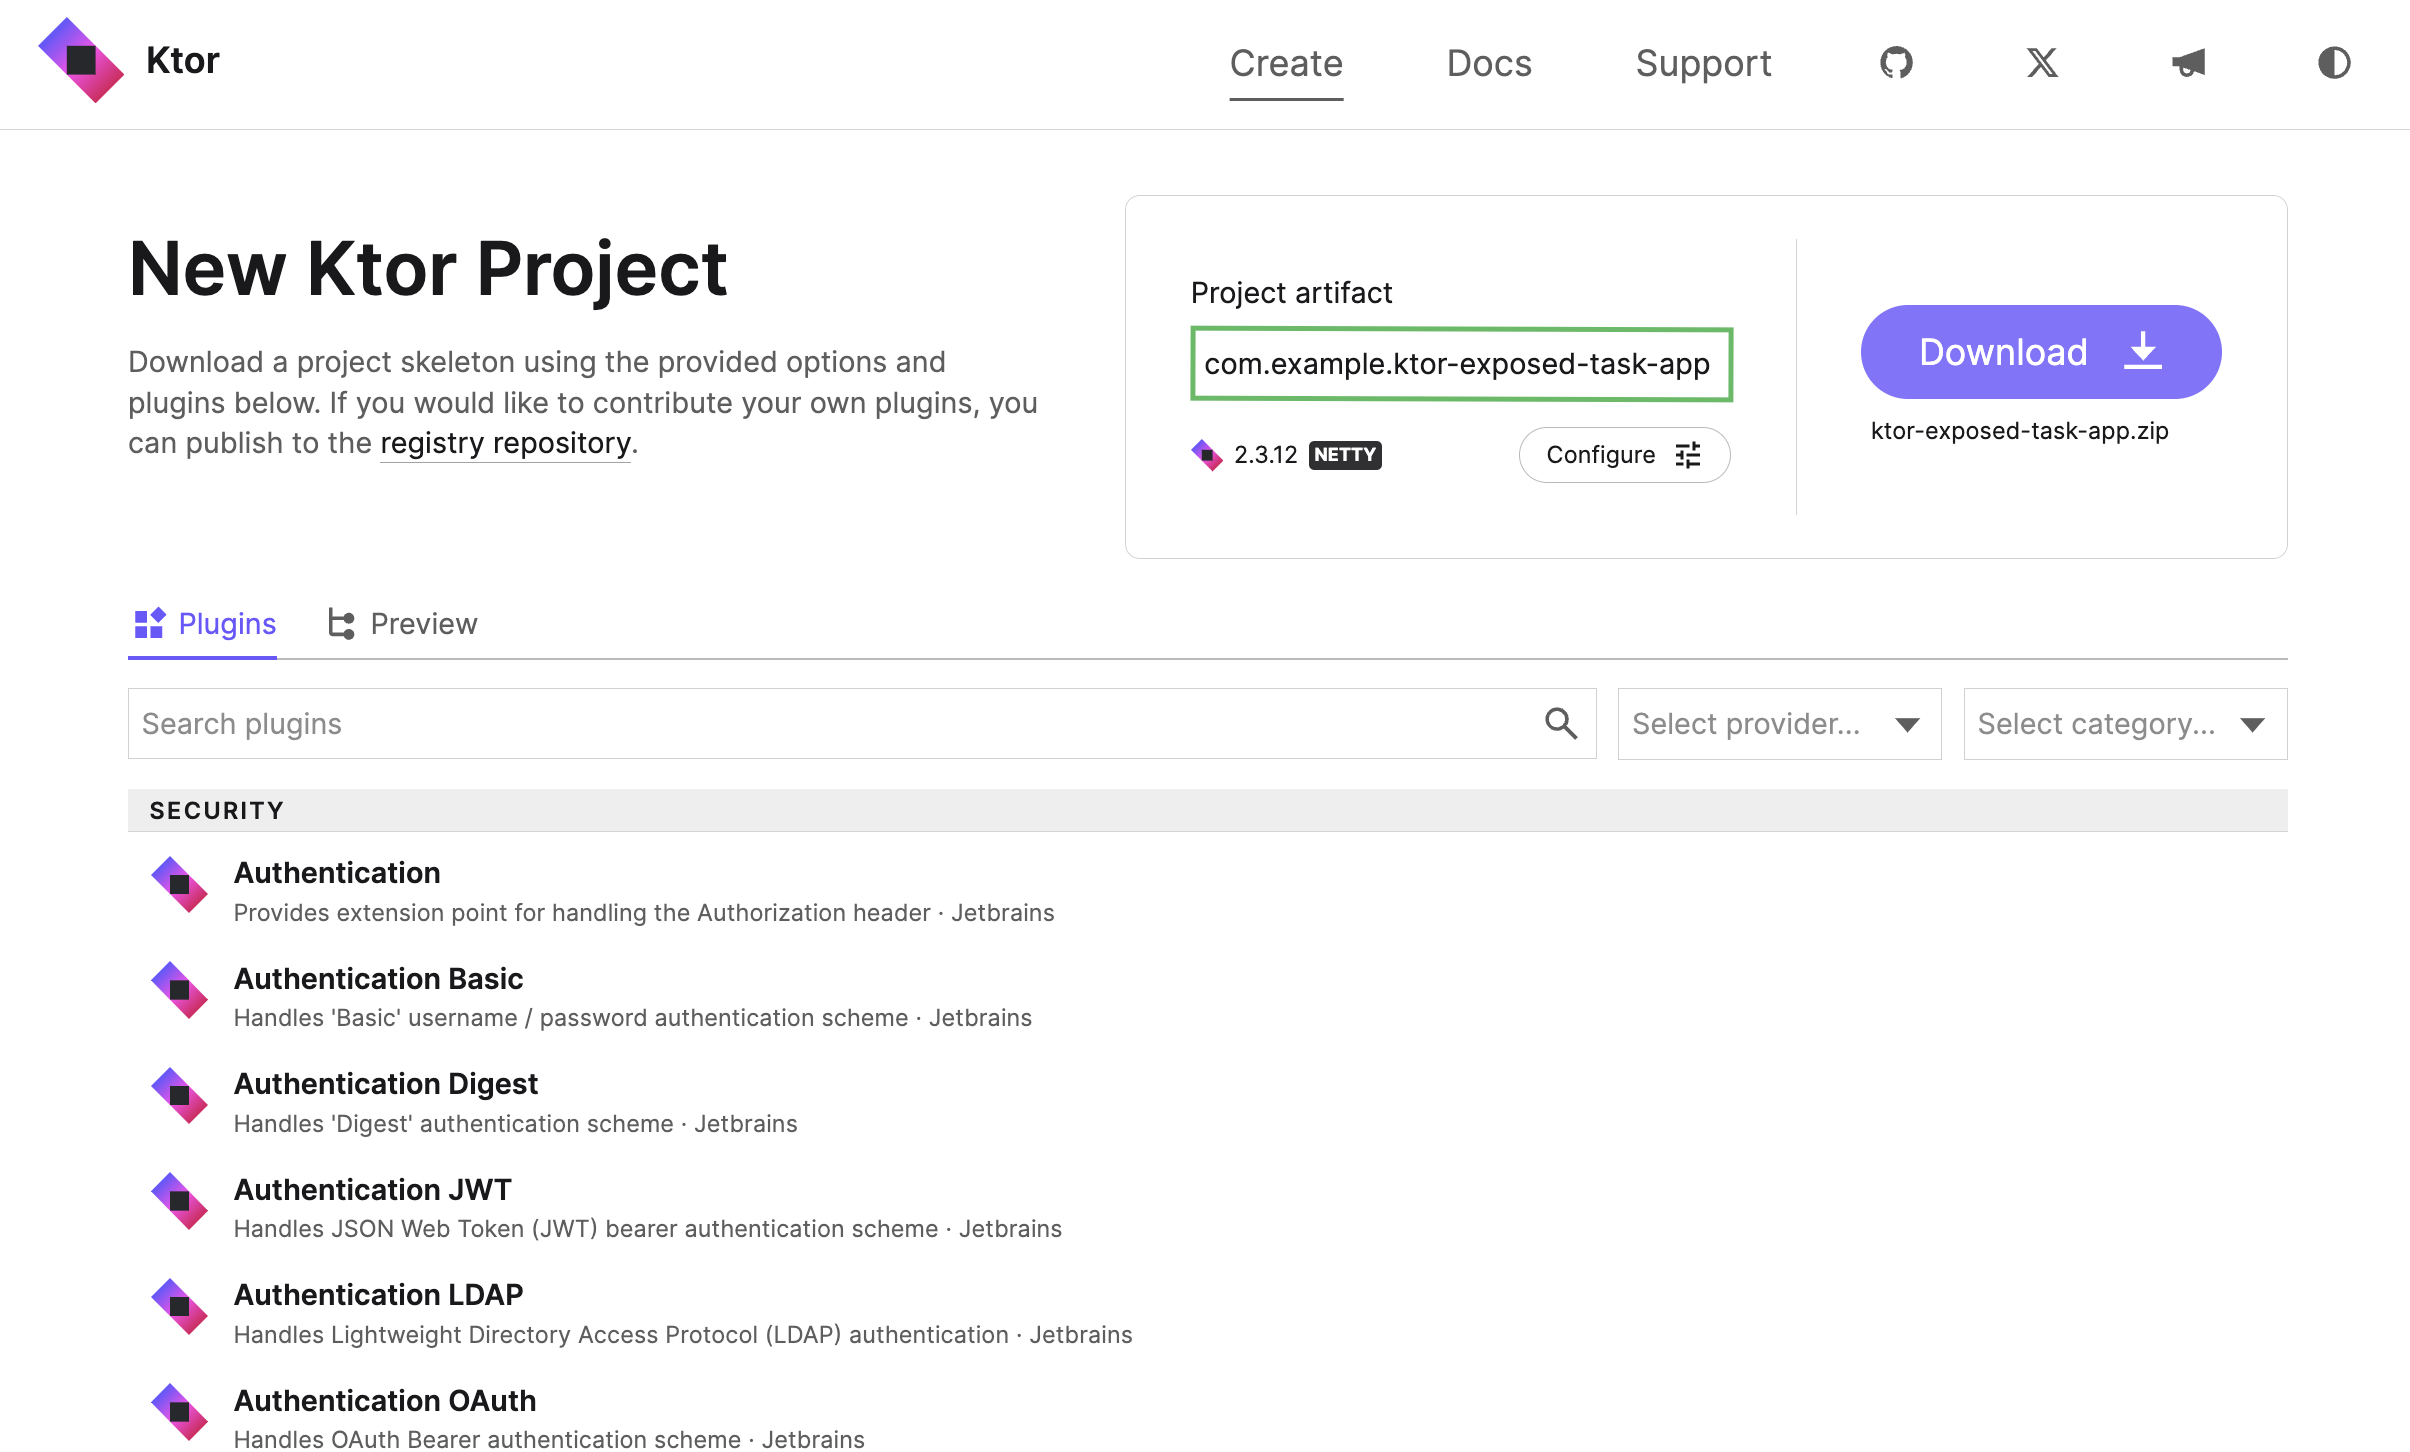
在外掛程式區段中,搜尋並點擊 Add 按鈕新增以下外掛程式:
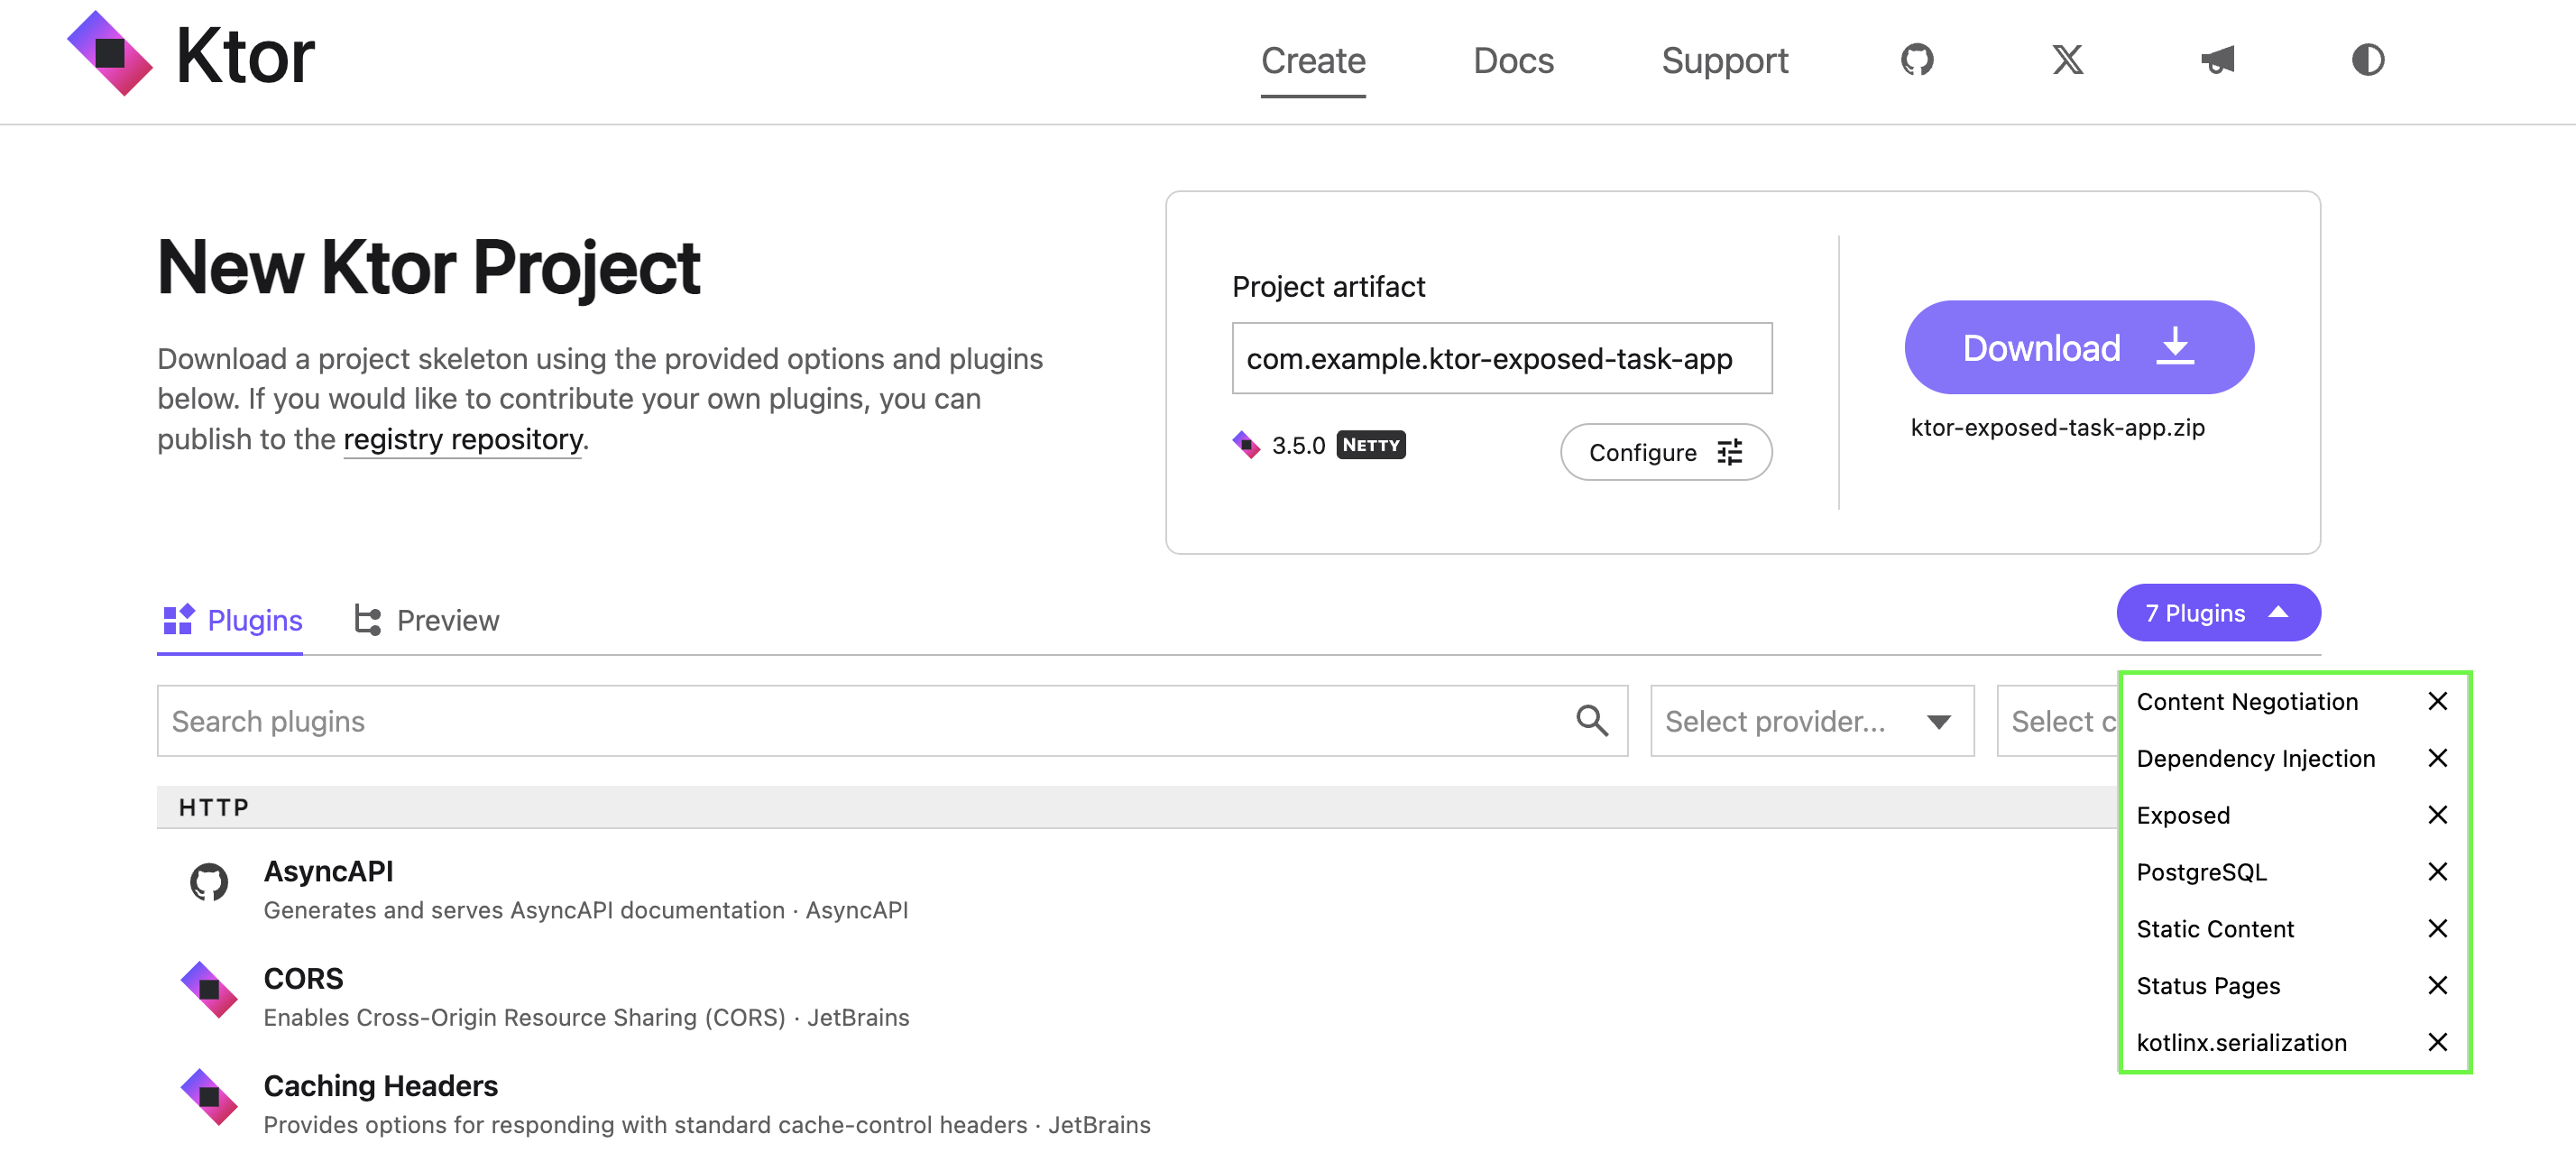
- Content Negotiation
- kotlinx.serialization
- Static Content
- Status Pages
- Dependency Injection
- Exposed
- PostgreSQL
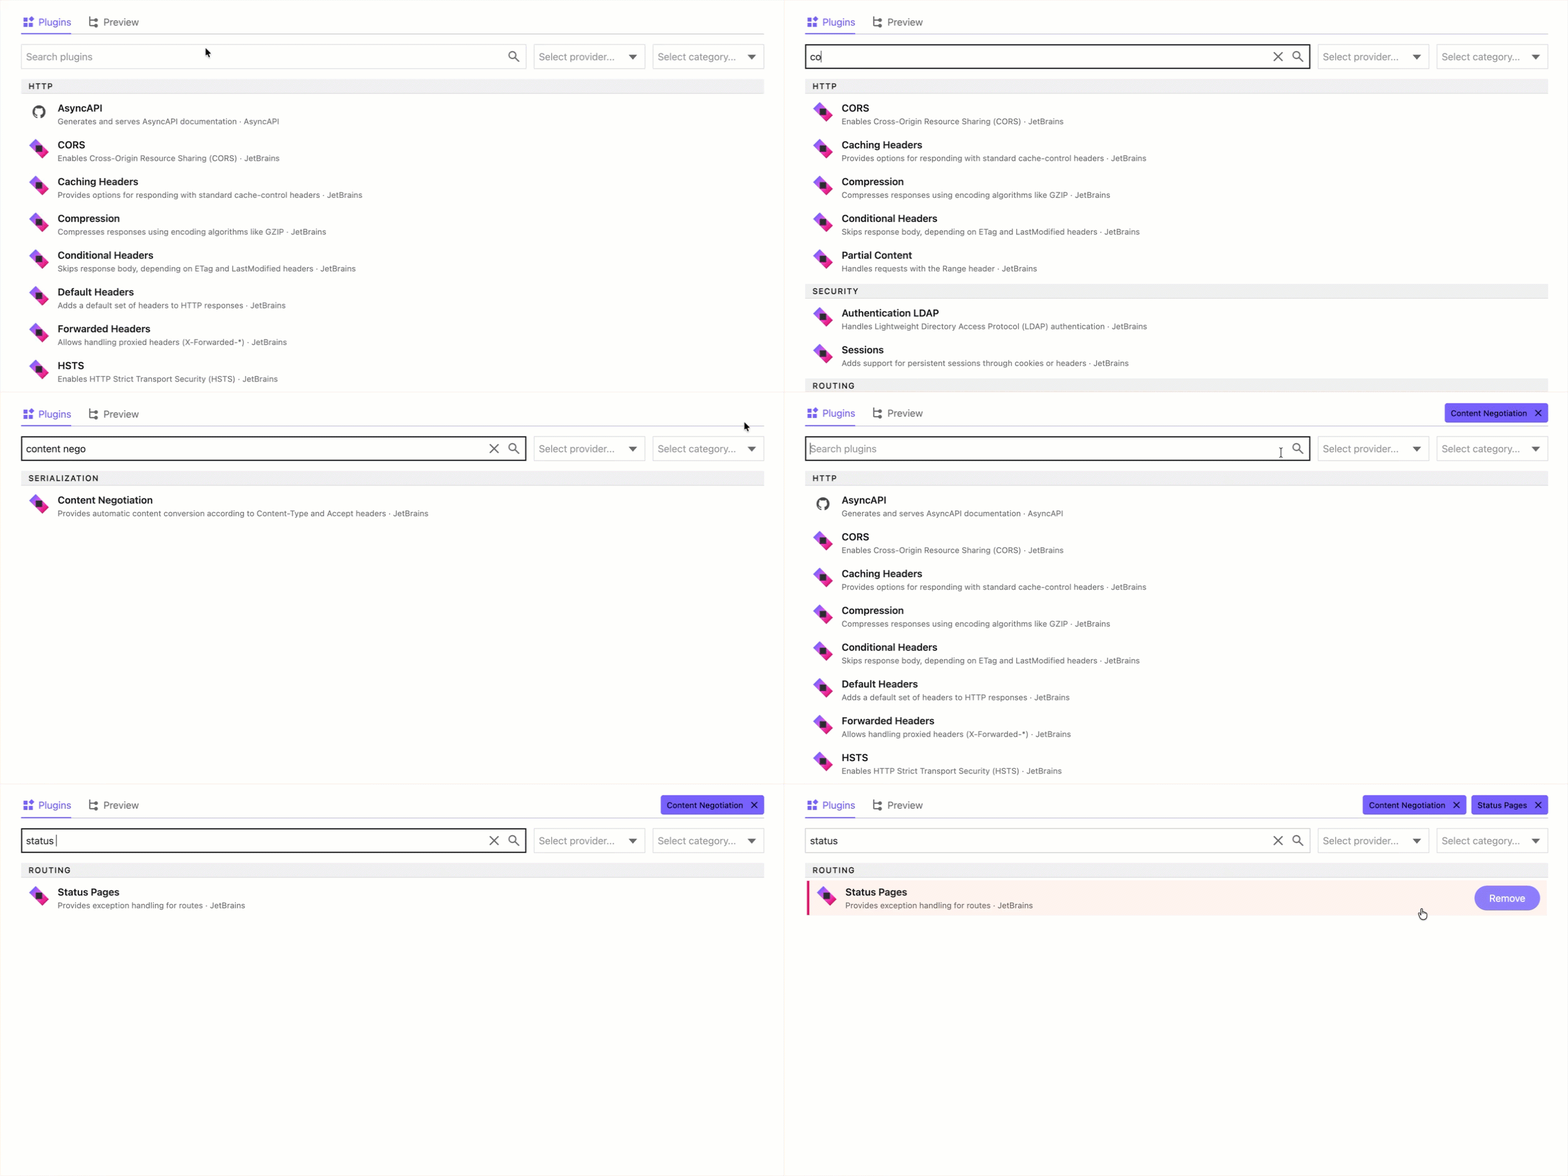
新增外掛程式後,點擊外掛程式區段右上角的 7 plugins 按鈕以檢視已新增的外掛程式。
接著你將看到所有將新增至專案的外掛程式清單:
點擊 Download 按鈕以產生並下載你的 Ktor 專案。
在 IntelliJ IDEA 或自選的其他 IDE 中開啟產生的專案。
巡覽至 src/main/kotlin 並刪除 CitySchema.kt、UsersService.kt、GreetingService.kt 和 Postgres.kt 檔案。
開啟 Exposed.kt 檔案並移除
.configureExposed()函式的內容:kotlinsuspend fun Application.configureExposed() { }移除此功能的原因在於 Ktor 專案產生器新增了範例程式碼,用於展示如何將使用者與城市的資料保存到 HSQLDB 或 PostgreSQL。在本教學中你不需要這些範例程式碼。
開啟 gradle/libs.versions.toml 檔案,並確認指定了最新的 Exposed 版本:
kotlin[versions] #... exposed = 1.6.0
新增入門程式碼
巡覽至 src/main/kotlin 並建立名為 model 的子套件。
在 model 套件中,建立新的 Task.kt 檔案。
開啟 Task.kt 並新增代表優先級的列舉以及代表任務的類別:
kotlinpackage com.example.model import kotlinx.serialization.Serializable enum class Priority { Low, Medium, High, Vital } @Serializable data class Task( val name: String, val description: String, val priority: Priority )Task類別使用來自kotlinx.serialization程式庫的Serializable型別加上註解。如同先前的教學,你將建立一個記憶體內存儲庫。不過,這次存儲庫將實作一個介面,以便你日後輕鬆替換。
在 model 子套件中,建立新的 TaskRepository.kt 檔案。
開啟 TaskRepository.kt 並新增以下介面:
kotlinpackage com.example.model interface TaskRepository { fun allTasks(): List<Task> fun tasksByPriority(priority: Priority): List<Task> fun taskByName(name: String): Task? fun addTask(task: Task) fun removeTask(name: String): Boolean }在同一個目錄中建立新的 FakeTaskRepository.kt 檔案。
開啟 FakeTaskRepository.kt 並新增以下類別:
kotlinpackage com.example.model class FakeTaskRepository : TaskRepository { private val tasks = mutableListOf( Task("cleaning", "Clean the house", Priority.Low), Task("gardening", "Mow the lawn", Priority.Medium), Task("shopping", "Buy the groceries", Priority.High), Task("painting", "Paint the fence", Priority.Medium) ) override fun allTasks(): List<Task> = tasks override fun tasksByPriority(priority: Priority) = tasks.filter { it.priority == priority } override fun taskByName(name: String) = tasks.find { it.name.equals(name, ignoreCase = true) } override fun addTask(task: Task) { if (taskByName(task.name) != null) { throw IllegalStateException("Cannot duplicate task names!") } tasks.add(task) } override fun removeTask(name: String): Boolean { return tasks.removeIf { it.name == name } } }
新增路由
開啟 src/main/kotlin 中的 Serialization.kt 檔案。
將現有的
Application.configureSerialization()函式替換為以下實作:kotlinpackage com.example import com.example.model.Priority import com.example.model.Task import com.example.model.TaskRepository import io.ktor.http.* import io.ktor.serialization.* import io.ktor.serialization.kotlinx.json.* import io.ktor.server.application.* import io.ktor.server.plugins.contentnegotiation.* import io.ktor.server.plugins.di.dependencies import io.ktor.server.request.* import io.ktor.server.response.* import io.ktor.server.routing.* suspend fun Application.configureSerialization() { val repository = dependencies.resolve<TaskRepository>() install(ContentNegotiation) { json() } routing { route("/tasks") { get { val tasks = repository.allTasks() call.respond(tasks) } get("/byName/{taskName}") { val name = call.parameters["taskName"] if (name == null) { call.respond(HttpStatusCode.BadRequest) return@get } val task = repository.taskByName(name) if (task == null) { call.respond(HttpStatusCode.NotFound) return@get } call.respond(task) } get("/byPriority/{priority}") { val priorityAsText = call.parameters["priority"] if (priorityAsText == null) { call.respond(HttpStatusCode.BadRequest) return@get } try { val priority = Priority.valueOf(priorityAsText) val tasks = repository.tasksByPriority(priority) if (tasks.isEmpty()) { call.respond(HttpStatusCode.NotFound) return@get } call.respond(tasks) } catch (ex: IllegalArgumentException) { call.respond(HttpStatusCode.BadRequest) } } post { try { val task = call.receive<Task>() repository.addTask(task) call.respond(HttpStatusCode.NoContent) } catch (ex: IllegalStateException) { call.respond(HttpStatusCode.BadRequest) } catch (ex: JsonConvertException) { call.respond(HttpStatusCode.BadRequest) } } delete("/{taskName}") { val name = call.parameters["taskName"] if (name == null) { call.respond(HttpStatusCode.BadRequest) return@delete } if (repository.removeTask(name)) { call.respond(HttpStatusCode.NoContent) } else { call.respond(HttpStatusCode.NotFound) } } } } }這與你在建立 RESTful API 教學中實作的路由相同,不同之處在於你現在是從 Ktor 的相依注入容器中解析存儲庫。由於相依項的型別是
interface,因此可以注入許多不同的實作。因為
dependencies.resolve()是一個 suspend 函式,所以.configureSerialization()也必須宣告為 suspend。現在你已為
.configureSerialization()新增了相依項,現有的呼叫將無法編譯。幸運的是,這個函式只會被呼叫一次。開啟 src/main/kotlin 中的 DI.kt 檔案。
將
.configureDependencyInjection()函式的內容替換為以下實作:kotlinimport com.example.model.FakeTaskRepository import com.example.model.TaskRepository // ... fun Application.configureDependencyInjection() { dependencies { provide<TaskRepository> { FakeTaskRepository() } } }你現在將
FakeTaskRepository註冊為TaskRepository的實作。長遠目標是能夠將其替換為PostgresTaskRepository。開啟位於 src/main/resources 資料夾中的 application.yaml 檔案,並確認
.configureDependencyInjection()函式列在.configureSerialization()之前:yamlktor: deployment: port: 8080 application: modules: - com.example.DIKt.configureDependencyInjection - com.example.SerializationKt.configureSerialization - com.example.ExposedKt.configureExposed - com.example.StatusPagesKt.configureStatusPages - com.example.RoutingKt.configureRouting
新增用戶端頁面
開啟 src/main/resources/static 中的 index.html 檔案。
將目前內容替換為以下實作:
html<html> <head> <title>A Simple SPA For Tasks</title> <script type="application/javascript"> function displayAllTasks() { clearTasksTable(); fetchAllTasks().then(displayTasks) } function displayTasksWithPriority() { clearTasksTable(); const priority = readTaskPriority(); fetchTasksWithPriority(priority).then(displayTasks) } function displayTask(name) { fetchTaskWithName(name).then(t => taskDisplay().innerHTML = `${t.priority} priority task ${t.name} with description "${t.description}"` ) } function deleteTask(name) { deleteTaskWithName(name).then(() => { clearTaskDisplay(); displayAllTasks(); }) } function deleteTaskWithName(name) { return sendDELETE(`/tasks/${name}`) } function addNewTask() { const task = buildTaskFromForm(); sendPOST("/tasks", task).then(displayAllTasks); } function buildTaskFromForm() { return { name: getTaskFormValue("newTaskName"), description: getTaskFormValue("newTaskDescription"), priority: getTaskFormValue("newTaskPriority") } } function getTaskFormValue(controlName) { return document.addTaskForm[controlName].value; } function taskDisplay() { return document.getElementById("currentTaskDisplay"); } function readTaskPriority() { return document.priorityForm.priority.value } function fetchTasksWithPriority(priority) { return sendGET(`/tasks/byPriority/${priority}`); } function fetchTaskWithName(name) { return sendGET(`/tasks/byName/${name}`); } function fetchAllTasks() { return sendGET("/tasks") } function sendGET(url) { return fetch( url, {headers: {'Accept': 'application/json'}} ).then(response => { if (response.ok) { return response.json() } return []; }); } function sendPOST(url, data) { return fetch(url, { method: 'POST', headers: {'Content-Type': 'application/json'}, body: JSON.stringify(data) }); } function sendDELETE(url) { return fetch(url, { method: "DELETE" }); } function tasksTable() { return document.getElementById("tasksTableBody"); } function clearTasksTable() { tasksTable().innerHTML = ""; } function clearTaskDisplay() { taskDisplay().innerText = "None"; } function displayTasks(tasks) { const tasksTableBody = tasksTable() tasks.forEach(task => { const newRow = taskRow(task); tasksTableBody.appendChild(newRow); }); } function taskRow(task) { return tr([ td(task.name), td(task.priority), td(viewLink(task.name)), td(deleteLink(task.name)), ]); } function tr(children) { const node = document.createElement("tr"); children.forEach(child => node.appendChild(child)); return node; } function td(content) { const node = document.createElement("td"); if (content instanceof Element) { node.appendChild(content) } else { node.appendChild(document.createTextNode(content)); } return node; } function viewLink(taskName) { const node = document.createElement("a"); node.setAttribute( "href", `javascript:displayTask("${taskName}")` ) node.appendChild(document.createTextNode("view")); return node; } function deleteLink(taskName) { const node = document.createElement("a"); node.setAttribute( "href", `javascript:deleteTask("${taskName}")` ) node.appendChild(document.createTextNode("delete")); return node; } </script> </head> <body onload="displayAllTasks()"> <h1>Task Manager Client</h1> <form action="javascript:displayAllTasks()"> <span>View all the tasks</span> <input type="submit" value="Go"> </form> <form name="priorityForm" action="javascript:displayTasksWithPriority()"> <span>View tasks with priority</span> <select name="priority"> <option name="Low">Low</option> <option name="Medium">Medium</option> <option name="High">High</option> <option name="Vital">Vital</option> </select> <input type="submit" value="Go"> </form> <form name="addTaskForm" action="javascript:addNewTask()"> <span>Create new task with</span> <label for="newTaskName">name</label> <input type="text" id="newTaskName" name="newTaskName" size="10"> <label for="newTaskDescription">description</label> <input type="text" id="newTaskDescription" name="newTaskDescription" size="20"> <label for="newTaskPriority">priority</label> <select id="newTaskPriority" name="newTaskPriority"> <option name="Low">Low</option> <option name="Medium">Medium</option> <option name="High">High</option> <option name="Vital">Vital</option> </select> <input type="submit" value="Go"> </form> <hr> <div> Current task is <em id="currentTaskDisplay">None</em> </div> <hr> <table> <thead> <tr> <th>Name</th> <th>Priority</th> <th></th> <th></th> </tr> </thead> <tbody id="tasksTableBody"> </tbody> </table> </body> </html>這與先前教學中使用的 SPA 相同。由於它是用 JavaScript 編寫的,並且僅使用瀏覽器內可用的程式庫,因此你不需要擔心用戶端相依性的問題。
手動測試應用程式
在 IntelliJ IDEA 中,點擊執行按鈕 (
 ) 以啟動應用程式。
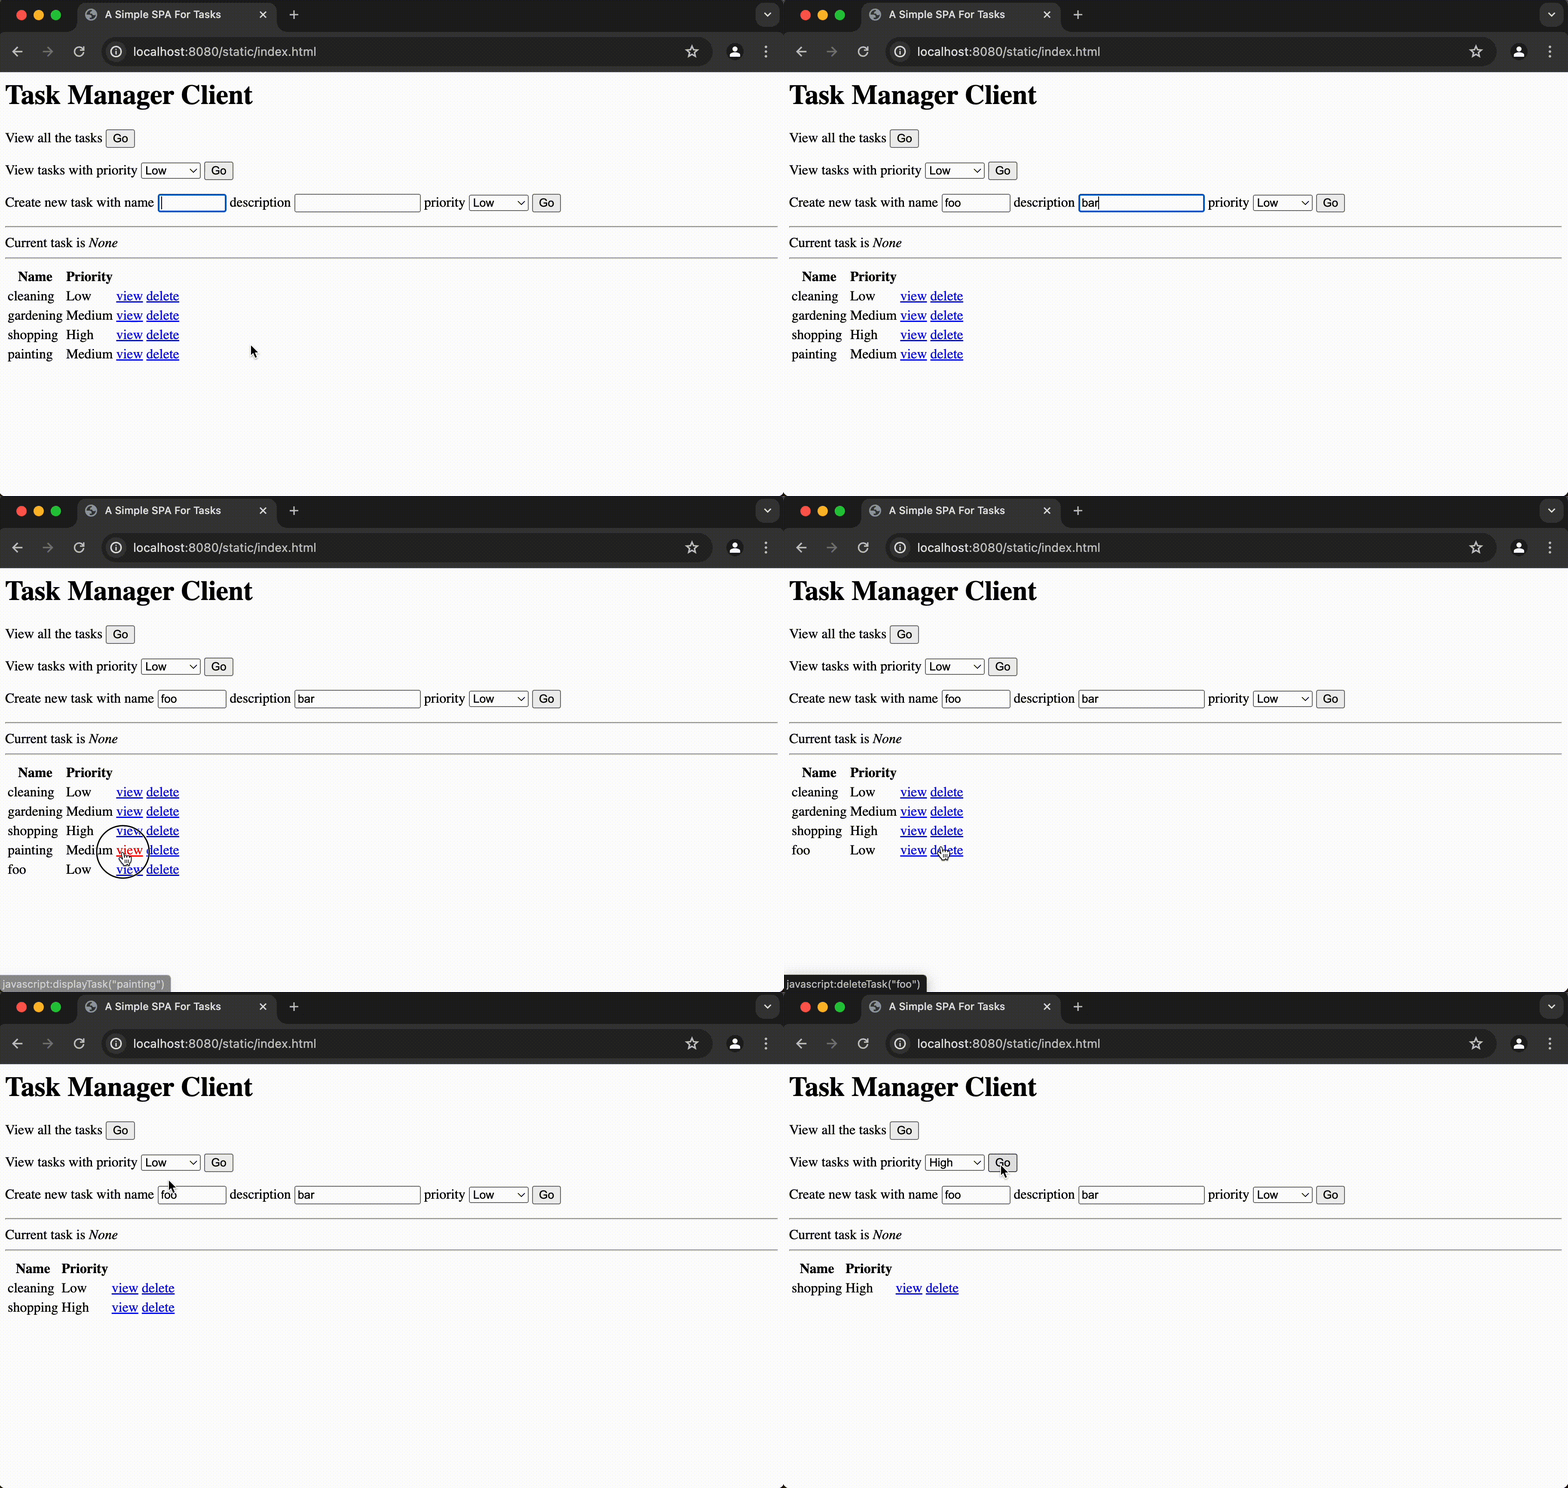
在瀏覽器中前往 http://0.0.0.0:8080/static/index.html。你應該會看到由三個表單和一個顯示篩選結果的表格所組成的用戶端頁面。
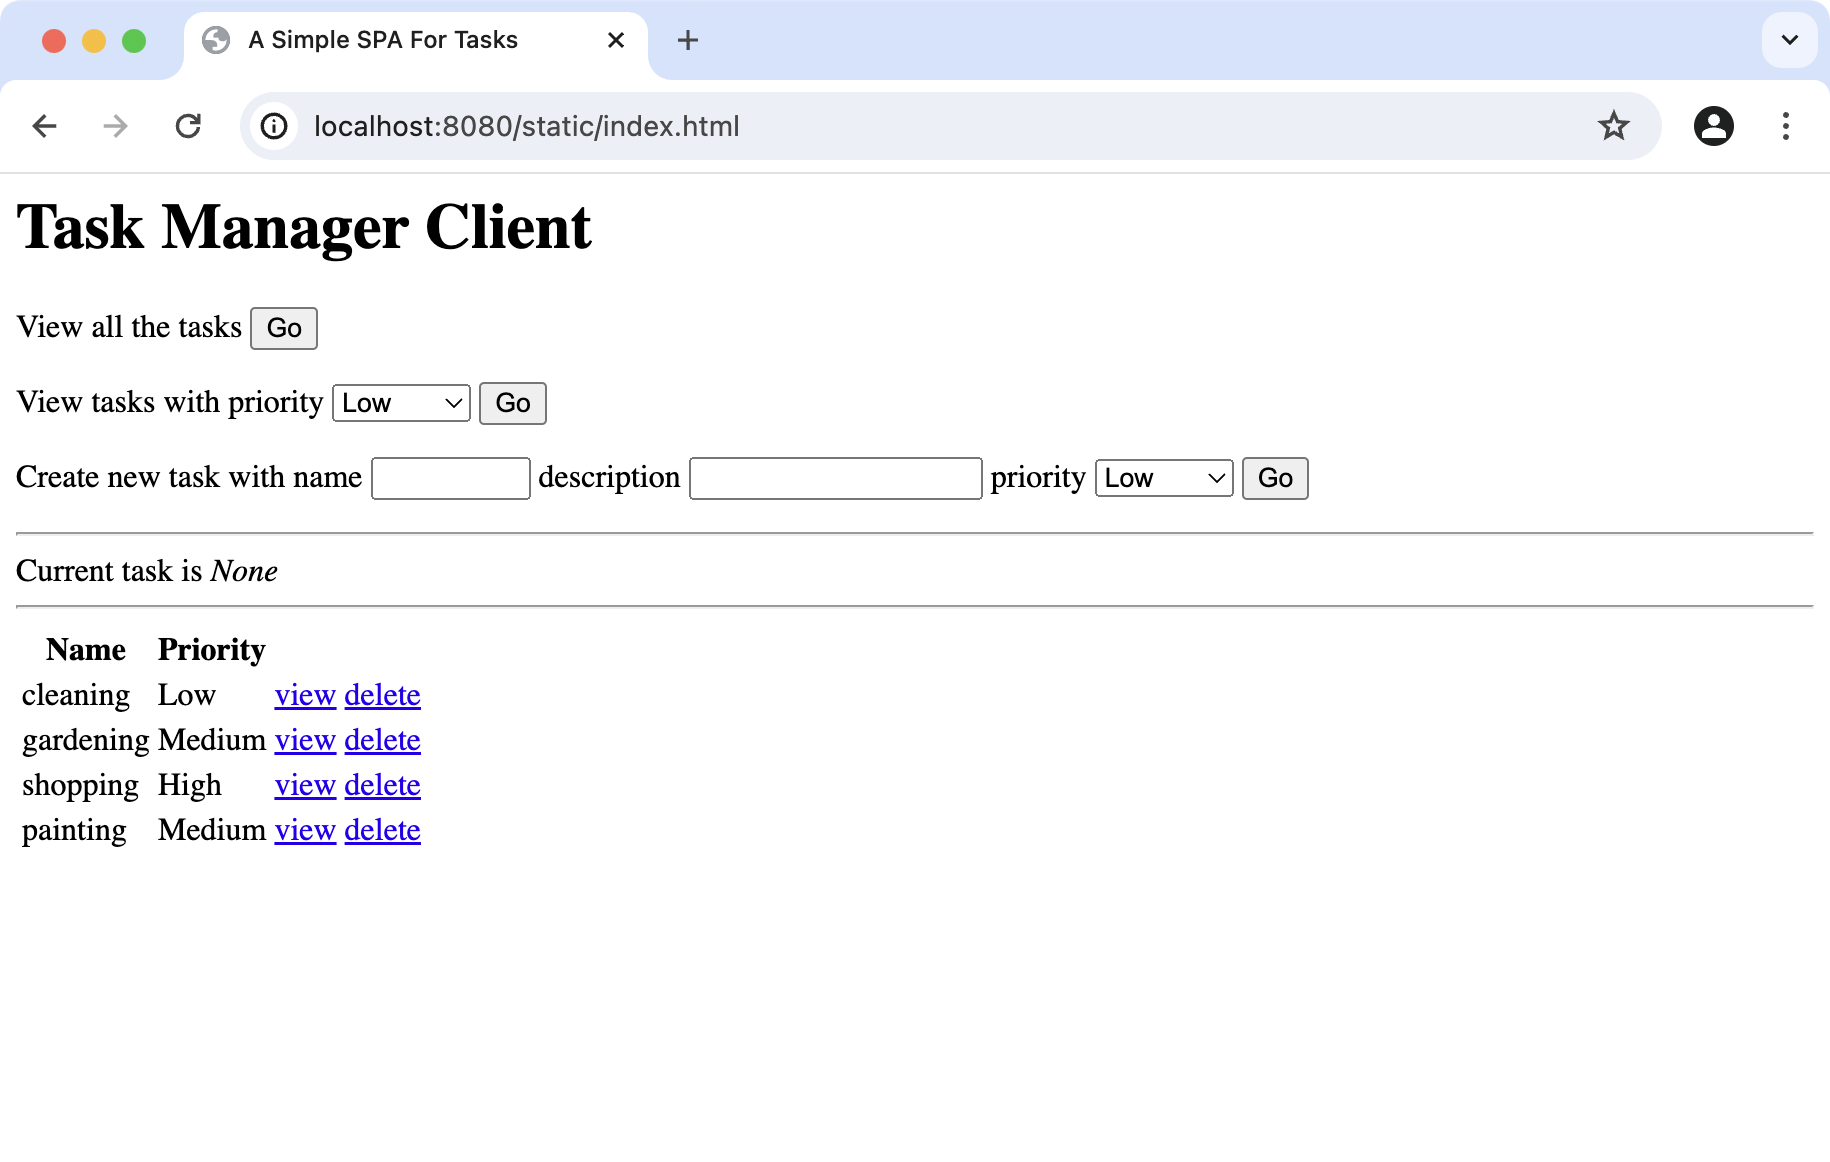
填寫表單並使用 Go 按鈕送出以測試應用程式。使用表格項目上的 View 和 Delete 按鈕。
新增自動化單元測試
開啟 src/test/kotlin 中的 ServerTest.kt 檔案並新增以下測試:
kotlinpackage com.example import com.example.model.Priority import com.example.model.Task import com.example.model.TaskRepository import io.ktor.client.call.* import io.ktor.client.plugins.contentnegotiation.* import io.ktor.server.plugins.di.dependencies import io.ktor.client.request.* import io.ktor.http.* import io.ktor.serialization.kotlinx.json.* import io.ktor.server.application.* import io.ktor.server.testing.* import kotlin.test.* suspend fun Application.configureTestApp() { dependencies { provide<TaskRepository> { FakeTaskRepository() } } configureSerialization() configureStatusPages() configureRouting() } class ServerTest { @Test fun tasksCanBeFoundByPriority() = testApplication { application { configureTestApp() } val client = createClient { install(ContentNegotiation) { json() } } val response = client.get("/tasks/byPriority/Medium") val results = response.body<List<Task>>() assertEquals(HttpStatusCode.OK, response.status) val expectedTaskNames = listOf("gardening", "painting") val actualTaskNames = results.map(Task::name) assertContentEquals(expectedTaskNames, actualTaskNames) } @Test fun invalidPriorityProduces400() = testApplication { application { configureTestApp() } val response = client.get("/tasks/byPriority/Invalid") assertEquals(HttpStatusCode.BadRequest, response.status) } @Test fun unusedPriorityProduces404() = testApplication { application { configureTestApp() } val response = client.get("/tasks/byPriority/Vital") assertEquals(HttpStatusCode.NotFound, response.status) } @Test fun newTasksCanBeAdded() = testApplication { application { configureTestApp() } val client = createClient { install(ContentNegotiation) { json() } } val task = Task("swimming", "Go to the beach", Priority.Low) val response1 = client.post("/tasks") { header( HttpHeaders.ContentType, ContentType.Application.Json ) setBody(task) } assertEquals(HttpStatusCode.NoContent, response1.status) val response2 = client.get("/tasks") assertEquals(HttpStatusCode.OK, response2.status) val taskNames = response2 .body<List<Task>>() .map { it.name } assertContains(taskNames, "swimming") } }為了讓這些測試能夠編譯並執行,你需要為 Ktor Client 新增對 Content Negotiation 外掛程式的相依性。
開啟 build.gradle.kts 檔案並新增以下相依性:
kotlindependencies { //... testImplementation(ktorLibs.client.contentNegotiation) }在 IntelliJ IDEA 中,點擊編輯器右側的通知 Gradle 圖示 (
 ) 以載入 Gradle 變更。
在 IntelliJ IDEA 中,點擊測試類別定義旁邊的執行按鈕 (
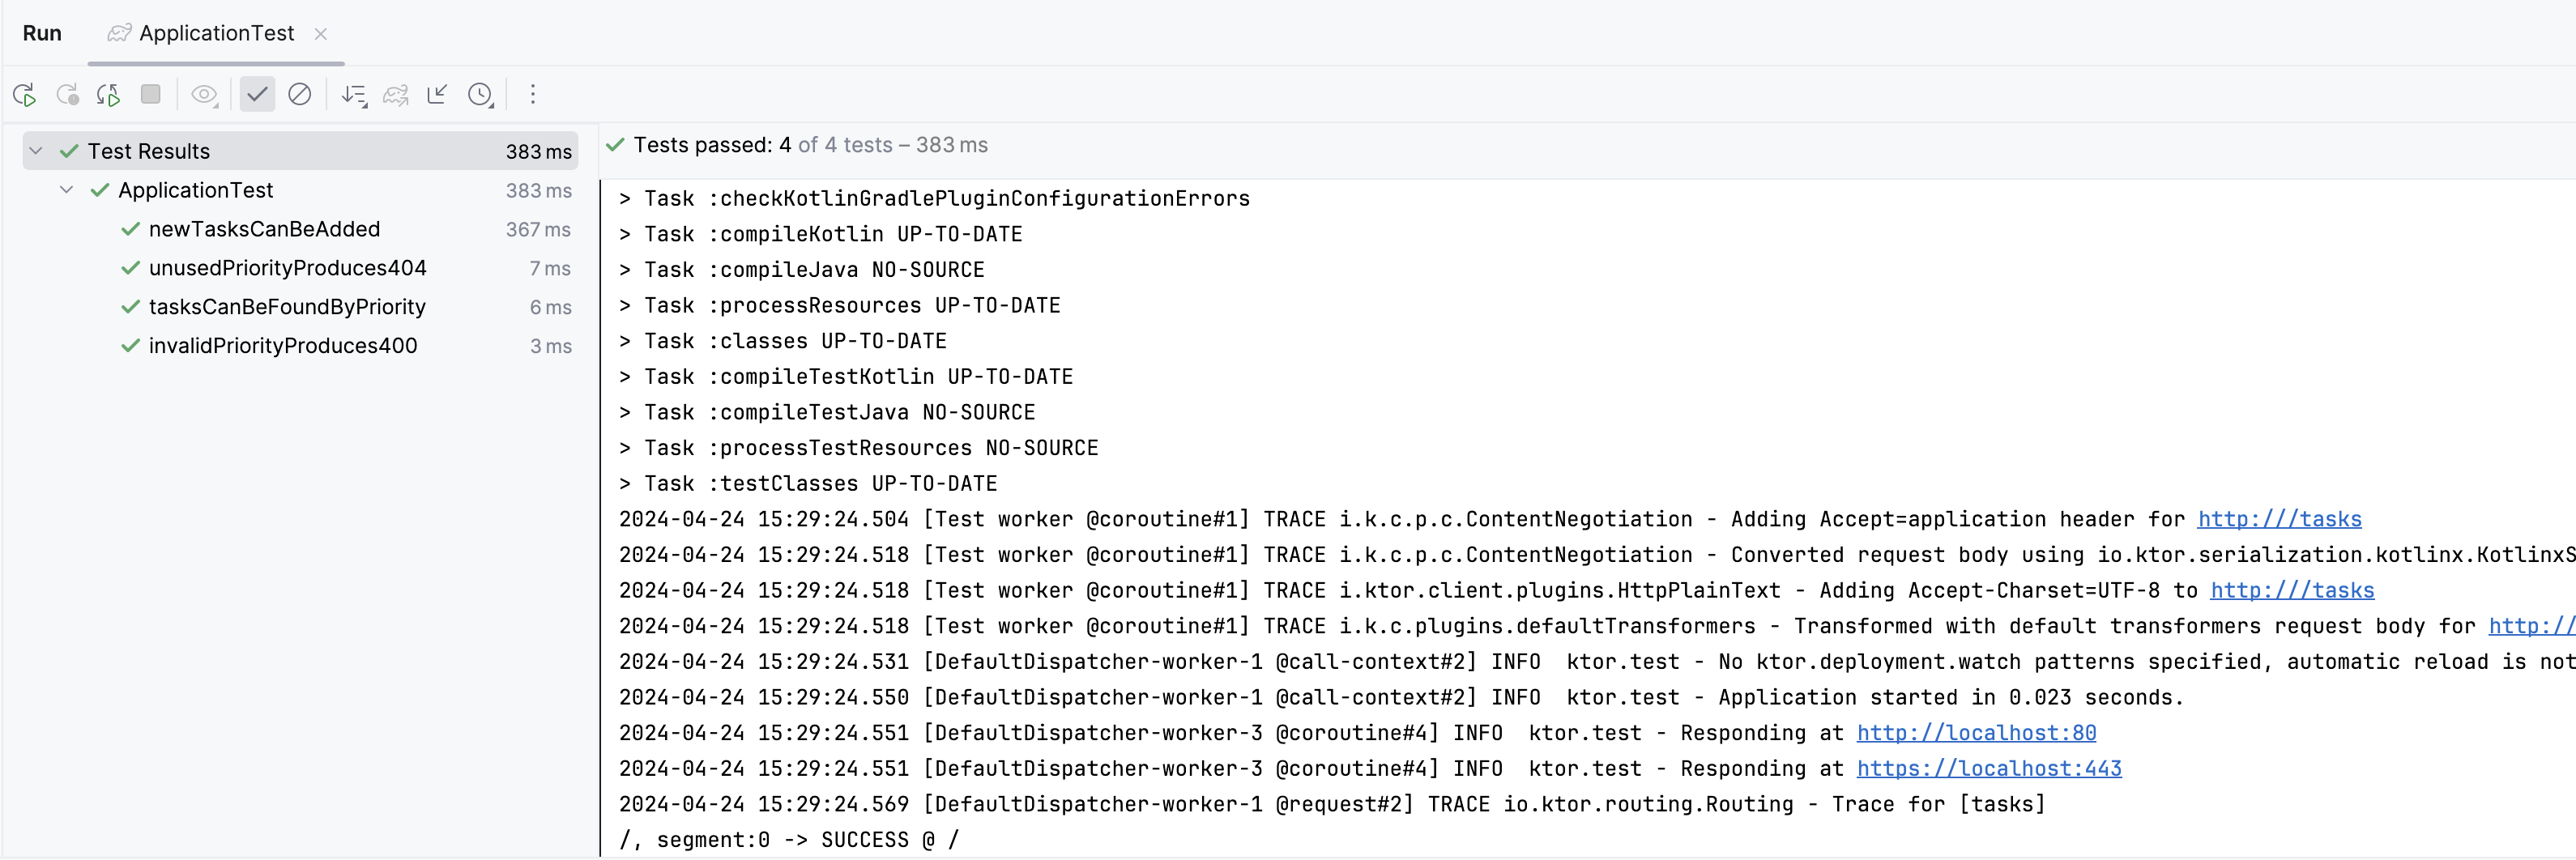
) 以執行測試。接著你應該會在 Run 窗格中看到測試已成功執行:
新增 PostgreSQL 存儲庫
現在你已經擁有一個使用記憶體內資料且可運作的應用程式,下一步是將資料儲存外部化到 PostgreSQL 資料庫中。
你將透過以下步驟實現此目標:
- 在 PostgreSQL 中建立資料庫架構。
- 調整
TaskRepository以支援非同步存取。 - 在應用程式中設定資料庫連線。
- 將
Task型別對應到關聯的資料庫資料表。 - 根據對應建立新的存儲庫。
- 在啟動程式碼中切換到新的存儲庫。
建立資料庫架構
使用你選擇的資料庫管理工具,在 PostgreSQL 中建立一個新的資料庫。只要你能記住,名稱並不重要。在此範例中,我們將使用
ktor_tutorial_db。如需有關 PostgreSQL 的詳細資訊,請參閱官方文件。
在 IntelliJ IDEA 中,你可以使用資料庫工具連接並管理你的 PostgreSQL 資料庫。
針對你的資料庫執行以下 SQL 指令。這些指令將建立並填入資料庫架構:
sqlDROP TABLE IF EXISTS task; CREATE TABLE task(id SERIAL PRIMARY KEY, name VARCHAR(50), description VARCHAR(50), priority VARCHAR(50)); INSERT INTO task (name, description, priority) VALUES ('cleaning', 'Clean the house', 'Low'); INSERT INTO task (name, description, priority) VALUES ('gardening', 'Mow the lawn', 'Medium'); INSERT INTO task (name, description, priority) VALUES ('shopping', 'Buy the groceries', 'High'); INSERT INTO task (name, description, priority) VALUES ('painting', 'Paint the fence', 'Medium'); INSERT INTO task (name, description, priority) VALUES ('exercising', 'Walk the dog', 'Medium'); INSERT INTO task (name, description, priority) VALUES ('meditating', 'Contemplate the infinite', 'High');請注意以下事項:
- 你正在建立一個名為
task的單一資料表,其中包含name、description和priority欄位。這些欄位需要對應到Task類別的屬性。 - 若資料表已存在則會重新建立,因此你可以重複執行此指令碼。
- 還有一個名為
id的額外欄位,其型別為SERIAL。這是一個整數值,用於為每一列提供主鍵。這些值將由資料庫代為指派。
- 你正在建立一個名為
調整現有存儲庫
針對資料庫執行查詢時,最好非同步執行,以避免阻塞處理 HTTP 請求的執行緒。在 Kotlin 中,最好透過協同程式來進行管理。
開啟 src/main/kotlin/model 中的 TaskRepository.kt 檔案。
為所有介面方法新增
suspend關鍵字:kotlininterface TaskRepository { suspend fun allTasks(): List<Task> suspend fun tasksByPriority(priority: Priority): List<Task> suspend fun taskByName(name: String): Task? suspend fun addTask(task: Task) suspend fun removeTask(name: String): Boolean }這將允許介面方法的實作在不同的協同程式發送器 (coroutine dispatcher) 上啟動工作。
你現在需要調整
FakeTaskRepository的方法以相符合,儘管在該實作中你不需要切換發送器。開啟 FakeTaskRepository.kt 檔案,並為所有方法新增
suspend關鍵字:kotlinclass FakeTaskRepository : TaskRepository { //... override suspend fun allTasks(): List<Task> = tasks override suspend fun tasksByPriority(priority: Priority) = tasks.filter { //... } override suspend fun taskByName(name: String) = tasks.find { //... } override suspend fun addTask(task: Task) { //... } override suspend fun removeTask(name: String): Boolean { //... } }到目前為止,你尚未引入任何新功能。相反地,你已經為建立能夠對資料庫非同步執行查詢的
PostgresTaskRepository奠定了基礎。
設定資料庫連線
在本教學的第一部分中,你刪除了 Exposed.kt 中 .configureExposed() 函式內的範例程式碼。現在你已準備好新增自己的實作。
Ktor 專案產生器尚未新增對 DAO 型別的支援,因此你首先需要在 Gradle 建置檔案中新增相關相依性。
在你的 gradle/libs.versions.toml 檔案中,新增
exposed-jdbc和exposed-dao程式庫:toml[libraries] exposed-jdbc = { module = "org.jetbrains.exposed:exposed-jdbc", version.ref = "exposed" } exposed-dao = { module = "org.jetbrains.exposed:exposed-dao", version.ref = "exposed" }這將使你能夠使用 Exposed 資料存取物件 (DAO) 模式。
在你的 build.gradle.kts 檔案中,新增以下相依性:
kotlindependencies { // ... implementation(libs.exposed.jdbc) implementation(libs.exposed.dao) }你只需要一個傳輸模組 –
exposed-jdbc或exposed-r2dbc。如果 Ktor 專案產生器新增了exposed-r2dbc相依性,請在繼續之前將其移除。在 IntelliJ IDEA 中,點擊編輯器右側的通知 Gradle 圖示 (
) 以載入 Gradle 變更。開啟 src/main/kotlin 中的 Exposed.kt 檔案。
使用
Database.connect()函式連接到你的資料庫,並調整設定值以符合你的環境:kotlinsuspend fun Application.configureExposed() { Database.connect( "jdbc:postgresql://localhost:5432/ktor_tutorial_db", user = "postgres", password = "password" ) }請注意,
url包含以下組成部分:localhost:5432是執行 PostgreSQL 資料庫的主機與連接埠。ktor_tutorial_db是執行服務時所建立的資料庫名稱。
如需詳細資訊,請參閱在 Exposed 中使用資料庫。
建立物件/關聯對應
巡覽至 src/main/kotlin 並建立名為 db 的新套件。
在 db 套件中,建立新的 mapping.kt 檔案。
開啟 mapping.kt 並新增
TaskTable和TaskDAO型別:kotlinpackage com.example.db import org.jetbrains.exposed.v1.core.dao.id.EntityID import org.jetbrains.exposed.v1.core.dao.id.IntIdTable import org.jetbrains.exposed.v1.dao.IntEntity import org.jetbrains.exposed.v1.dao.IntEntityClass object TaskTable : IntIdTable("task") { val name = varchar("name", 50) val description = varchar("description", 50) val priority = varchar("priority", 50) } class TaskDAO(id: EntityID<Int>) : IntEntity(id) { companion object : IntEntityClass<TaskDAO>(TaskTable) var name by TaskTable.name var description by TaskTable.description var priority by TaskTable.priority }這些型別使用 Exposed 程式庫將
Task型別中的屬性對應到資料庫中task資料表的資料欄。TaskTable型別定義了基本對應,而TaskDAO型別則新增了用於建立、尋找、更新和刪除任務的幫助程式方法。在同一個 mapping.kt 檔案中,新增以下幫助程式函式:
kotlinpackage com.example.db import com.example.model.Priority import com.example.model.Task import kotlinx.coroutines.Dispatchers import kotlinx.coroutines.withContext import org.jetbrains.exposed.v1.core.dao.id.EntityID import org.jetbrains.exposed.v1.core.dao.id.IntIdTable import org.jetbrains.exposed.v1.dao.IntEntity import org.jetbrains.exposed.v1.dao.IntEntityClass import org.jetbrains.exposed.v1.jdbc.JdbcTransaction import org.jetbrains.exposed.v1.jdbc.transactions.inTopLevelSuspendTransaction object TaskTable : IntIdTable("task") { val name = varchar("name", 50) val description = varchar("description", 50) val priority = varchar("priority", 50) } class TaskDAO(id: EntityID<Int>) : IntEntity(id) { companion object : IntEntityClass<TaskDAO>(TaskTable) var name by TaskTable.name var description by TaskTable.description var priority by TaskTable.priority } suspend fun <T> withTransaction(block: suspend JdbcTransaction.() -> T): T = withContext(Dispatchers.IO) { inTopLevelSuspendTransaction { block() } } fun daoToModel(dao: TaskDAO) = Task( dao.name, dao.description, Priority.valueOf(dao.priority) )withTransaction()函式會在新的最上層資料庫交易中執行一個暫停區塊 (suspending block)。協同程式上下文會切換至Dispatchers.IO,以便阻塞式 JDBC 操作在針對 IO 任務最佳化的執行緒池上執行。daoToModel()函式將TaskDAO型別的執行個體轉換為Task物件。
新增以下缺少的匯入陳述式:
kotlinimport com.example.model.Priority import com.example.model.Task import kotlinx.coroutines.Dispatchers import kotlinx.coroutines.withContext import org.jetbrains.exposed.v1.jdbc.JdbcTransaction import org.jetbrains.exposed.v1.jdbc.transactions.inTopLevelSuspendTransaction
編寫新的存儲庫
你現在已經擁有了建立特定資料庫存儲庫所需的所有資源。
巡覽至 src/main/kotlin/model 並建立新的 PostgresTaskRepository.kt 檔案。
開啟 PostgresTaskRepository.kt 檔案,並使用以下實作建立一個新型別:
kotlinpackage com.example.model import com.example.db.TaskDAO import com.example.db.TaskTable import com.example.db.daoToModel import com.example.db.withTransaction import org.jetbrains.exposed.v1.core.eq import org.jetbrains.exposed.v1.jdbc.deleteWhere class PostgresTaskRepository : TaskRepository { override suspend fun allTasks(): List<Task> = withTransaction { TaskDAO.all().map(::daoToModel) } override suspend fun tasksByPriority(priority: Priority): List<Task> = withTransaction { TaskDAO .find { (TaskTable.priority eq priority.toString()) } .map(::daoToModel) } override suspend fun taskByName(name: String): Task? = withTransaction { TaskDAO .find { (TaskTable.name eq name) } .limit(1) .map(::daoToModel) .firstOrNull() } override suspend fun addTask(task: Task): Unit = withTransaction { TaskDAO.new { name = task.name description = task.description priority = task.priority.toString() } } override suspend fun removeTask(name: String): Boolean = withTransaction { val rowsDeleted = TaskTable.deleteWhere { TaskTable.name eq name } rowsDeleted == 1 } }在此實作中,你使用
TaskDAO和TaskTable型別的幫助程式方法與資料庫進行互動。建立好這個新的存儲庫後,剩下的唯一任務就是在你的路由中切換使用它。
切換至新的存儲庫
若要切換到外部資料庫,你只需要變更存儲庫型別即可。
開啟 src/main/kotlin 中的 DI.kt 檔案。
在
Application.configureDependencyInjection()函式中,將FakeTaskRepository替換為PostgresTaskRepository:kotlin//... import com.example.model.PostgresTaskRepository //... fun Application.configureDependencyInjection() { dependencies { provide<TaskRepository> { PostgresTaskRepository() } } }因為你是透過介面注入相依性,所以實作的切換對管理路由的程式碼是透明的。
在 IntelliJ IDEA 中,點擊重新執行按鈕 (
 ) 以重新啟動應用程式。
前往 http://0.0.0.0:8080/static/index.html。UI 保持不變,但現在它會從資料庫中擷取資料。
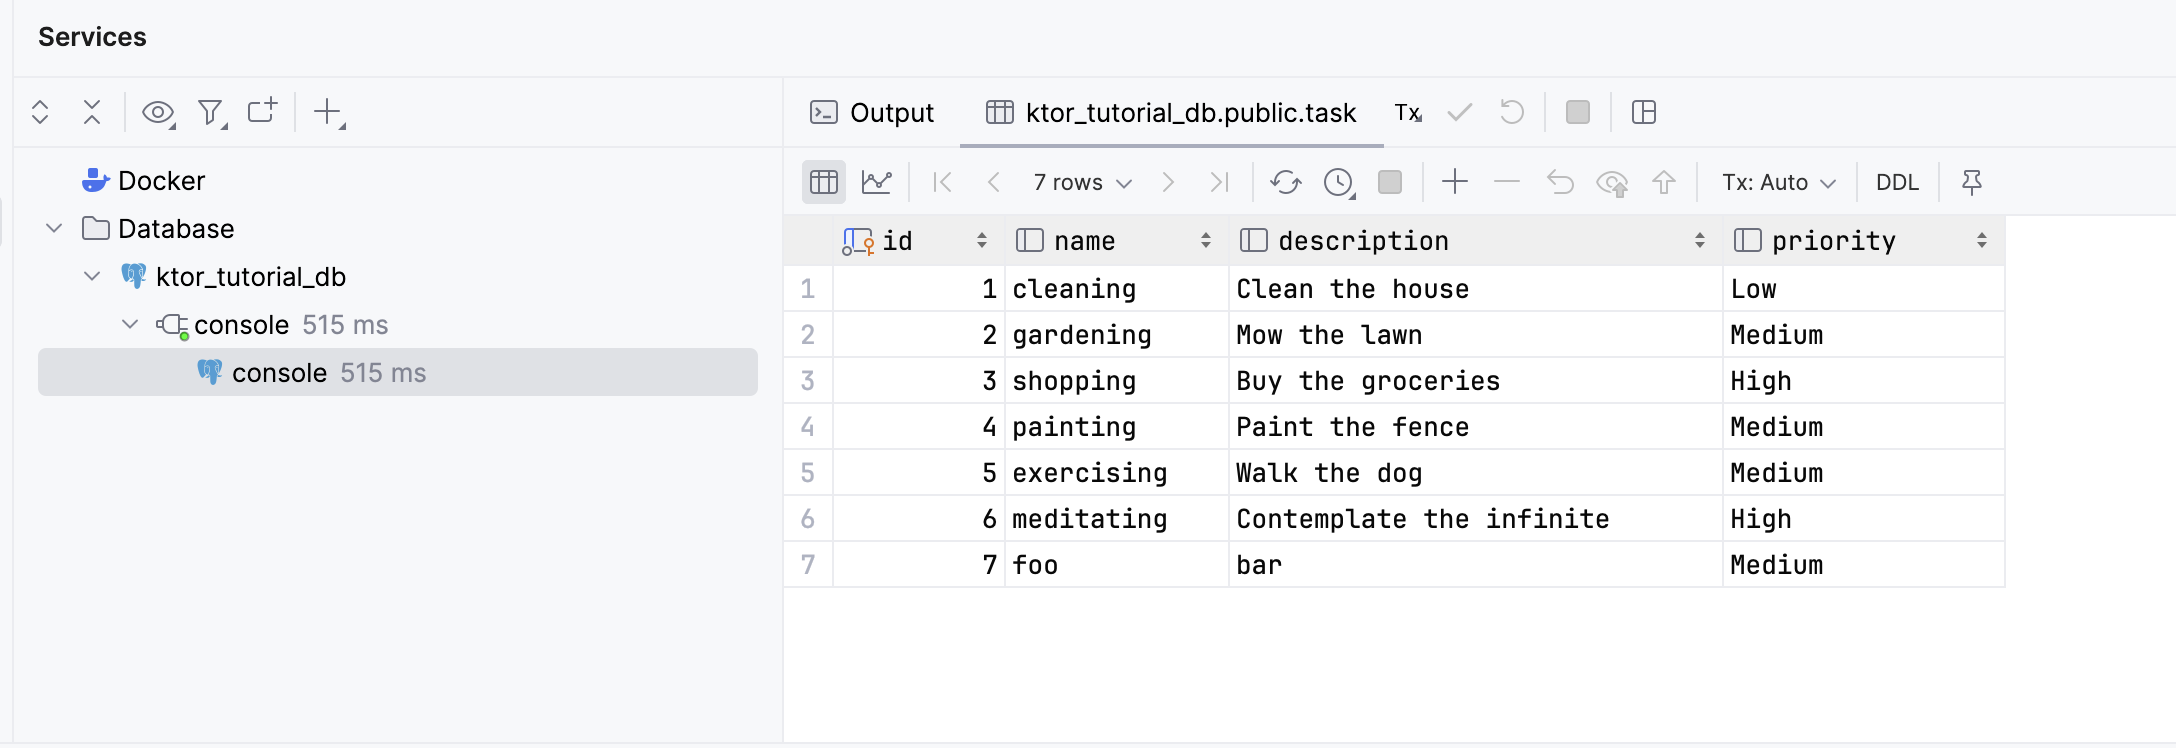
若要驗證這一點,請使用表單新增一個新任務,並查詢 PostgreSQL 中任務資料表內保存的資料。
在 IntelliJ IDEA 中,你可以使用查詢主控台與
SELECTSQL 陳述式來查詢表格資料:sqlSELECT * FROM task;查詢後,資料應顯示在 Service 窗格中,包含新任務:
至此,你已成功完成將資料庫整合到應用程式中。
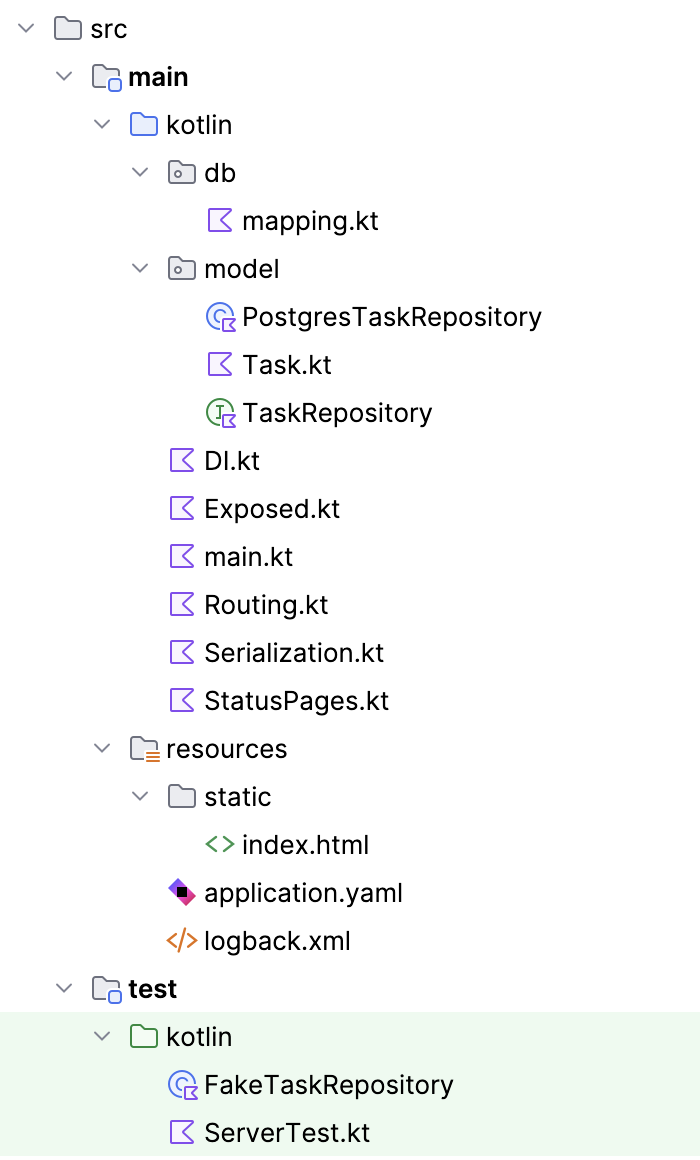
由於正式環境程式碼中不再需要 FakeTaskRepository 型別,你可以將它移至 src/test 中的測試原始碼集。
最終的專案結構應如下所示:
後續步驟
你現在擁有一個與 Ktor RESTful 服務進行通訊的應用程式。該服務進而使用以 Exposed 編寫的存儲庫來存取 PostgreSQL。你還擁有一套測試,無需 Web 伺服器或資料庫即可驗證核心功能。
此架構可根據需要進行擴充以支援任意功能,但你可能需要先考慮設計的非功能性層面,例如容錯性、安全性和擴充性。你可以先從將資料庫連線設定擷取到設定檔開始。